Terne (Diskussion | Beiträge) |
Terne (Diskussion | Beiträge) |
||
| Zeile 10: | Zeile 10: | ||
* want to access licensed databases of the University Library, | * want to access licensed databases of the University Library, | ||
* want to access a [[Netzlaufwerk_einbinden_(Windows_10)|Network drive/ group storage]] | * want to access a [[Netzlaufwerk_einbinden_(Windows_10)|Network drive/ group storage]] | ||
| − | * use the green | + | * use the green sockets within the university (these are only available via VPN for security reasons) |
* use a license server of the university, | * use a license server of the university, | ||
| − | * want to access | + | * want to access secured pages of the university, |
* would like to work with the CMS TYPO3 from home. | * would like to work with the CMS TYPO3 from home. | ||
<br clear=all> | <br clear=all> | ||
| Zeile 22: | Zeile 22: | ||
== What needs to be done? == | == What needs to be done? == | ||
| − | * To use OpenVPN, you must first install a [[Netzwerkzertifikate|personal network certificate]]. If you use | + | * To use OpenVPN, you must first install a [[Netzwerkzertifikate|personal network certificate]]. If you use Wi-Fi "[[Eduroam_unter_Windows_10|eduroam]]", the certificate is already installed on your computer. |
* Install [https://openvpn.net/community-downloads/ OpenVPN]. | * Install [https://openvpn.net/community-downloads/ OpenVPN]. | ||
* Download the configuration file: | * Download the configuration file: | ||
<center><iframe key="infoboard" width="600" height="320" path="vpn-config/index.php?group=uni&os=win" /></center> | <center><iframe key="infoboard" width="600" height="320" path="vpn-config/index.php?group=uni&os=win" /></center> | ||
| − | * Place the configuration file '''"OpenVPN-UPB-NG_*.ovpn"''' | + | * Place the configuration file '''"OpenVPN-UPB-NG_*.ovpn"''' into the directory '''"C:/User/<Username>/OpenVPN/config/"''. |
| − | *: Directory is created at the first start of OpenVPN, so it may not exist before | + | *: The Directory is created at the first start of OpenVPN, so it may not exist before |
* Connect to the university via OpenVPN | * Connect to the university via OpenVPN | ||
== OpenVPN installation == | == OpenVPN installation == | ||
| − | After installing the network certificate, download the current installer from the download page of the OpenVPN website "[https://openvpn.net/community-downloads/ openvpn-install-xxxx-win10.exe]" | + | After installing the network certificate, download the current installer from the download page of the OpenVPN website "[https://openvpn.net/community-downloads/ openvpn-install-xxxx-win10.exe]" and open it. |
| − | A security warning from the User Account Control may appear first. Click on "Yes" | + | A security warning from the User Account Control may appear first. Click on "Yes". |
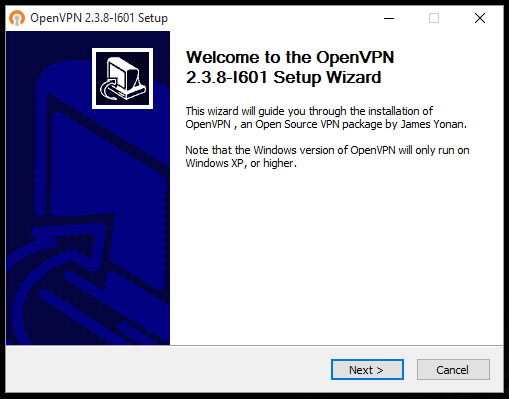
<div class="tleft" style="clear:none">[[Datei:OpenVPN Windows10 1.png|600px|mini|ohne|'''Step 1:''' Click on "Next >" in the welcome screen.]]</div> | <div class="tleft" style="clear:none">[[Datei:OpenVPN Windows10 1.png|600px|mini|ohne|'''Step 1:''' Click on "Next >" in the welcome screen.]]</div> | ||
| Zeile 39: | Zeile 39: | ||
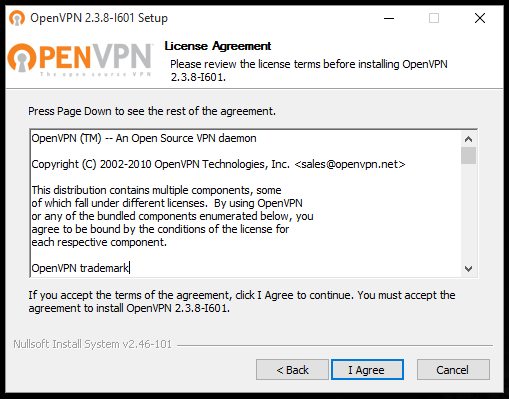
<div class="tleft" style="clear:none">[[Datei:OpenVPN Windows10 2.png|600px|mini|ohne|'''Step 2:''' Agree to the licence conditions with "I Agree" if you want to use OpenVPN.]]</div> | <div class="tleft" style="clear:none">[[Datei:OpenVPN Windows10 2.png|600px|mini|ohne|'''Step 2:''' Agree to the licence conditions with "I Agree" if you want to use OpenVPN.]]</div> | ||
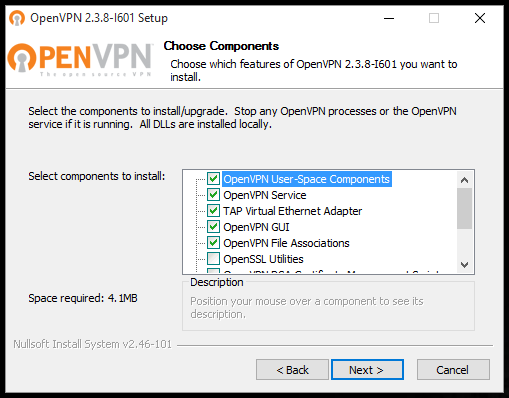
| − | <div class="tleft" style="clear:none">[[Datei:OpenVPN Windows10 3.png|600px|mini|ohne|'''Step 3:''' | + | <div class="tleft" style="clear:none">[[Datei:OpenVPN Windows10 3.png|600px|mini|ohne|'''Step 3:''' '''Only then''' click on "Next >" to confirm the selection of the components.]]</div> |
<br clear=all> | <br clear=all> | ||
| Zeile 45: | Zeile 45: | ||
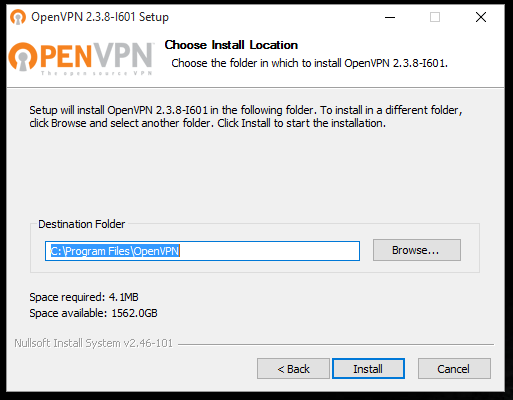
<div class="tleft" style="clear:none">[[Datei:OpenVPN Windows10 4.png|600px|mini|ohne|'''Step 4:''' Click on "Install" to install OpenVPN in the specified folder.]]</div> | <div class="tleft" style="clear:none">[[Datei:OpenVPN Windows10 4.png|600px|mini|ohne|'''Step 4:''' Click on "Install" to install OpenVPN in the specified folder.]]</div> | ||
| − | <div class="tleft" style="clear:none">[[Datei:OpenVPN Windows10 5.png|600px|mini|ohne|'''Step 5:''' OpenVPN is now installed.]]</div> | + | <div class="tleft" style="clear:none">[[Datei:OpenVPN Windows10 5.png|600px|mini|ohne|'''Step 5:''' OpenVPN is now being installed.]]</div> |
<br clear=all> | <br clear=all> | ||
| Zeile 51: | Zeile 51: | ||
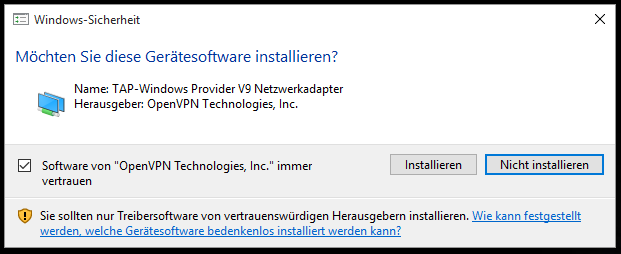
<div class="tleft" style="clear:none">[[Datei:OpenVPN Windows10 6.png|600px|mini|ohne|'''Step 6:''' You can set a check mark for the Windows security so that OpenVPN is always trusted, then click on "Install".]]</div> | <div class="tleft" style="clear:none">[[Datei:OpenVPN Windows10 6.png|600px|mini|ohne|'''Step 6:''' You can set a check mark for the Windows security so that OpenVPN is always trusted, then click on "Install".]]</div> | ||
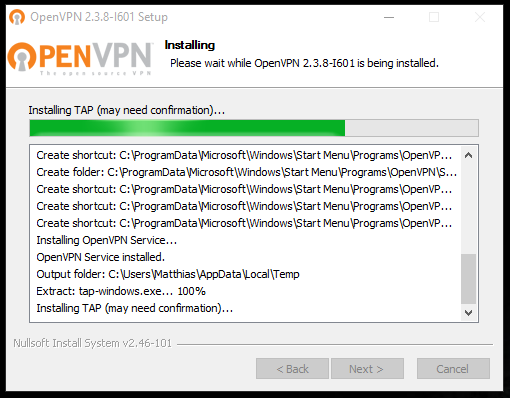
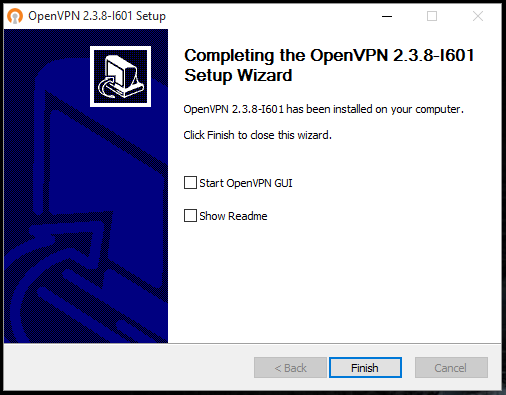
| − | <div class="tleft" style="clear:none">[[Datei:OpenVPN Windows10 7.png|600px|mini|ohne|'''Step 7:''' | + | <div class="tleft" style="clear:none">[[Datei:OpenVPN Windows10 7.png|600px|mini|ohne|'''Step 7:''' Once the installation is complete, click on "Next >". <br> Then click "Finish" to close the wizard.]]</div> |
<br clear=all> | <br clear=all> | ||
| Zeile 66: | Zeile 66: | ||
=== Using the OpenVPN configuration for the network of the University of Paderborn === | === Using the OpenVPN configuration for the network of the University of Paderborn === | ||
| − | Download the configuration file, select the VPN you want to | + | Download the configuration file, select the VPN you want to use in the following box and click on Download. |
| − | Normally "Uni-VPN (Standard)" should | + | Normally "Uni-VPN (Standard)" should work, but if you have problems with the connection, try "Uni-VPN-TCP". |
<center><iframe key="infoboard" width="600" height="320" path="vpn-config/index.php?group=uni&os=win" /></center> | <center><iframe key="infoboard" width="600" height="320" path="vpn-config/index.php?group=uni&os=win" /></center> | ||
Place the downloaded file "OpenVPN-UPB-NG_*.ovpn" in the configuration folder in the | Place the downloaded file "OpenVPN-UPB-NG_*.ovpn" in the configuration folder in the | ||
C:/User/<User name>/OpenVPN/config/ | C:/User/<User name>/OpenVPN/config/ | ||
| − | + | . The connection is then automatically added to the OpenVPN GUI. | |
| − | : "C:" | + | : "C:" usually refers to the Windows partition. |
<br clear=all> | <br clear=all> | ||
| Zeile 82: | Zeile 82: | ||
<div class="tleft" style="clear:none">[[Datei:OpenVPN Windows10 - Start.png|200px|mini|'''Step 1:''' This symbol is used to start the OpenVPN client]]</div> | <div class="tleft" style="clear:none">[[Datei:OpenVPN Windows10 - Start.png|200px|mini|'''Step 1:''' This symbol is used to start the OpenVPN client]]</div> | ||
<div class="tleft" style="clear:none"></div> | <div class="tleft" style="clear:none"></div> | ||
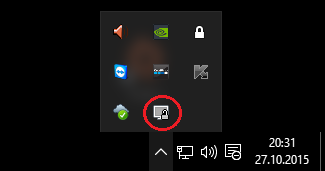
| − | <div class="tleft" style="clear:none">[[Datei:OpenVPN Windows10 11.png|400px|mini|'''Step 2:''' | + | <div class="tleft" style="clear:none">[[Datei:OpenVPN Windows10 11.png|400px|mini|'''Step 2:''' Subsequently, an icon appears at the bottom of the task bar which, depending on the connection status, lights up grey (no VPN connection), yellow (VPN connection being set up) or green (VPN connection established).]]</div> |
<br clear=all> | <br clear=all> | ||
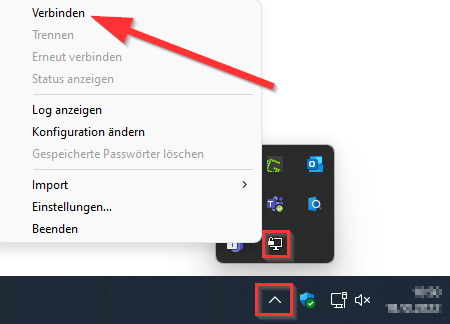
<div class="tleft" style="clear:none">[[Datei:OpenVPN Windows10 12.png|x265px|mini|ohne|'''Step 3:''' Please click with the right mouse button on the icon and then on '''"Connect"/"Verbinden"''' to establish a connection to the VPN server.]]</div> | <div class="tleft" style="clear:none">[[Datei:OpenVPN Windows10 12.png|x265px|mini|ohne|'''Step 3:''' Please click with the right mouse button on the icon and then on '''"Connect"/"Verbinden"''' to establish a connection to the VPN server.]]</div> | ||
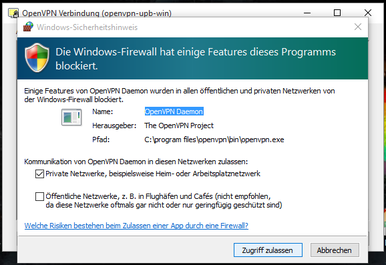
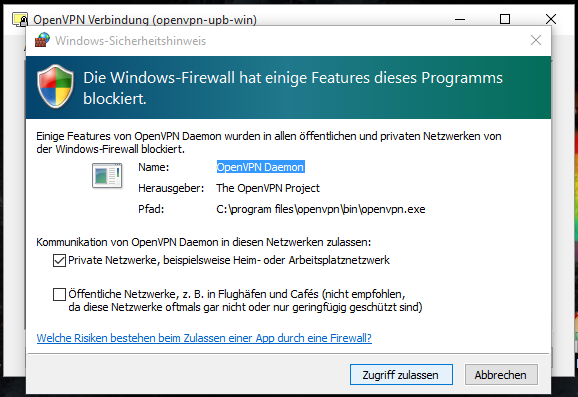
| − | <div class="tleft" style="clear:none">[[Datei:OpenVPN Windows10 13.png|x265px|mini|ohne|'''Step 4:''' When running the program for the first time, the Windows firewall may need the permission to trust OpenVPN in the future. | + | <div class="tleft" style="clear:none">[[Datei:OpenVPN Windows10 13.png|x265px|mini|ohne|'''Step 4:''' When running the program for the first time, the Windows firewall may need the permission to trust OpenVPN in the future. Click on '''"Allow access"'''.]]</div> |
<br clear=all> | <br clear=all> | ||
| − | <div class="tleft" style="clear:none">[[Datei:OpenVPN Windows10 verbunden.png|400px|mini|ohne|'''Step 5:''' | + | <div class="tleft" style="clear:none">[[Datei:OpenVPN Windows10 verbunden.png|400px|mini|ohne|'''Step 5:''' Then, an IP address is assigned to your computer and the icon turns green.]]</div> |
<br clear=all> | <br clear=all> | ||
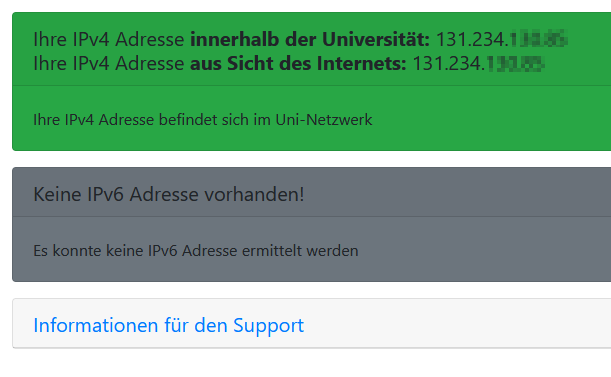
| − | As soon as a green | + | As soon as a green indicator is displayed, you are connected to the local university network. |
| − | You can | + | You can check this status by entering |
: [https://go.upb.de/ip https://go.upb.de/ip] | : [https://go.upb.de/ip https://go.upb.de/ip] | ||
| − | + | into your browser. Your current IP is displayed and whether you are using the university network or not. | |
[[Datei:OpenVPN verbunden - go_ip.png|center|400px|mini|ohne|Example: Existing connection to the university network.]] | [[Datei:OpenVPN verbunden - go_ip.png|center|400px|mini|ohne|Example: Existing connection to the university network.]] | ||
<br clear=all> | <br clear=all> | ||
Version vom 27. März 2020, 12:20 Uhr
VPN (Virtual Private Network) is needed if you want to use services from outside the University of Paderborn that are only accessible within the University network. VPN guarantees secure access to the University network through other networks (dial-in via other providers, external company or university networks).
You need VPN, if you[Bearbeiten | Quelltext bearbeiten]
- want to access licensed databases of the University Library,
- want to access a Network drive/ group storage
- use the green sockets within the university (these are only available via VPN for security reasons)
- use a license server of the university,
- want to access secured pages of the university,
- would like to work with the CMS TYPO3 from home.
You do not need VPN, if you[Bearbeiten | Quelltext bearbeiten]
- want to read your e-mails on webmail,
- want to send e-mails via the IMT mail server (see Mail).
What needs to be done?[Bearbeiten | Quelltext bearbeiten]
- To use OpenVPN, you must first install a personal network certificate. If you use Wi-Fi "eduroam", the certificate is already installed on your computer.
- Install OpenVPN.
- Download the configuration file:
- Place the configuration file "OpenVPN-UPB-NG_*.ovpn"' into the directory "C:/User/<Username>/OpenVPN/config/".
- The Directory is created at the first start of OpenVPN, so it may not exist before
- Connect to the university via OpenVPN
OpenVPN installation[Bearbeiten | Quelltext bearbeiten]
After installing the network certificate, download the current installer from the download page of the OpenVPN website "openvpn-install-xxxx-win10.exe" and open it.
A security warning from the User Account Control may appear first. Click on "Yes".

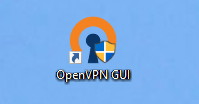
After the successful installation, the new icon "OpenVPN GUI" appears on the desktop.
configure OpenVPN[Bearbeiten | Quelltext bearbeiten]
Using the OpenVPN configuration for the network of the University of Paderborn[Bearbeiten | Quelltext bearbeiten]
Download the configuration file, select the VPN you want to use in the following box and click on Download. Normally "Uni-VPN (Standard)" should work, but if you have problems with the connection, try "Uni-VPN-TCP".
Place the downloaded file "OpenVPN-UPB-NG_*.ovpn" in the configuration folder in the
C:/User/<User name>/OpenVPN/config/
. The connection is then automatically added to the OpenVPN GUI.
- "C:" usually refers to the Windows partition.
Start OpenVPN[Bearbeiten | Quelltext bearbeiten]
To run the program, double-click with the left mouse button on the OpenVPN icon on your desktop.

As soon as a green indicator is displayed, you are connected to the local university network. You can check this status by entering
into your browser. Your current IP is displayed and whether you are using the university network or not.
