Jnk (Diskussion | Beiträge) |
Jnk (Diskussion | Beiträge) |
||
| (8 dazwischenliegende Versionen desselben Benutzers werden nicht angezeigt) | |||
| Zeile 8: | Zeile 8: | ||
== What needs to be done? - Quick guide == | == What needs to be done? - Quick guide == | ||
| − | # Install Tunnelblick in the most recent version. https://tunnelblick.net/downloads.html Tunnelblick] (Version 3.8.0 is used in this manual). | + | # Install Tunnelblick in the most recent stable version. https://tunnelblick.net/downloads.html Tunnelblick] (Version 3.8.0 is used in this manual). |
# Create your '''personal network certificate''' in the [https://serviceportal.uni-paderborn.de/web/portal/willkommen service portal]. | # Create your '''personal network certificate''' in the [https://serviceportal.uni-paderborn.de/web/portal/willkommen service portal]. | ||
# '''Download the configuration file''' | # '''Download the configuration file''' | ||
| Zeile 16: | Zeile 16: | ||
# Put your '''personal network certificate''' and the '''configuration file''' in the folder you just created. | # Put your '''personal network certificate''' and the '''configuration file''' in the folder you just created. | ||
# Delete the serial number in the filename from your network certificate, so that Network_Certificate_<username>_******.p12 becomes Network_Certificate.p12 | # Delete the serial number in the filename from your network certificate, so that Network_Certificate_<username>_******.p12 becomes Network_Certificate.p12 | ||
| − | # Add the file extension '''.tblk''' to this folder by | + | # Add the file extension '''.tblk''' to this folder by renaming it to '''VPN Uni.tblk'''. |
# Double click the file just created to install the connection. | # Double click the file just created to install the connection. | ||
# You will be asked to enter your Mac password to allow the configuration. | # You will be asked to enter your Mac password to allow the configuration. | ||
| Zeile 27: | Zeile 27: | ||
[[Datei:Tunnelblick Download.png|links|mini|531x531px]] | [[Datei:Tunnelblick Download.png|links|mini|531x531px]] | ||
<br> | <br> | ||
| − | * Install [https://tunnelblick.net/downloads.html Tunnelblick] in the most recent version. | + | * Install [https://tunnelblick.net/downloads.html Tunnelblick] in the most recent stable version. |
* Click on the link provided and then on the version marked '''"Stable"'''. | * Click on the link provided and then on the version marked '''"Stable"'''. | ||
* Then open your downloads and double click on the Tunnelblick download. Tunnelblick will now install itself automatically. | * Then open your downloads and double click on the Tunnelblick download. Tunnelblick will now install itself automatically. | ||
| Zeile 35: | Zeile 35: | ||
[[Datei:VPN Serviceportal.png|links|mini|403x403px]] | [[Datei:VPN Serviceportal.png|links|mini|403x403px]] | ||
<br> | <br> | ||
| − | # Create your personal network certificate in the [https://serviceportal.uni-paderborn.de/web/portal/willkommen | + | # Create your personal network certificate in the [https://serviceportal.uni-paderborn.de/web/portal/willkommen Serviceportal]. |
#* You can also use existing certificates for the VPN connection, if they are still valid. | #* You can also use existing certificates for the VPN connection, if they are still valid. | ||
# Log in to the service portal to access the certificate. Open "User management" in the upper drop down menu, then click on '''Network settings'''. | # Log in to the service portal to access the certificate. Open "User management" in the upper drop down menu, then click on '''Network settings'''. | ||
| Zeile 62: | Zeile 62: | ||
<br clear=all> | <br clear=all> | ||
| − | [[Datei:VPN Ordner.png|links|mini| | + | [[Datei:VPN Ordner.png|links|mini|350px]] |
<br> | <br> | ||
| − | * | + | * Create a new folder and name it '''"vpn-upb"'''. |
* Now place the personal network certificate and the configuration file in the created folder. | * Now place the personal network certificate and the configuration file in the created folder. | ||
* Rename your personal network certificate, for example '''Network_Certificate_<username>_******.p12''' becomes '''Network_Certificate.p12''' | * Rename your personal network certificate, for example '''Network_Certificate_<username>_******.p12''' becomes '''Network_Certificate.p12''' | ||
<br clear=all> | <br clear=all> | ||
| − | [[Datei:VPN Suffix.png|links|mini| | + | [[Datei:VPN Suffix.png|links|mini|350px]] |
<br> | <br> | ||
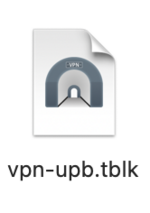
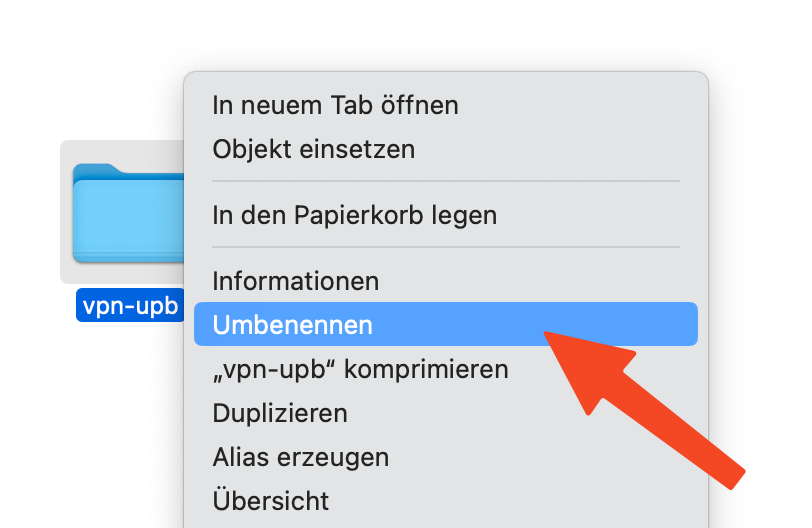
| − | * | + | * Rename the folder and add the file extension <code>.tblk</code> |
| + | * e.g. ''"vpn-upb"''' becomes ''"vpn-upb.tblk"'' | ||
<br clear=all> | <br clear=all> | ||
| − | [[Datei:VPN tblk.png|links|mini| | + | [[Datei:Vpn-unter-macos-12.png|links|mini|ohne|350px|Add file extension]] |
| + | <br> | ||
| + | * You must accept the changes. | ||
| + | * Click on '''Add"'''. | ||
| + | <br clear=all> | ||
| + | |||
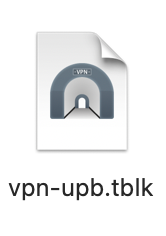
| + | [[Datei:VPN tblk.png|links|mini|150px]] | ||
<br> | <br> | ||
* Double-click the file just created from the folder to install the connection. | * Double-click the file just created from the folder to install the connection. | ||
<br clear=all> | <br clear=all> | ||
| − | [[Datei: | + | [[Datei:Vpn-unter-macos-13.png|links|mini|ohne|350px|Install configuration]] |
<br> | <br> | ||
| − | * You will be asked to enter your Mac password to | + | * You get asked, for which user the configuration should be installed. |
| + | * Choose '''"Just for this user"'''. | ||
| + | <br clear=all> | ||
| + | |||
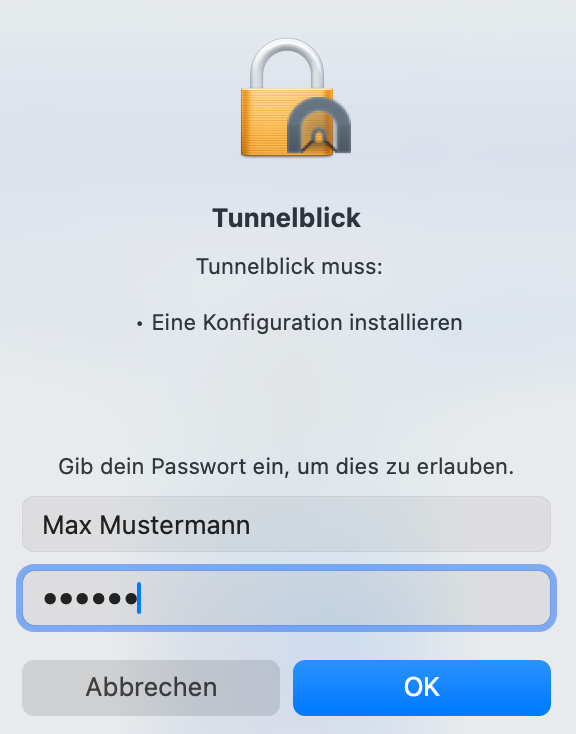
| + | [[Datei:VPN Konfiguration.png|links|mini|250px]] | ||
| + | <br> | ||
| + | * You will be asked to enter your Mac password to install the configuration. | ||
<br clear=all> | <br clear=all> | ||
| Zeile 89: | Zeile 102: | ||
<br clear=all> | <br clear=all> | ||
| − | [[Datei:VPN Passwort.png|links|mini| | + | [[Datei:VPN Passwort.png|links|mini|350px]] |
<br> | <br> | ||
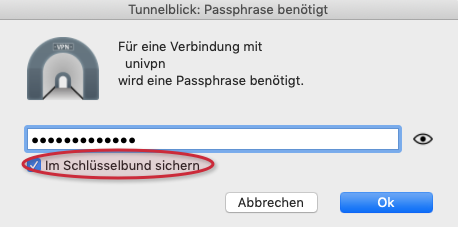
* In the next step you will be asked to enter a password. Enter the '''Import password''' already mentioned above, which belongs to the certificate. | * In the next step you will be asked to enter a password. Enter the '''Import password''' already mentioned above, which belongs to the certificate. | ||
| Zeile 100: | Zeile 113: | ||
* You can quickly connect and disconnect using the tunnelblick icon. | * You can quickly connect and disconnect using the tunnelblick icon. | ||
<br clear=all> | <br clear=all> | ||
| + | |||
| + | ==OpenSSL problem== | ||
| + | As of version 4.0.0, Tunnelblick can no longer unpack the network certificates of Paderborn University. You can work around this temporarily by downgrading OpenSSL to v1. | ||
| + | <br> | ||
| + | Proceed as follows if you receive the following error when connecting with Tunnelblick: | ||
| + | <br> | ||
| + | <code>Authentication failed - The passphrase was not accepted</code> | ||
| + | |||
| + | [[Datei:Vpn-unter-macos-09.png|links|mini|ohne|450px]] | ||
| + | <br> | ||
| + | * Click on '''"Discard"'''. | ||
| + | <br clear=all> | ||
| + | |||
| + | [[Datei:Vpn-unter-macos-10.png|links|mini|ohne|450px]] | ||
| + | <br> | ||
| + | * Click on the '''"Tunnelblick-Icon"''' in the menu bar. | ||
| + | * Click on '''"VPN-Details"'''. | ||
| + | <br clear=all> | ||
| + | |||
| + | [[Datei:Vpn-unter-macos-11.png|links|mini|ohne|450px]] | ||
| + | <br> | ||
| + | # Click on '''"Configuration"'''. | ||
| + | # Choose your VPN connection on the left. | ||
| + | # Go to the tab '''"Settings"'''. | ||
| + | # Chosse the following settings: | ||
| + | #* OpenVPN Version: '''2.6.9 - OpenSSL v1.1.1w''' | ||
| + | <br clear=all> | ||
| + | |||
| + | Click on '''"Connect"'''. Tunnelblick should now establish a connection. | ||
| + | <br> | ||
| + | |||
| + | This setting must be reversed at a later date. We will inform you about this here. | ||
==Change Config== | ==Change Config== | ||
| Zeile 159: | Zeile 204: | ||
* The config file opens. | * The config file opens. | ||
* You can recognize your config file by checking '''"date"''' and '''"version"'''.<span style="color:green"> (1)</span> | * You can recognize your config file by checking '''"date"''' and '''"version"'''.<span style="color:green"> (1)</span> | ||
| − | * Delete the file and insert the content from the clipboard. | + | * Delete the content from the file and insert the content from the clipboard. |
* You can use the following shortcuts | * You can use the following shortcuts | ||
** <code>cmd</code> + <code>A</code> (Mark all) | ** <code>cmd</code> + <code>A</code> (Mark all) | ||
| − | ** | + | ** Delete |
** <code>cmd</code> + <code>V</code> (Insert) | ** <code>cmd</code> + <code>V</code> (Insert) | ||
* You can tell that the file has been modified by the '''"edited"''' indicator <span style="color:green"> (2)</span> | * You can tell that the file has been modified by the '''"edited"''' indicator <span style="color:green"> (2)</span> | ||
| Zeile 168: | Zeile 213: | ||
<br clear=all> | <br clear=all> | ||
| − | + | Congratulations. You changed your config file successfully. | |
</bootstrap_panel> | </bootstrap_panel> | ||
| Zeile 174: | Zeile 219: | ||
== Known issues== | == Known issues== | ||
| − | It's possible that while downolading the .ovpn conifiguration file is changed to a .txt file. If this is the | + | It's possible that while downolading the .ovpn conifiguration file is changed to a .txt file. If this is the case: <br> |
* Select the configuration file. | * Select the configuration file. | ||
* Click '''cmd''' + '''i'''. | * Click '''cmd''' + '''i'''. | ||
Aktuelle Version vom 5. April 2024, 12:50 Uhr
VPN (Virtual Private Network) is required if you want to use services from outside the University of Paderborn that are only accessible within the university network. VPN guarantees secure access to the University network through other networks (dial-in via other providers, external company or university networks).
What needs to be done? - Quick guide[Bearbeiten | Quelltext bearbeiten]
- Install Tunnelblick in the most recent stable version. https://tunnelblick.net/downloads.html Tunnelblick] (Version 3.8.0 is used in this manual).
- Create your personal network certificate in the service portal.
- Download the configuration file
- Click on Download in the drop-down menu above!
- Create a new folder on your desktop with the name you want your connection to have, e.g. "VPN Uni".
- Put your personal network certificate and the configuration file in the folder you just created.
- Delete the serial number in the filename from your network certificate, so that Network_Certificate_<username>_******.p12 becomes Network_Certificate.p12
- Add the file extension .tblk to this folder by renaming it to VPN Uni.tblk.
- Double click the file just created to install the connection.
- You will be asked to enter your Mac password to allow the configuration.
- Now click on the Tunnelblick icon at the top of the menu bar and select your connection, which is now named the same as your folder. Enter the import password, which you can find in the service portal under Network Preferences. Select the option to save the password in your keychain.
- Wait until the font turns green. You are now connected.
Step-by-step instructions: Preparation[Bearbeiten | Quelltext bearbeiten]
Install Tunnelblick[Bearbeiten | Quelltext bearbeiten]
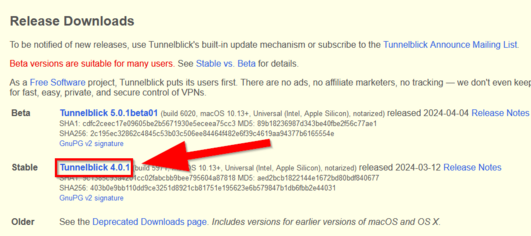
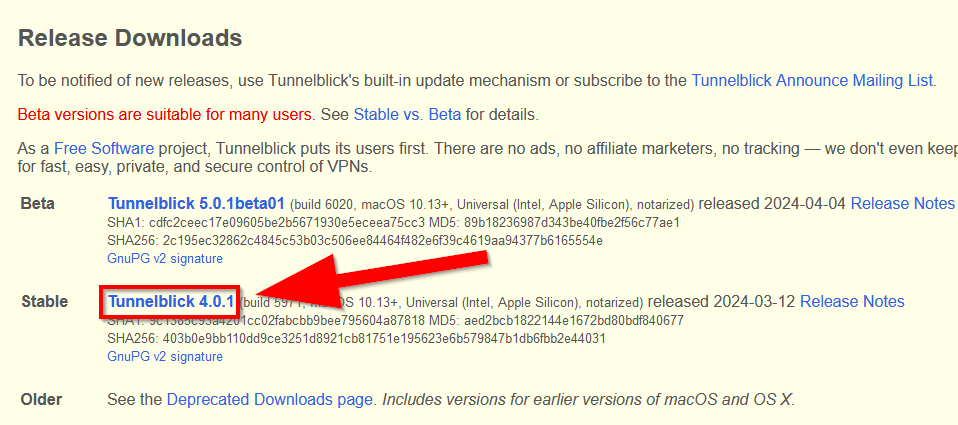
- Install Tunnelblick in the most recent stable version.
- Click on the link provided and then on the version marked "Stable".
- Then open your downloads and double click on the Tunnelblick download. Tunnelblick will now install itself automatically.
Create network certificate[Bearbeiten | Quelltext bearbeiten]

- Create your personal network certificate in the Serviceportal.
- You can also use existing certificates for the VPN connection, if they are still valid.
- Log in to the service portal to access the certificate. Open "User management" in the upper drop down menu, then click on Network settings.
- Create a new certificate!
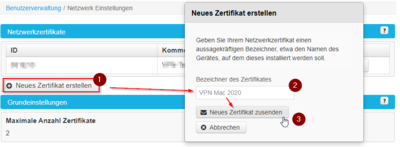
- With a click on "Create new certificate" you create a new network certificate
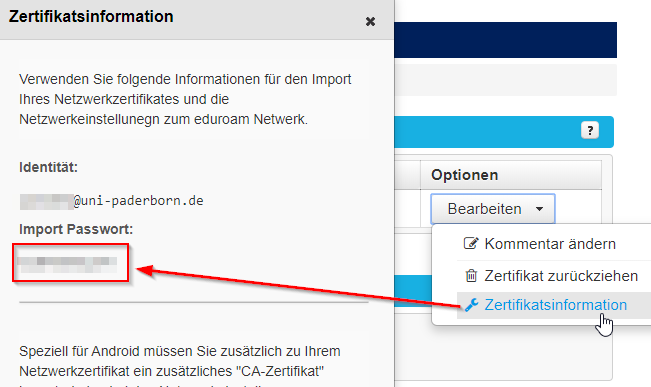
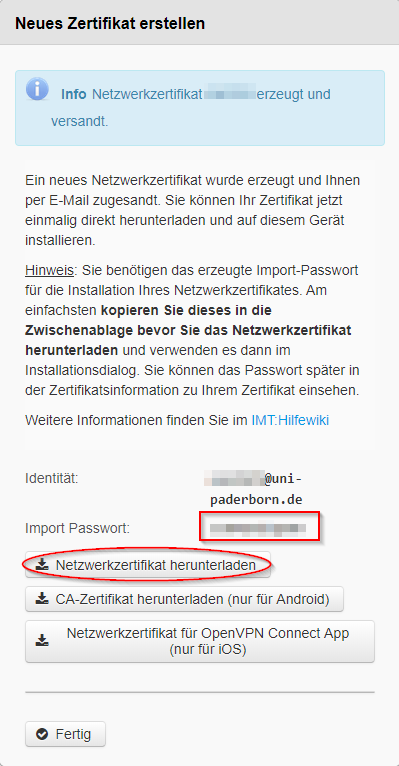
- Click on Download network certificate and save the certificate on your computer!
- You will also find the associated password on the newly appearing window under Import Password. It can also be viewed any time by clicking "Edit > Certificate information".
- For network certificate see below

Set up Tunnelblick[Bearbeiten | Quelltext bearbeiten]
Download the configuration file, select the VPN you want to connect to and click on Download. Usually "Uni-VPN (standard)" should work, but if you have problems with the connection, try "Uni-VPN-TCP".
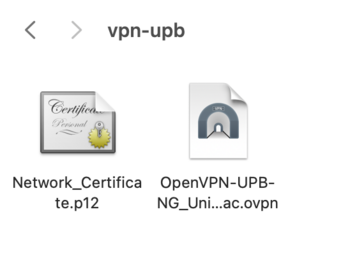
- Create a new folder and name it "vpn-upb".
- Now place the personal network certificate and the configuration file in the created folder.
- Rename your personal network certificate, for example Network_Certificate_<username>_******.p12 becomes Network_Certificate.p12

- Rename the folder and add the file extension
.tblk - e.g. "vpn-upb"' becomes "vpn-upb.tblk"

- You must accept the changes.
- Click on Add".
- Double-click the file just created from the folder to install the connection.
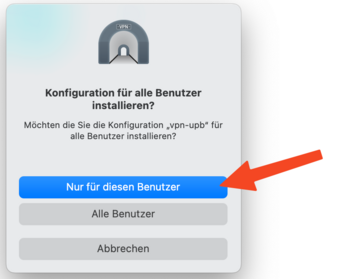
- You get asked, for which user the configuration should be installed.
- Choose "Just for this user".

- You will be asked to enter your Mac password to install the configuration.

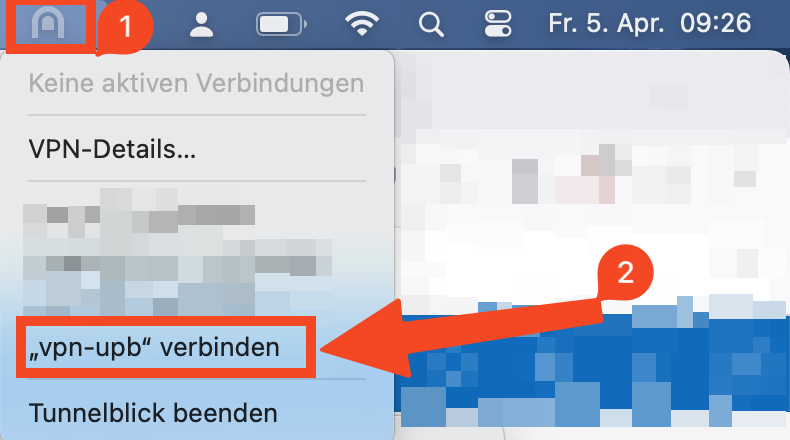
- Now click on the Tunnelblick icon at the top of the menu bar and select Your connection, which now has the same name as your folder, for example "VPN Uni".
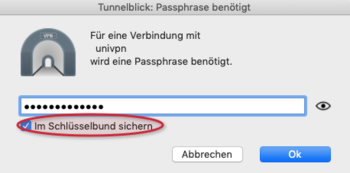
- In the next step you will be asked to enter a password. Enter the Import password already mentioned above, which belongs to the certificate.
- In addition you should definitely select the option "Save in keychain" to save the password (otherwise you will have to enter the import password again and again).
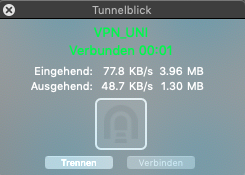
- Wait until the font turns green and you are connected.
- You can quickly connect and disconnect using the tunnelblick icon.
OpenSSL problem[Bearbeiten | Quelltext bearbeiten]
As of version 4.0.0, Tunnelblick can no longer unpack the network certificates of Paderborn University. You can work around this temporarily by downgrading OpenSSL to v1.
Proceed as follows if you receive the following error when connecting with Tunnelblick:
Authentication failed - The passphrase was not accepted
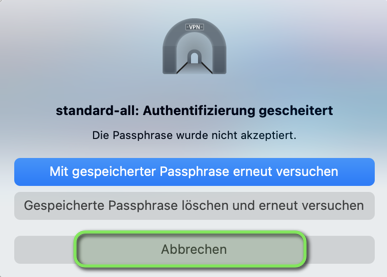
- Click on "Discard".
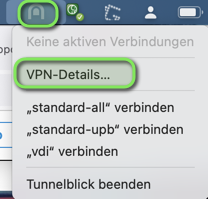
- Click on the "Tunnelblick-Icon" in the menu bar.
- Click on "VPN-Details".

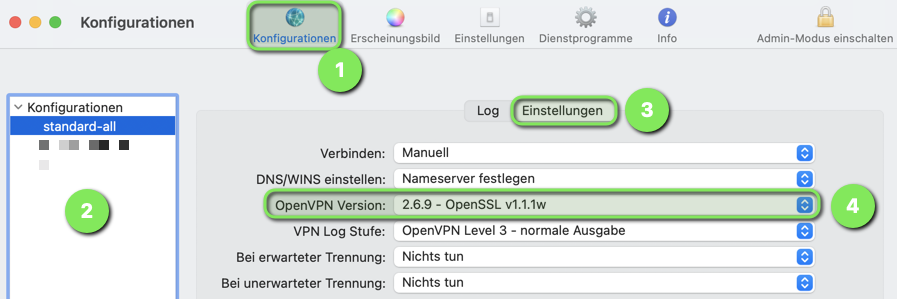
- Click on "Configuration".
- Choose your VPN connection on the left.
- Go to the tab "Settings".
- Chosse the following settings:
- OpenVPN Version: 2.6.9 - OpenSSL v1.1.1w
Click on "Connect". Tunnelblick should now establish a connection.
This setting must be reversed at a later date. We will inform you about this here.
Change Config[Bearbeiten | Quelltext bearbeiten]
If you have been using VPN access for some time, it may be necessary at some point to update the configuration file to the latest version. In the following we explain how this works.
Details
- Download the new config file.
- Select the new config file.
- Open the context menu via right click.

- Choose "Open with". (1)
- Click on "Other...". (2)
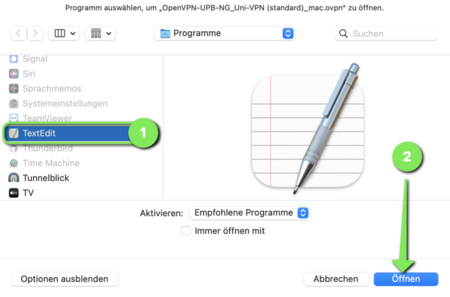
- Choose "TextEdit" from the app list. (1)
- Click on "Open". (2)
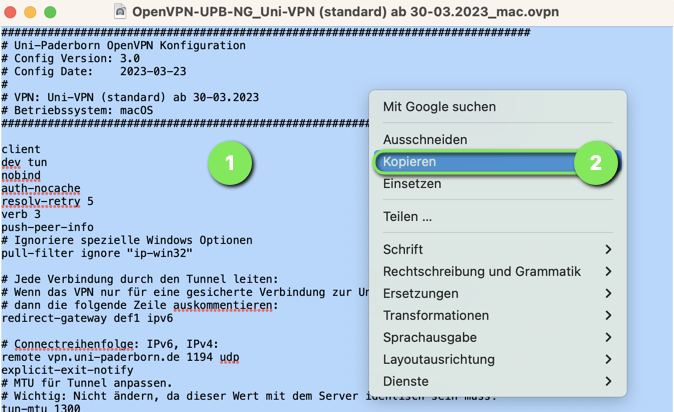
- Copy the contents of the file to the clipboard.
- You can use the following shortcuts:
cmd+A(Mark all)cmd+C(Copy)
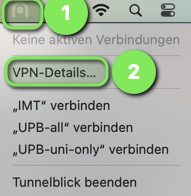
- Click on the Tunnelblick-Icon in the menu bar at the top. (1)
- Click on "VPN-Details". (2)
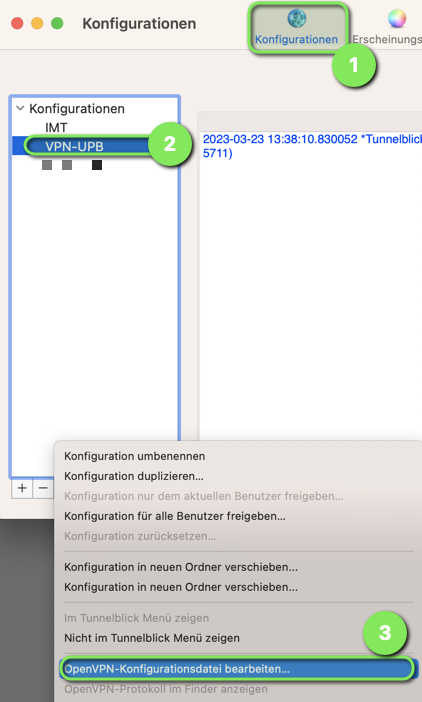
- Choose "Configurations". (1)
- Select the configuration, that you want to update. (2)
- Click on the circle with the three dots at the bottom of the window.
- Scroll down in the upcomming window.
- Click on "Change OpenVPN-Config-File..." (3)
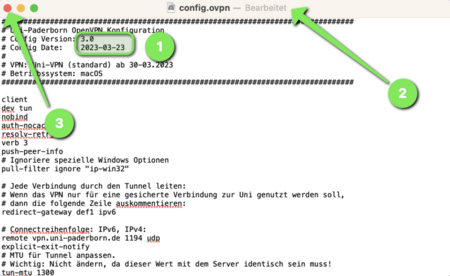
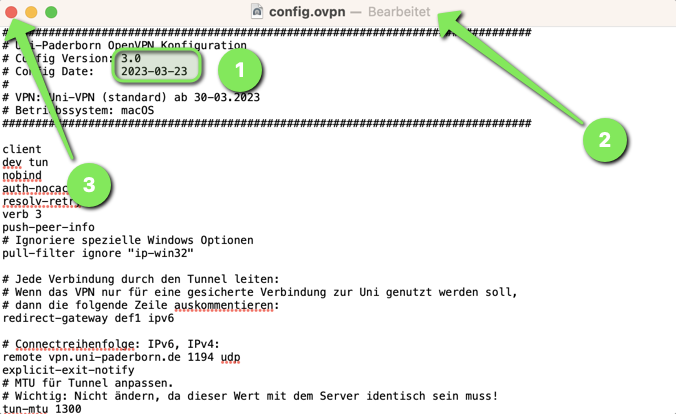
- The config file opens.
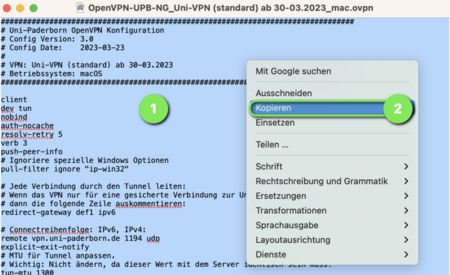
- You can recognize your config file by checking "date" and "version". (1)
- Delete the content from the file and insert the content from the clipboard.
- You can use the following shortcuts
cmd+A(Mark all)- Delete
cmd+V(Insert)
- You can tell that the file has been modified by the "edited" indicator (2)
- Close the application by clicking on the red X. (3)
Congratulations. You changed your config file successfully.
Known issues[Bearbeiten | Quelltext bearbeiten]
It's possible that while downolading the .ovpn conifiguration file is changed to a .txt file. If this is the case:
- Select the configuration file.
- Click cmd + i.
- Check the ending in the section Suffix.
- If necessary delete the .txt part.
- The name should end as .opvn


