Jnk (Diskussion | Beiträge) |
Jnk (Diskussion | Beiträge) (Hinweise zum Radius Server Zertifikat Fingerprint eingeblendet) |
||
| (21 dazwischenliegende Versionen von 2 Benutzern werden nicht angezeigt) | |||
| Zeile 1: | Zeile 1: | ||
{{translated page | {{translated page | ||
| − | |origin=Eduroam unter Windows | + | |origin=Eduroam unter Windows |
|lang=en | |lang=en | ||
| − | |translated title=eduroam on Windows | + | |translated title=eduroam on Windows |
}} | }} | ||
| − | |||
| − | + | {{Fingerprint_Radiuszertifikat-en}} | |
| − | |||
| − | This | + | This tutorial describes how to set up the Wi-Fi eduroam on '''Windows'''. |
| − | + | == What has to be done? == | |
| − | == | + | * Install your personal network certificate from the University of Paderborn. |
| − | + | * Then connect to the eduroam network. | |
| − | + | ||
| − | + | == Step-by-step instructions == | |
| − | + | ||
| + | ===Create certificate === | ||
| + | Access using a browser such as B. Firefox or Edge, go to the [http://sp.upb.de service portal] and log in with your user name and password from your university account. | ||
| + | * Go to '''Benutzerverwaltung''' and then '''Netzwerkeinstellungen'''. | ||
| + | <br clear=all> | ||
| − | + | [[Datei:Eduroam-unter-android-4.png|links|mini|ohne|350px]] | |
| − | + | <br> | |
| − | + | * Click '''Neues Zertifikat erstellen'''. | |
| − | * | ||
<br clear=all> | <br clear=all> | ||
| − | [[Datei: | + | [[Datei:Netzwerkzertifikat-container-v2.png|links|mini|ohne|350px]] |
| − | * | + | <br> |
| + | * Give the certificate a unique name (Example: Laptop) | ||
| + | * For Windows 11, select '''Version 2''' as the file format. | ||
| + | * For older versions than Windows 10, please use '''Version 1'''. | ||
| + | * Then click on '''Neues Zertifikat zusenden'''. | ||
<br clear=all> | <br clear=all> | ||
| − | [[Datei: | + | [[Datei:Netzwerkzertifikat-download.png|links|mini|ohne|350px]] |
<br> | <br> | ||
| − | * | + | * A new network certificate has been created for you. |
| − | * | + | * First copy the '''Import Password''' to the clipboard. |
| + | * Now click on '''Netzwerkzertifikat herunterladen'''. | ||
<br clear=all> | <br clear=all> | ||
| − | [[Datei:Eduroam- | + | Save the network certificate to your device. |
| + | |||
| + | ===Install certificate=== | ||
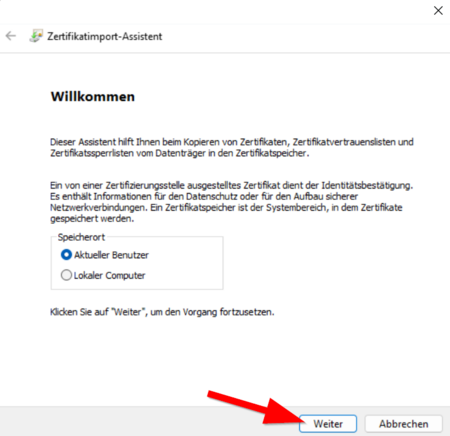
| + | Open the certificate we just downloaded. The certificate import wizard then starts automatically. | ||
| + | |||
| + | [[Datei:Eduroam-windows11-01.png|links|mini|ohne|450px]] | ||
<br> | <br> | ||
| − | + | * Click on '''Continue'''. | |
| − | * Click on ''' | ||
<br clear=all> | <br clear=all> | ||
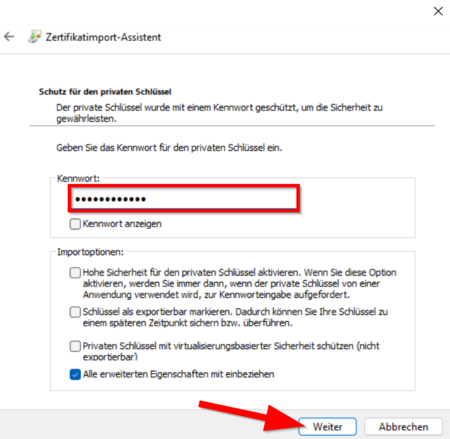
| − | + | [[Datei:Eduroam-windows11-02.png|links|mini|ohne|450px]] | |
| + | <br clear=all> | ||
| + | * Paste the import password that we just copied. | ||
| + | * Leave the default settings intact. | ||
| + | * <span style="color:orange">'''Note:''' It is not allowed to tick "Activate high security for the private key". The Windows WLAN client currently does not support this function and therefore no connection to eduroam would be possible.</span> | ||
| + | * Then click Next''' | ||
| + | <br> | ||
| + | * In the following window, if necessary, click on '''Next''' and finally on '''Finish'''. | ||
| + | <br clear=all> | ||
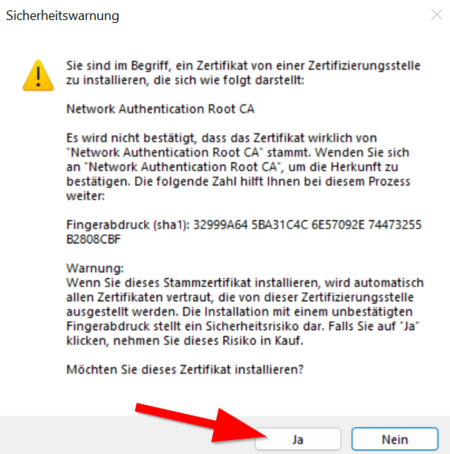
| − | [[Datei:Eduroam-windows11- | + | [[Datei:Eduroam-windows11-03.png|links|mini|ohne|450px]] |
<br> | <br> | ||
| − | * | + | * If a security warning appears, click Yes. |
| − | |||
| − | |||
| − | |||
| − | |||
<br clear=all> | <br clear=all> | ||
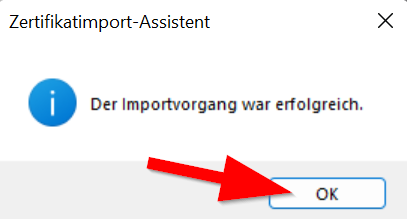
| − | < | + | [[Datei:Eduroam-windows11-04.png|links|mini|ohne|450px]] |
| + | <br> | ||
| + | * Now click on '''OK'''. | ||
| + | <br clear=all> | ||
| − | + | <span style="color:red">'''Note:''' Now open the same certificate again and install it a second time. This allows us to work around an error in the Windows certificate manager. Do not create a new certificate for this! </span> | |
| − | === Connect | + | === Connect with eduroam === |
| + | After we have installed the certificate, we can now set up Eduroam. | ||
| + | <bootstrap_accordion> | ||
| + | <bootstrap_panel heading="Windows 10" color="info"> | ||
[[Datei:Win10-edu-1.png|links|mini|ohne|350px]] | [[Datei:Win10-edu-1.png|links|mini|ohne|350px]] | ||
<br> | <br> | ||
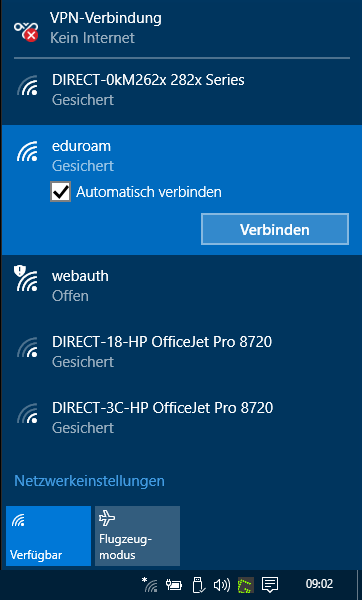
| − | * | + | * Click on the '''Wi-Fi symbol''' at the bottom right. |
* Click on '''eduroam'''. | * Click on '''eduroam'''. | ||
| − | * | + | * Make sure that the “Connect automatically” box is checked. |
| − | * Click | + | * Click '''Connect'''. |
<br clear=all> | <br clear=all> | ||
[[Datei:Win10-edu-2.png|links|mini|ohne|350px]] | [[Datei:Win10-edu-2.png|links|mini|ohne|350px]] | ||
<br> | <br> | ||
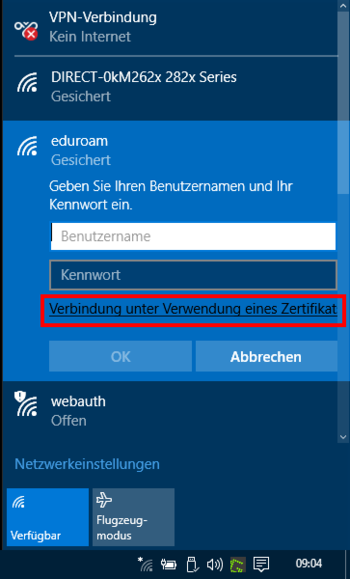
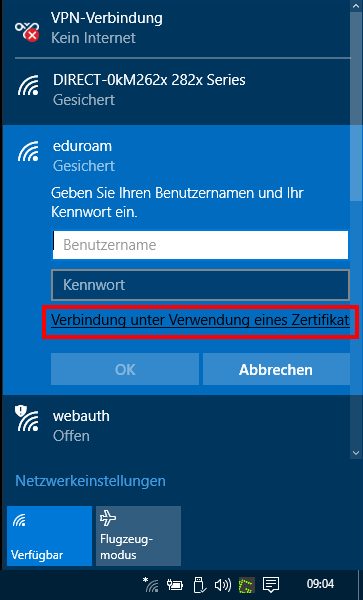
| − | * Click | + | * Click '''Connect using a certificate''' |
| − | * <span style="color:red">Important: | + | * <span style="color:red"> Important: Be sure to leave the username and password fields blank </span> |
| + | <br clear=all> | ||
| + | |||
| + | Your device is now connected to the '''eduroam''' WiFi network. | ||
| + | </bootstrap_panel> | ||
| + | |||
| + | <bootstrap_panel heading="Windows 11" color="info"> | ||
| + | <!-- | ||
| + | Unfortunately, in order for a Windows 11 device to connect to Eduroam, a change to the Windows registry is currently necessary. We explain the necessary steps below. Be careful when doing this! Making changes in the wrong place can irreparably damage your Windows system. If you are unsure, please feel free to visit us in the Notebook Café. We'll help you. | ||
| + | <br> | ||
| + | <br> | ||
| + | |||
| + | We recommend carrying out the following steps with the '''EDGE''' or '''Chrome''' browsers. | ||
| + | <br> | ||
| + | |||
| + | Go to the following page: | ||
| + | * https://download.uni-paderborn.de/pc/configs/win11-tls12-enable | ||
| + | <br> | ||
| + | |||
| + | Right-click on '''WIN11-TLS12.reg'''. | ||
| + | <br> | ||
| + | [[Datei:Eduroam-unter-windows10-08.png|links|mini|ohne|300px|Now click on '''"Save link as..."''']] | ||
| + | <div class="tleft" style="clear:none"> [[Datei:Eduroam-under-windows10-09.png|links|mini|ohne|300px|In some browsers this is called '''"Save target as. .."''' ]] </div> | ||
| + | <br clear=all> | ||
| + | |||
| + | Then open the downloaded file with a double click. | ||
| + | [[Datei:Eduroam-unter-windows10-10.png|links|mini|ohne|300px|Click '''"Run"'''.]] | ||
| + | <div class="tleft" style="clear:none"> [[Datei:Eduroam-unter-windows10-11.png|links|mini|ohne|300px|Confirm the security question with '''"Yes"'' '.]] </div> | ||
| + | <div class="tleft" style="clear:none"> [[Datei:Eduroam-unter-windows10-12.png|left|mini|ohne|300px|Close the process with '''"Yes"'' '.]] </div> | ||
| + | <br clear=all> | ||
| + | |||
| + | <span style="color:orange"> Info:</span> Can't run the file? Then you probably downloaded the file using the ''Firefox'' browser. This does not save the file with the ending <code>.reg</code> but as <code>.txt</code>. Make sure the file extension is correct. By default, file extensions are hidden in Windows 11. You can change this in Explorer Settings. | ||
| + | <br clear=all> | ||
| + | |||
| + | Now we can connect to the eduroam WiFi. | ||
| + | --> | ||
| + | |||
| + | [[Datei:Eduroam-windows11-05.png|links|mini|ohne|450px|WLAN settings]] | ||
| + | <br> | ||
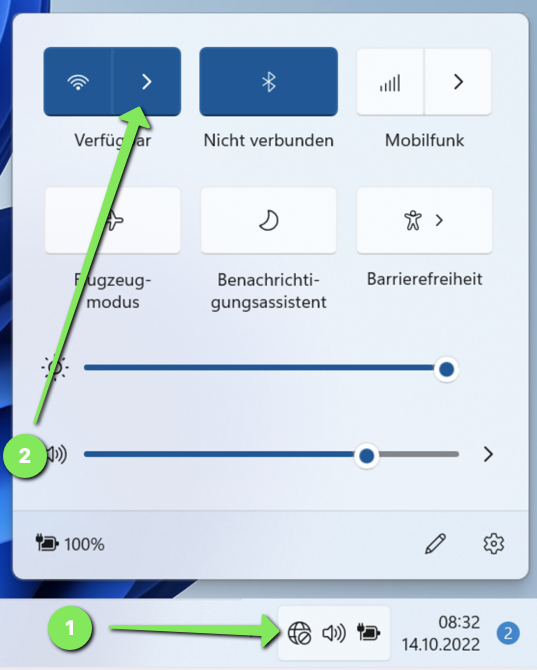
| + | * Click on the '''"Wi-Fi symbol"''' at the bottom right of the tray. | ||
| + | * Then click on the arrow to display the WiFi networks. | ||
| + | <br clear=all> | ||
| + | |||
| + | [[Datei:Eduroam-windows11-06.png|links|mini|ohne|450px|WLAN settings]] | ||
| + | <br> | ||
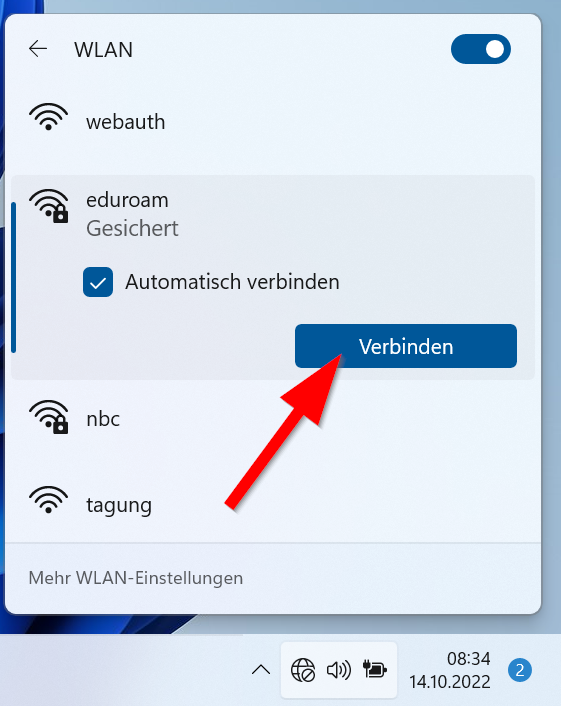
| + | * Select '''"eduroam"'''. | ||
| + | * Click on ''''Connect''' there. | ||
| + | <br clear=all> | ||
| + | |||
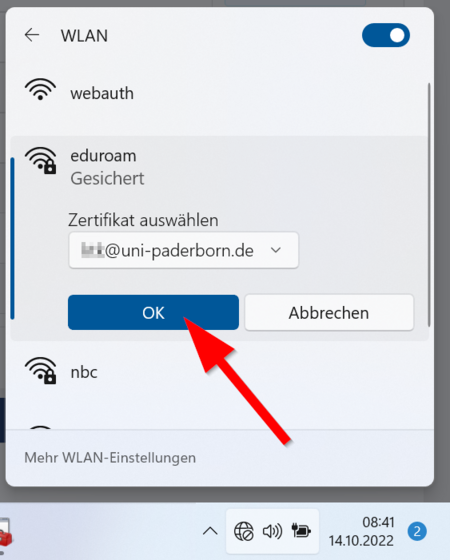
| + | [[Datei:Eduroam-windows11-07.png|links|mini|ohne|450px|WLAN settings]] | ||
| + | <br> | ||
| + | * Select your certificate. | ||
| + | * It ends in ''..@uni-paderborn.de''. | ||
| + | * Then click '''"OK"'''. | ||
<br clear=all> | <br clear=all> | ||
| − | Your device should now connect to | + | Your device should now connect to the Eduroam network. |
| + | </bootstrap_panel> | ||
| + | </bootstrap_accordion> | ||
==Troubleshooting== | ==Troubleshooting== | ||
===No connection possible=== | ===No connection possible=== | ||
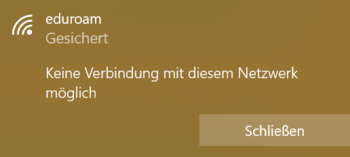
| − | If you get the error message ''' " | + | If you get the error message ''' "Cannot connect to this network" ''', this can have several causes. |
| − | [[Datei:Eduroam-unter-windows10-7.png|links|mini|ohne|350px]] | + | [[Datei:Eduroam-unter-windows10-7.png|links|mini|ohne|350px|Eduroam error message]] |
<br clear=all> | <br clear=all> | ||
| − | + | Check the following settings: | |
| + | <bootstrap_accordion> | ||
| + | <bootstrap_panel heading="Reinstall certificate" color="info"> | ||
| + | In some cases it is necessary to install the network certificate twice. Open your certificate again and install it with the import password as described above. Apply for '''no''' second certificate. Then reconnect to Eduroam as described above. | ||
| + | </bootstrap_panel> | ||
| − | == | + | <bootstrap_panel heading="Date and time settings" color="info"> |
| − | + | If you want to connect to the Eduroam network at the University of Paderborn, the system time on your device must be set correctly.<br> | |
| + | '''Please check whether the following settings are correct on your device:''' | ||
| + | * Time | ||
| + | * Date | ||
| + | * Time zone | ||
| − | + | </bootstrap_panel> | |
| − | + | </bootstrap_accordion> | |
| − | + | <br> | |
| − | |||
| − | |||
| − | |||
| − | ===No certificate | + | ===No certificate can be selected=== |
| − | + | If you cannot select a certificate, this may be due to the following reasons: | |
| − | < | + | <bootstrap_accordion> |
| + | <bootstrap_panel heading="Reinstall certificate" color="info"> | ||
| + | In some cases it is necessary to install the network certificate twice. Open your certificate again and install it with the import password as described above. Apply for '''no''' second certificate. Then reconnect to Eduroam as described above. | ||
| + | </bootstrap_panel> | ||
| − | If | + | <bootstrap_panel heading="Incorrect profile settings" color="info"> |
| + | If an eduroam profile exists with incorrect settings (e.g. from another university), the '''Connect using a certificate''' option may not be displayed. In this case, the existing profile must first be deleted. | ||
[[Datei:Eduroam-unter-windows10-3.png|links|mini|ohne|350px]] | [[Datei:Eduroam-unter-windows10-3.png|links|mini|ohne|350px]] | ||
<br> | <br> | ||
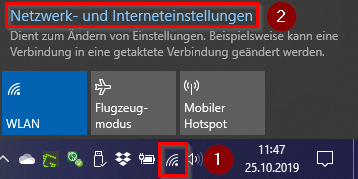
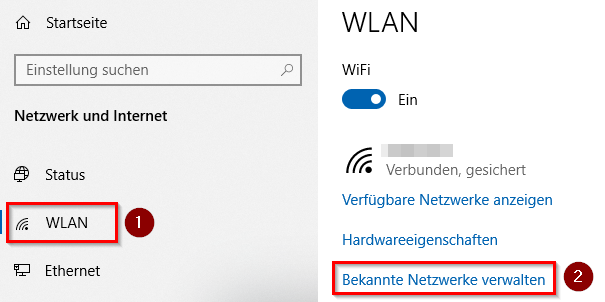
| − | * Click on the '''WLAN | + | * Click on the '''WLAN symbol''' at the bottom right |
| − | * | + | * Then click on '''Network and Internet Settings''' |
<br clear=all> | <br clear=all> | ||
[[Datei:Eduroam-unter-windows10-4.png|links|mini|ohne|350px]] | [[Datei:Eduroam-unter-windows10-4.png|links|mini|ohne|350px]] | ||
<br> | <br> | ||
| − | * Click on '''WLAN''' | + | * Click on '''WLAN''' on the left edge |
| − | * | + | * Then click on '''Manage Known Networks''' in the right pane. |
<br clear=all> | <br clear=all> | ||
[[Datei:Eduroam-unter-windows10-5.png|links|mini|ohne|350px]] | [[Datei:Eduroam-unter-windows10-5.png|links|mini|ohne|350px]] | ||
<br> | <br> | ||
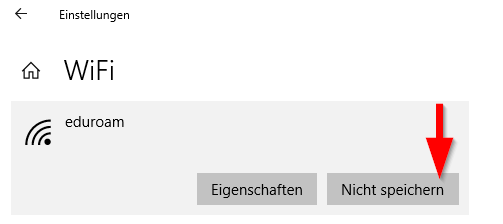
| − | * | + | * All WiFi networks to which your device was already connected are displayed here |
| − | * Click | + | * Search for the '''eduroam''' profile and select it with one click |
| + | * Click '''Don't Save''' | ||
| + | <br clear=all> | ||
| + | |||
| + | The former WiFi profile for Eduroam is now deleted. Now, please follow the instructions above to set up '''eduroam''' again! | ||
<br clear=all> | <br clear=all> | ||
| + | <hr> | ||
| + | You can also delete a WiFi network profile using Windows Command Prompt or Power Shell:<br> | ||
| + | '''Start the command prompt or a powershell as administrator'''<br> | ||
| + | {| class="wikitable" | ||
| + | ! '''Command''' !! '''Result''' | ||
| + | |- | ||
| + | | NetSH WLAN Show Profiles || Shows a list of WiFi profiles configured on the system. Copy the profile name here | ||
| + | |- | ||
| + | | NetSH WLAN Delete Profile Name="Profile Name" || Deletes the specified WiFi profile | ||
| + | |} | ||
| + | <br clear=all> | ||
| + | </bootstrap_panel> | ||
| + | |||
| + | </bootstrap_accordion> | ||
| − | + | ==See also== | |
| + | * [[WLAN]] | ||
Aktuelle Version vom 12. Dezember 2025, 10:55 Uhr
The RADIUS server certificate was replaced on 17 December 2025 at 8:00 a.m. After that, your device may prompt you to verify the certificate before trusting it. You can find the current fingerprint for the certificate here:
You do not need to replace any network certificates on your device. Most devices should still be able to connect to eduroam without any problems. More details on how individual devices will behave can be found here:
For details click here
Depending on the device, you may have to reconnect to eduroam, select the certificate again or trust the certificate.
macOS
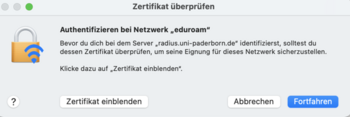
- Zertifikat einblenden to check certificate
- Continue to trust the certificate
- You may need to select your certificate again afterwards.
- Do not enter a username to log in to eduroam!


iPhone und iPad
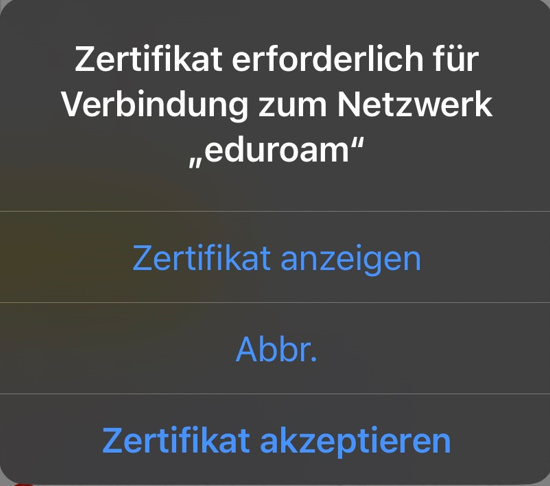
- Display certificate to check the certificate
- Accept certificate to trust the certificate

Windows

- Show certificate details to check the certificate
- Connect to trust the certificate
This tutorial describes how to set up the Wi-Fi eduroam on Windows.
What has to be done?[Bearbeiten | Quelltext bearbeiten]
- Install your personal network certificate from the University of Paderborn.
- Then connect to the eduroam network.
Step-by-step instructions[Bearbeiten | Quelltext bearbeiten]
Create certificate[Bearbeiten | Quelltext bearbeiten]
Access using a browser such as B. Firefox or Edge, go to the service portal and log in with your user name and password from your university account.
- Go to Benutzerverwaltung and then Netzwerkeinstellungen.
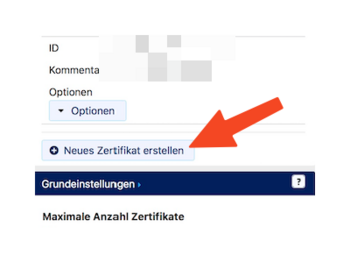
- Click Neues Zertifikat erstellen.
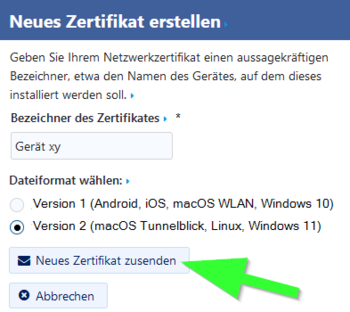
- Give the certificate a unique name (Example: Laptop)
- For Windows 11, select Version 2 as the file format.
- For older versions than Windows 10, please use Version 1.
- Then click on Neues Zertifikat zusenden.

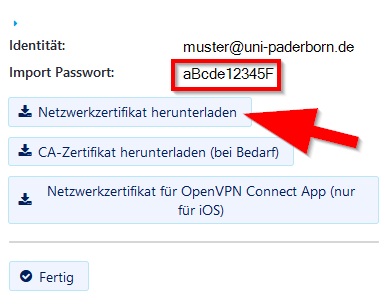
- A new network certificate has been created for you.
- First copy the Import Password to the clipboard.
- Now click on Netzwerkzertifikat herunterladen.
Save the network certificate to your device.
Install certificate[Bearbeiten | Quelltext bearbeiten]
Open the certificate we just downloaded. The certificate import wizard then starts automatically.
- Click on Continue.
- Paste the import password that we just copied.
- Leave the default settings intact.
- Note: It is not allowed to tick "Activate high security for the private key". The Windows WLAN client currently does not support this function and therefore no connection to eduroam would be possible.
- Then click Next
- In the following window, if necessary, click on Next and finally on Finish.
- If a security warning appears, click Yes.
- Now click on OK.
Note: Now open the same certificate again and install it a second time. This allows us to work around an error in the Windows certificate manager. Do not create a new certificate for this!
Connect with eduroam[Bearbeiten | Quelltext bearbeiten]
After we have installed the certificate, we can now set up Eduroam.
Windows 10

Windows 11

- Click on the "Wi-Fi symbol" at the bottom right of the tray.
- Then click on the arrow to display the WiFi networks.

- Select "eduroam".
- Click on 'Connect there.
- Select your certificate.
- It ends in ..@uni-paderborn.de.
- Then click "OK".
Your device should now connect to the Eduroam network.
Troubleshooting[Bearbeiten | Quelltext bearbeiten]
No connection possible[Bearbeiten | Quelltext bearbeiten]
If you get the error message "Cannot connect to this network" , this can have several causes.
Check the following settings:
Reinstall certificate
In some cases it is necessary to install the network certificate twice. Open your certificate again and install it with the import password as described above. Apply for no second certificate. Then reconnect to Eduroam as described above.
Date and time settings
If you want to connect to the Eduroam network at the University of Paderborn, the system time on your device must be set correctly.
Please check whether the following settings are correct on your device:
- Time
- Date
- Time zone
No certificate can be selected[Bearbeiten | Quelltext bearbeiten]
If you cannot select a certificate, this may be due to the following reasons:
Reinstall certificate
In some cases it is necessary to install the network certificate twice. Open your certificate again and install it with the import password as described above. Apply for no second certificate. Then reconnect to Eduroam as described above.
Incorrect profile settings
If an eduroam profile exists with incorrect settings (e.g. from another university), the Connect using a certificate option may not be displayed. In this case, the existing profile must first be deleted.

- Click on the WLAN symbol at the bottom right
- Then click on Network and Internet Settings

- Click on WLAN on the left edge
- Then click on Manage Known Networks in the right pane.

- All WiFi networks to which your device was already connected are displayed here
- Search for the eduroam profile and select it with one click
- Click Don't Save
The former WiFi profile for Eduroam is now deleted. Now, please follow the instructions above to set up eduroam again!
You can also delete a WiFi network profile using Windows Command Prompt or Power Shell:
Start the command prompt or a powershell as administrator
| Command | Result |
|---|---|
| NetSH WLAN Show Profiles | Shows a list of WiFi profiles configured on the system. Copy the profile name here |
| NetSH WLAN Delete Profile Name="Profile Name" | Deletes the specified WiFi profile |


