| Zeile 4: | Zeile 4: | ||
|translated title=Bitwarden - Register Account | |translated title=Bitwarden - Register Account | ||
}} | }} | ||
| + | Do you want to use Bitwarden through the University of Paderborn? You have to register once with your university account to create a Bitwarden account. | ||
| + | |||
| + | == Step-by-Step Instructions == | ||
| + | |||
| + | Use the following link to register for the University of Paderborn's Bitwarden service. | ||
| + | |||
| + | * https://pw.uni-paderborn.de/#/sso?identifier=upb | ||
| + | |||
| + | [[Datei:Bitwarden-10.png|links|mini|ohne|450px|Login with University Account]] | ||
| + | |||
| + | <br> | ||
| + | * Enter your username and password for your university account. | ||
| + | |||
| + | * Then click on '''"Login"'''. | ||
| + | |||
| + | <br clear=all> | ||
| + | |||
| + | Account creation is only possible via a web browser. Do not use the app or browser extension. | ||
| + | |||
| + | |||
| + | ``` [[Datei:Bitwarden-11.png|links|mini|ohne|450px|Set Master Password]] | ||
| + | |||
| + | * Enter a master password for your Bitwarden account. Choose a long and secure password that you haven't used for any other service. | ||
| + | |||
| + | * Uncheck the box for '''"Check this password for known data breaches." | ||
| + | |||
| + | * Then click '''"Create Account." | ||
| + | |||
| + | <br clear=all> | ||
| + | |||
| + | <bootstrap_alert color=warning> | ||
| + | <span style='font-size:30px;'>⚠</span> | ||
| + | |||
| + | * Make sure you don't forget your master password. | ||
| + | |||
| + | * The master password cannot be reset! | ||
| + | |||
| + | * Without a master password, you will lose access to your password manager. | ||
| + | |||
| + | </bootstrap_alert> | ||
| + | |||
| + | [[Datei:Bitwarden-12.png|links|mini|ohne|450px|Install extension]] | ||
| + | |||
| + | <br> | ||
| + | * You can now install the Bitwarden extension for your browser. | ||
| + | |||
| + | * We explain this in detail in another guide - [[Bitwarden - Installing extensions and apps]] | ||
| + | |||
| + | * Alternatively, you can skip this step and add the extension '''later'''. | ||
| + | |||
| + | <br clear=all> | ||
| + | |||
| + | [[Datei:Bitwarden-13.png|links|mini|ohne|450px|Install extension]] | ||
| + | |||
| + | <br> | ||
| + | * If you haven't installed the browser extension, you must confirm it again now. | ||
| + | |||
| + | <br clear=all> | ||
| + | |||
| + | === Confirm email address=== | ||
| + | |||
| + | [[Datei:Bitwarden-16.png|links|mini|ohne|450px|Install extension]] | ||
| + | |||
| + | <br> | ||
| + | * You are now in the Bitwarden web interface and will see an overview of the first steps. | ||
| + | |||
| + | |||
| + | * You are now in the Bitwarden web interface and will see an overview of the first steps. | ||
| + | |||
| + | |||
| + | * * Start by verifying your email address - click on '''"Send Email"'''. | ||
| + | |||
| + | <br clear=all> | ||
| + | |||
| + | [[Datei:Bitwarden-14.png|links|mini|ohne|450px|Install extension]] | ||
| + | |||
| + | <br> | ||
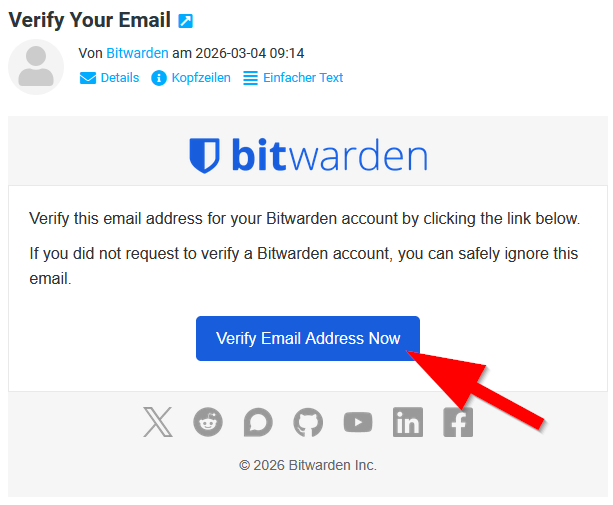
| + | * You should now receive an email shortly. | ||
| + | |||
| + | * Click on '''"Verify Email Address now"''' to confirm your address. | ||
| + | |||
| + | <br clear=all> | ||
| + | |||
| + | [[Datei:Bitwarden-15.png|links|mini|ohne|450px|Install extension]] | ||
| + | |||
| + | <br> | ||
| + | * Your address has been successfully verified. | ||
| + | |||
| + | <br clear=all> | ||
| + | |||
| + | === Login=== | ||
| + | From now on, log in to Bitwarden with your preferred email address and master password. Instructions can be found here: [[Bitwarden - Login Web Interface]] | ||
| + | |||
| + | ===Set up an additional factor=== | ||
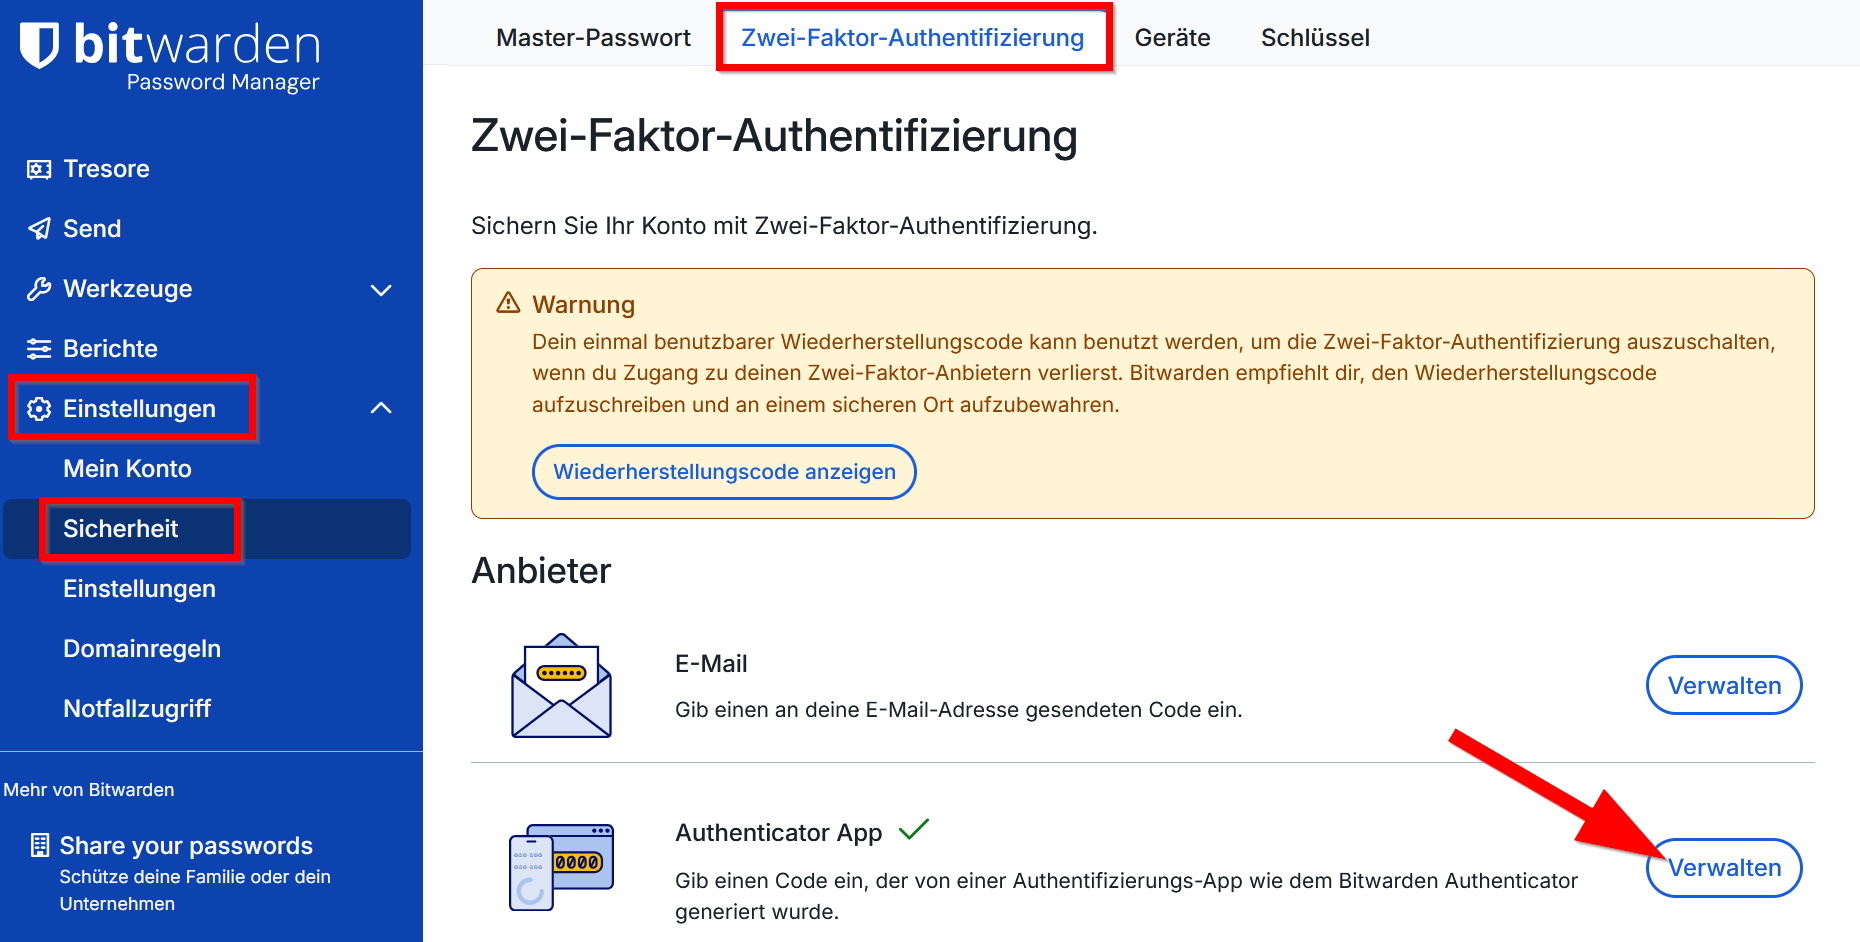
| + | Your password manager is very important to protect. In addition to a very secure master password, we recommend further securing it with an additional factor. | ||
| + | |||
| + | * Click on '''Settings'''. | ||
| + | |||
| + | * Click on '''Security'''. | ||
| + | |||
| + | * Switch to the '''"Two-Factor Authentication"''' tab. | ||
| + | |||
| + | * Several factors are available to choose from. | ||
| + | |||
| + | * If you have a smartphone, we recommend using an '''authenticator app''' as an additional factor. To do this, click on '''"Manage"'''. | ||
| + | |||
| + | <br> | ||
| + | |||
| + | [[Datei:Bitwarden-mfa-01.png|mini|ohne|650px]] | ||
| + | |||
| + | <br clear=all> | ||
| + | |||
| + | For instructions on using authenticator apps, see [[Multi-Faktor Authentifizierung (MFA)]]. | ||
| + | |||
| + | |||
| + | <bootstrap_alert color=warning> | ||
| + | |||
| + | <span style='font-size:30px;'>⚠</span> | ||
| + | |||
| + | Now, be sure to back up your recovery key. | ||
| + | |||
| + | </bootstrap_alert> | ||
| + | |||
| + | [[Datei:Bitwarden-mfa-02.png|mini|ohne|650px]] | ||
| + | |||
| + | <br clear=all> | ||
| + | |||
| + | You can, for example, print the recovery key and store it in a safe place. | ||
| + | |||
| + | == See also == | ||
| + | |||
| + | * [[Passwortmanager]] | ||
Version vom 19. März 2026, 20:21 Uhr
Do you want to use Bitwarden through the University of Paderborn? You have to register once with your university account to create a Bitwarden account.
Step-by-Step Instructions[Bearbeiten | Quelltext bearbeiten]
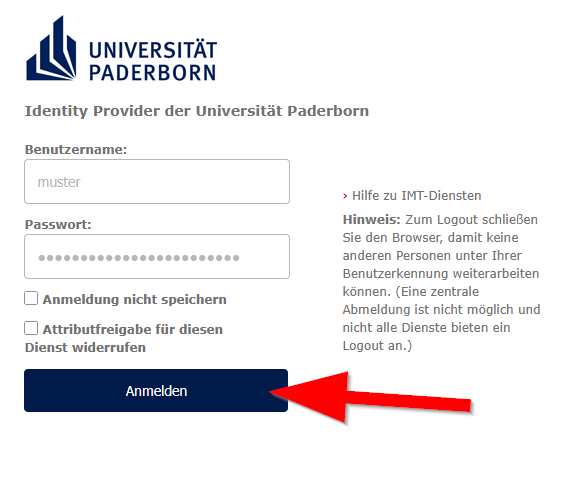
Use the following link to register for the University of Paderborn's Bitwarden service.

- Enter your username and password for your university account.
- Then click on "Login".
Account creation is only possible via a web browser. Do not use the app or browser extension.
```
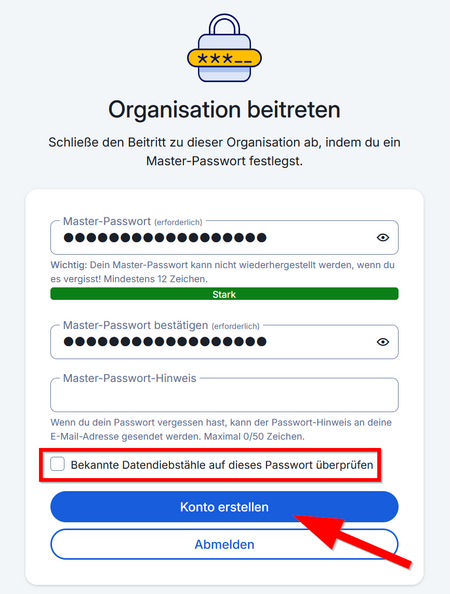
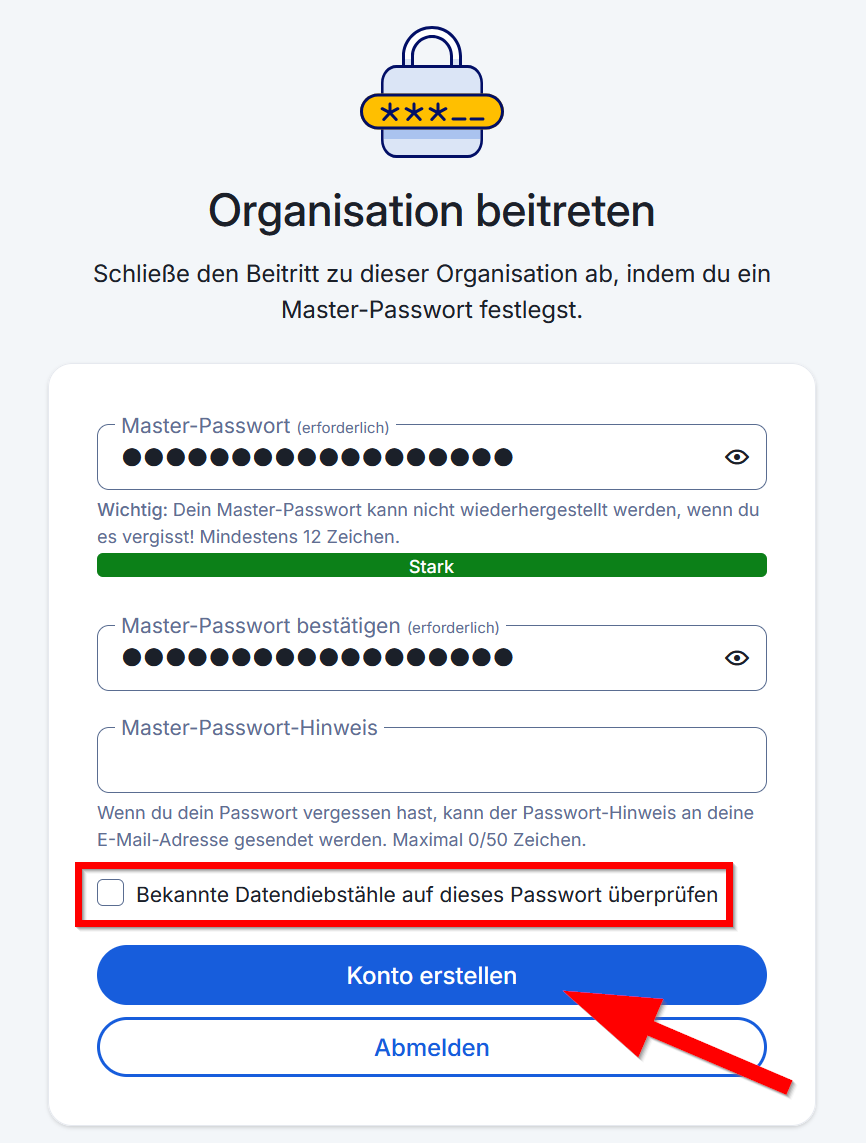
- Enter a master password for your Bitwarden account. Choose a long and secure password that you haven't used for any other service.
- Uncheck the box for "Check this password for known data breaches."
- Then click "Create Account."
⚠
- Make sure you don't forget your master password.
- The master password cannot be reset!
- Without a master password, you will lose access to your password manager.
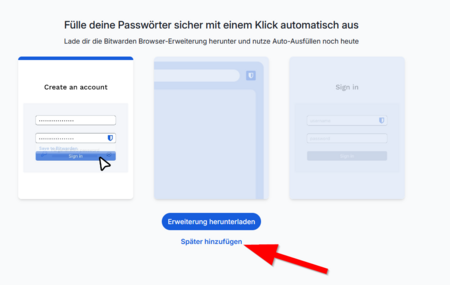
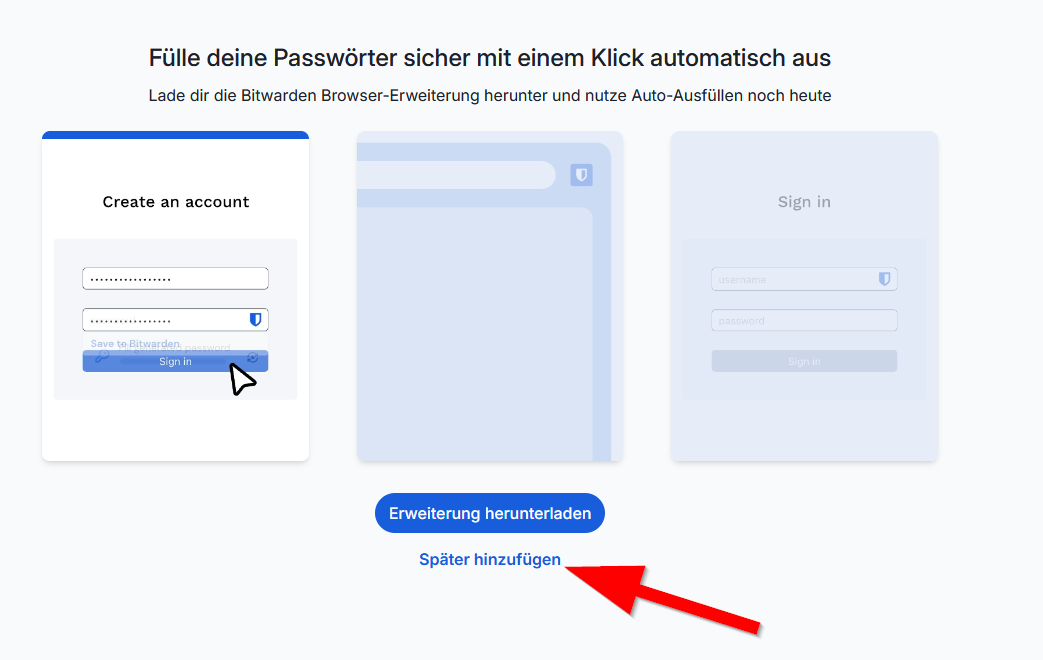
- You can now install the Bitwarden extension for your browser.
- We explain this in detail in another guide - Bitwarden - Installing extensions and apps
- Alternatively, you can skip this step and add the extension later.

- If you haven't installed the browser extension, you must confirm it again now.
Confirm email address[Bearbeiten | Quelltext bearbeiten]

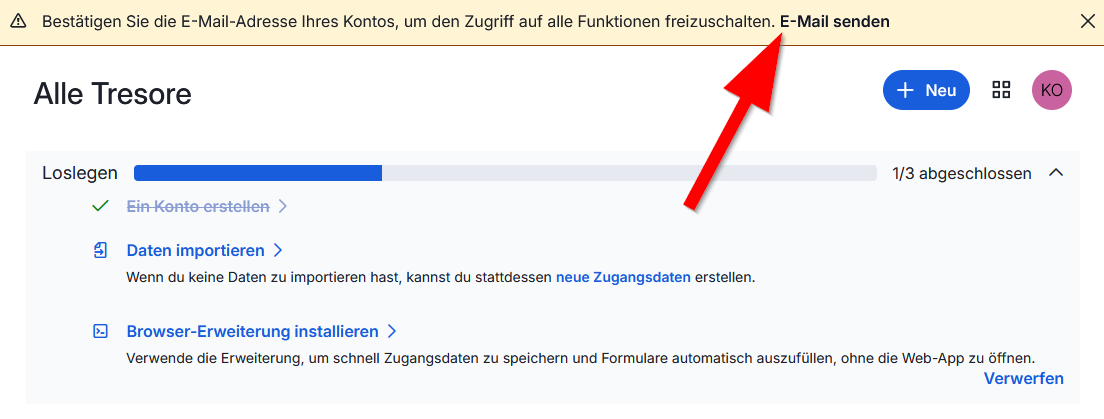
- You are now in the Bitwarden web interface and will see an overview of the first steps.
- You are now in the Bitwarden web interface and will see an overview of the first steps.
- * Start by verifying your email address - click on "Send Email".

- You should now receive an email shortly.
- Click on "Verify Email Address now" to confirm your address.
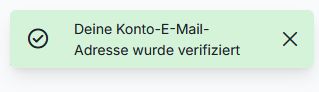
- Your address has been successfully verified.
Login[Bearbeiten | Quelltext bearbeiten]
From now on, log in to Bitwarden with your preferred email address and master password. Instructions can be found here: Bitwarden - Login Web Interface
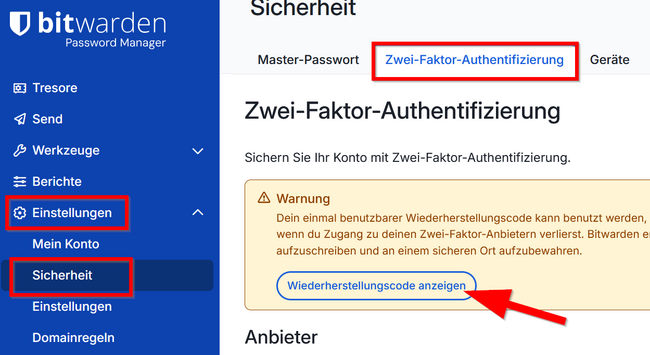
Set up an additional factor[Bearbeiten | Quelltext bearbeiten]
Your password manager is very important to protect. In addition to a very secure master password, we recommend further securing it with an additional factor.
- Click on Settings.
- Click on Security.
- Switch to the "Two-Factor Authentication" tab.
- Several factors are available to choose from.
- If you have a smartphone, we recommend using an authenticator app as an additional factor. To do this, click on "Manage".

For instructions on using authenticator apps, see Multi-Faktor Authentifizierung (MFA).
⚠
Now, be sure to back up your recovery key.
You can, for example, print the recovery key and store it in a safe place.

