Add materials[Bearbeiten | Quelltext bearbeiten]
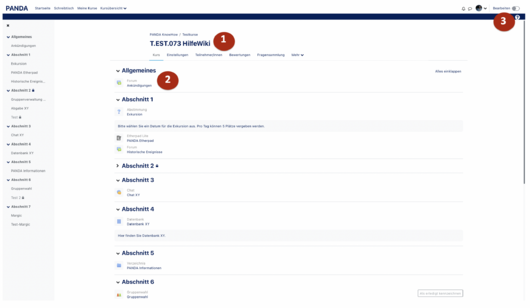
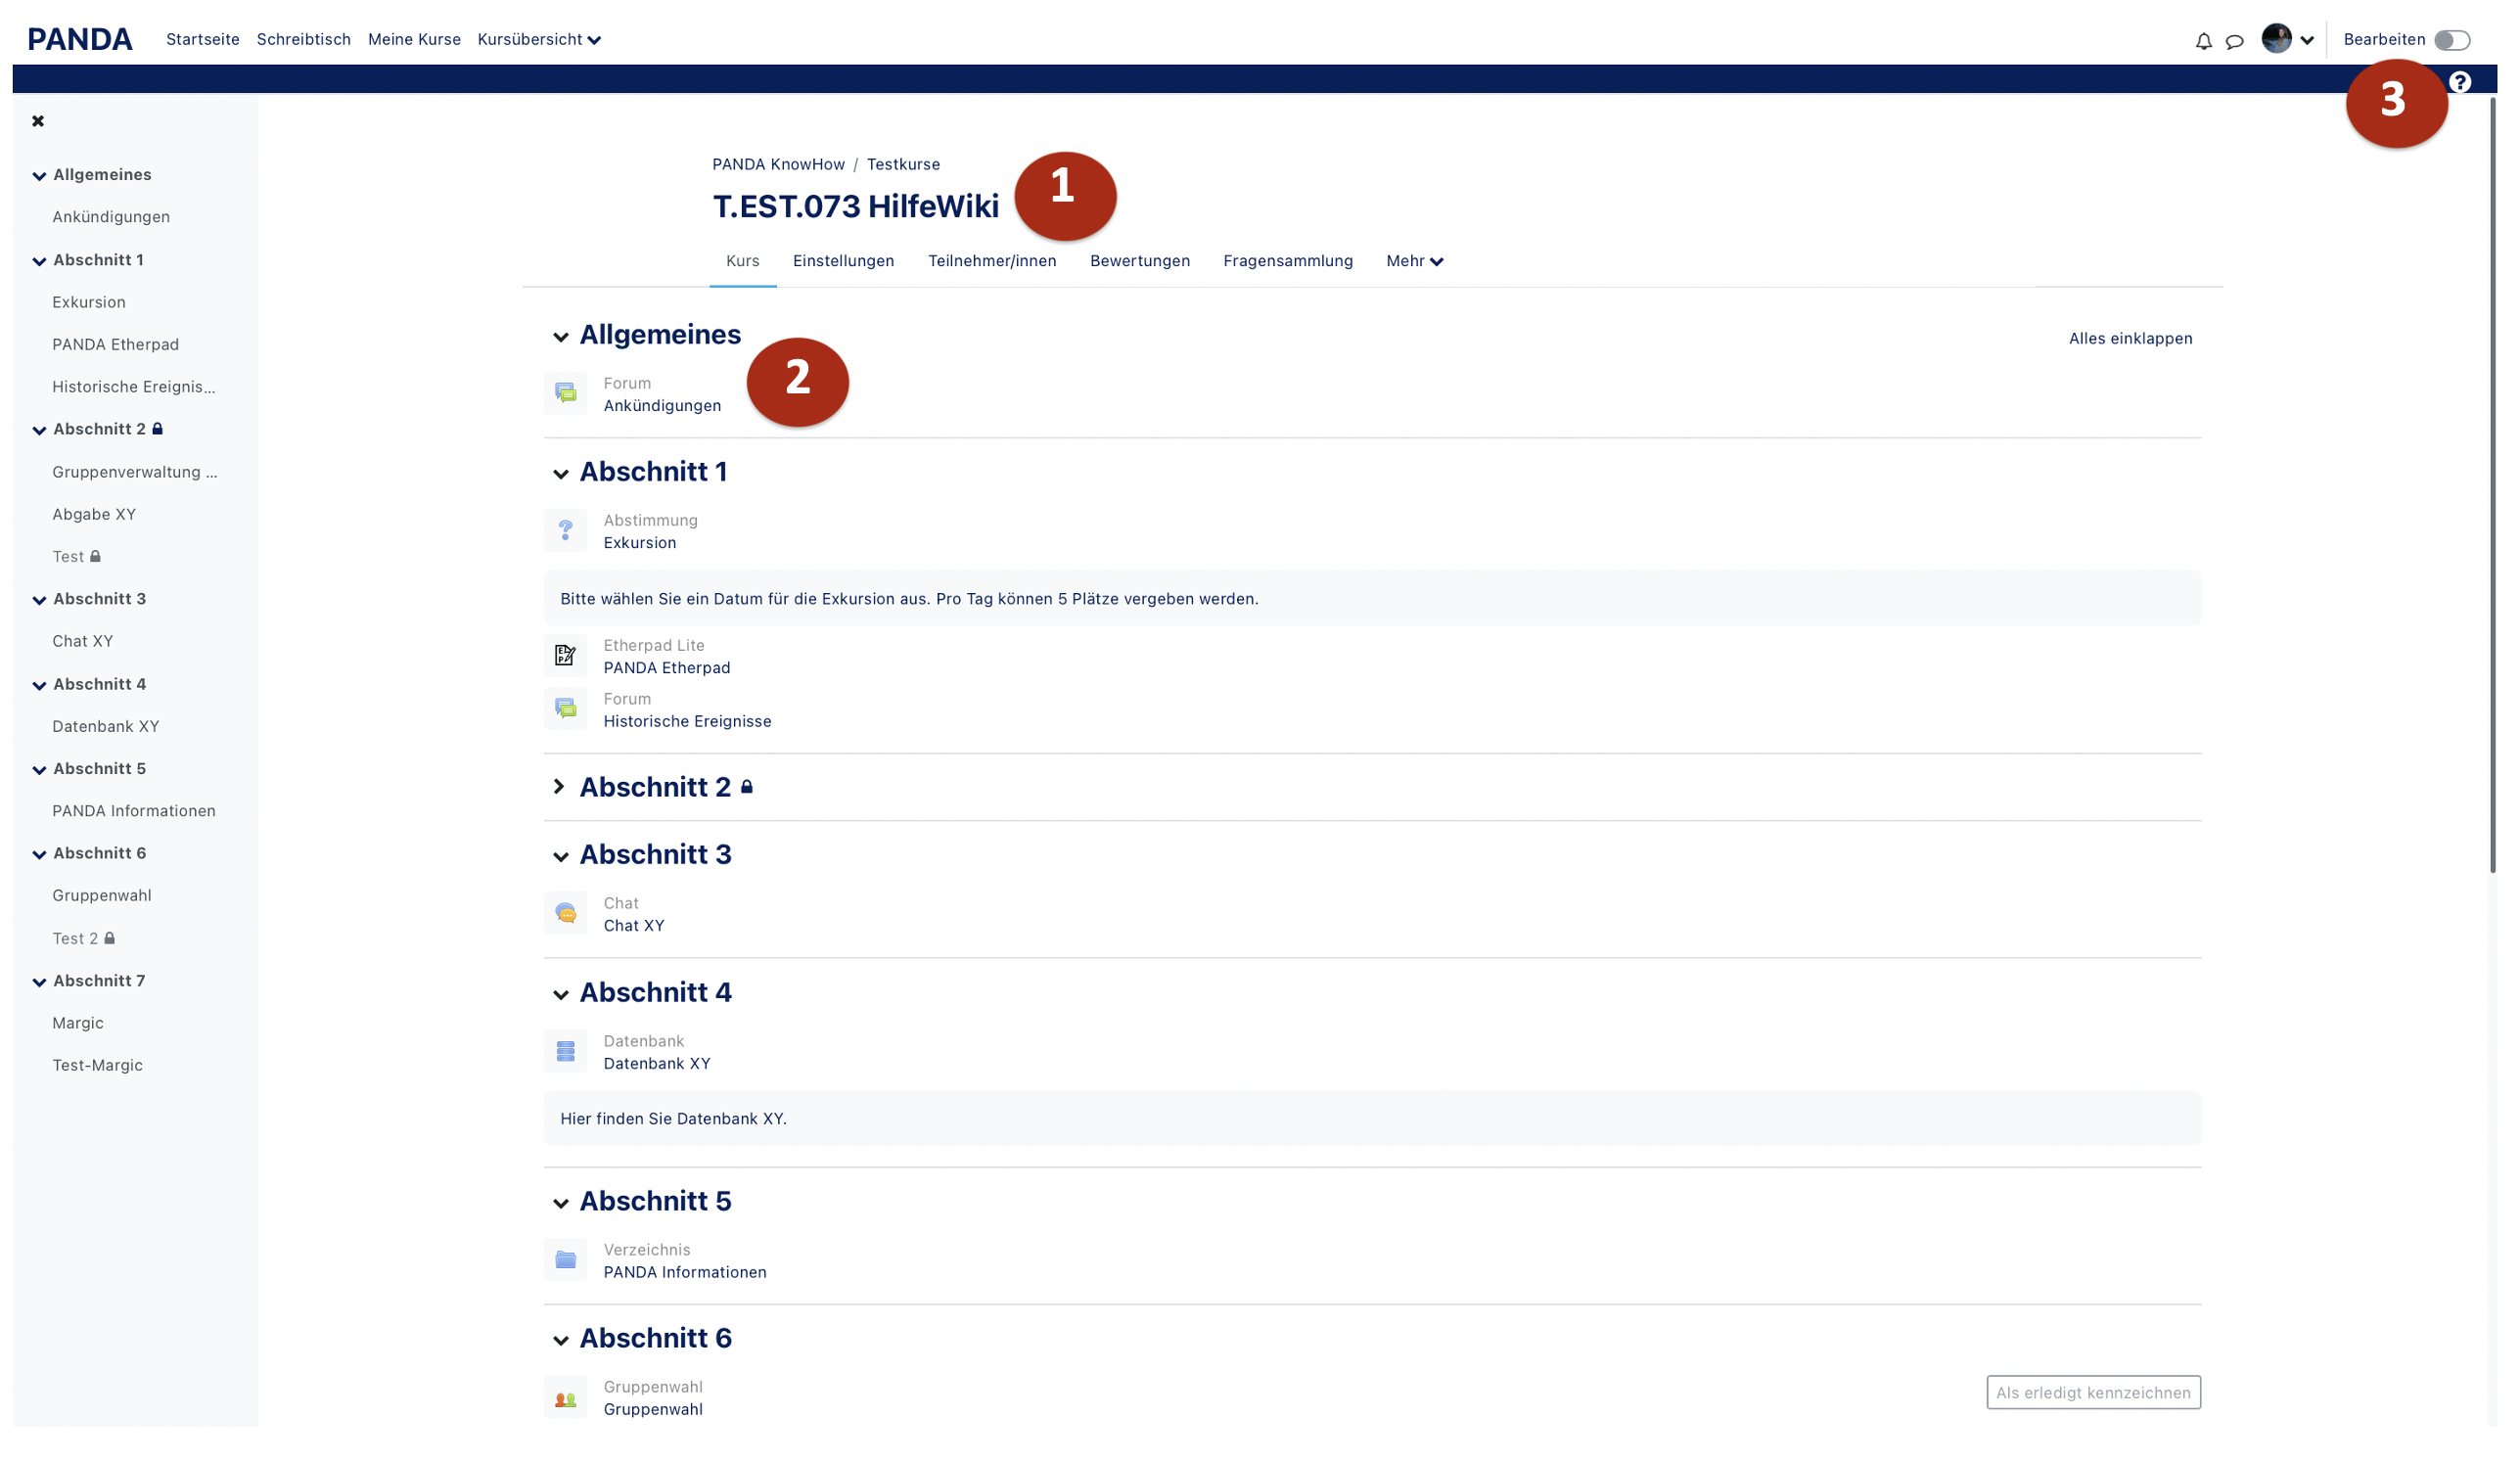
In a newly created PANDA course, the middle area(1) - the main course area - contains a certain number of empty topics and an announcement forum (2). In addition, changes can be made here by Enable editing (3).
Edit topics & material[Bearbeiten | Quelltext bearbeiten]
The Announcement Forum (2) (Figure 1) is a forum that is automatically generated by PANDA in each course. Only instructors and assistant instructors may post in the announcement forum. There can only be one announcement forum per course.
In the block "Latest announcements" the most recent contributions are displayed. The default setting is that all course participants have a mandatory subscription to this forum.
In order to add materials or activities to your course you have to activate Enable editing in the first step.
This can be done at the top right (3) (figure 1).
If editing is activated you will see different options to edit the course in the main course area.
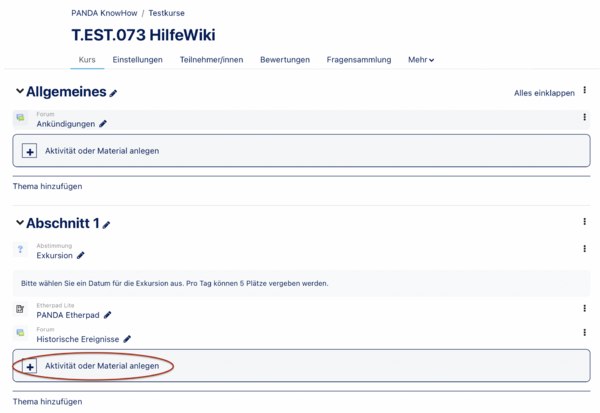
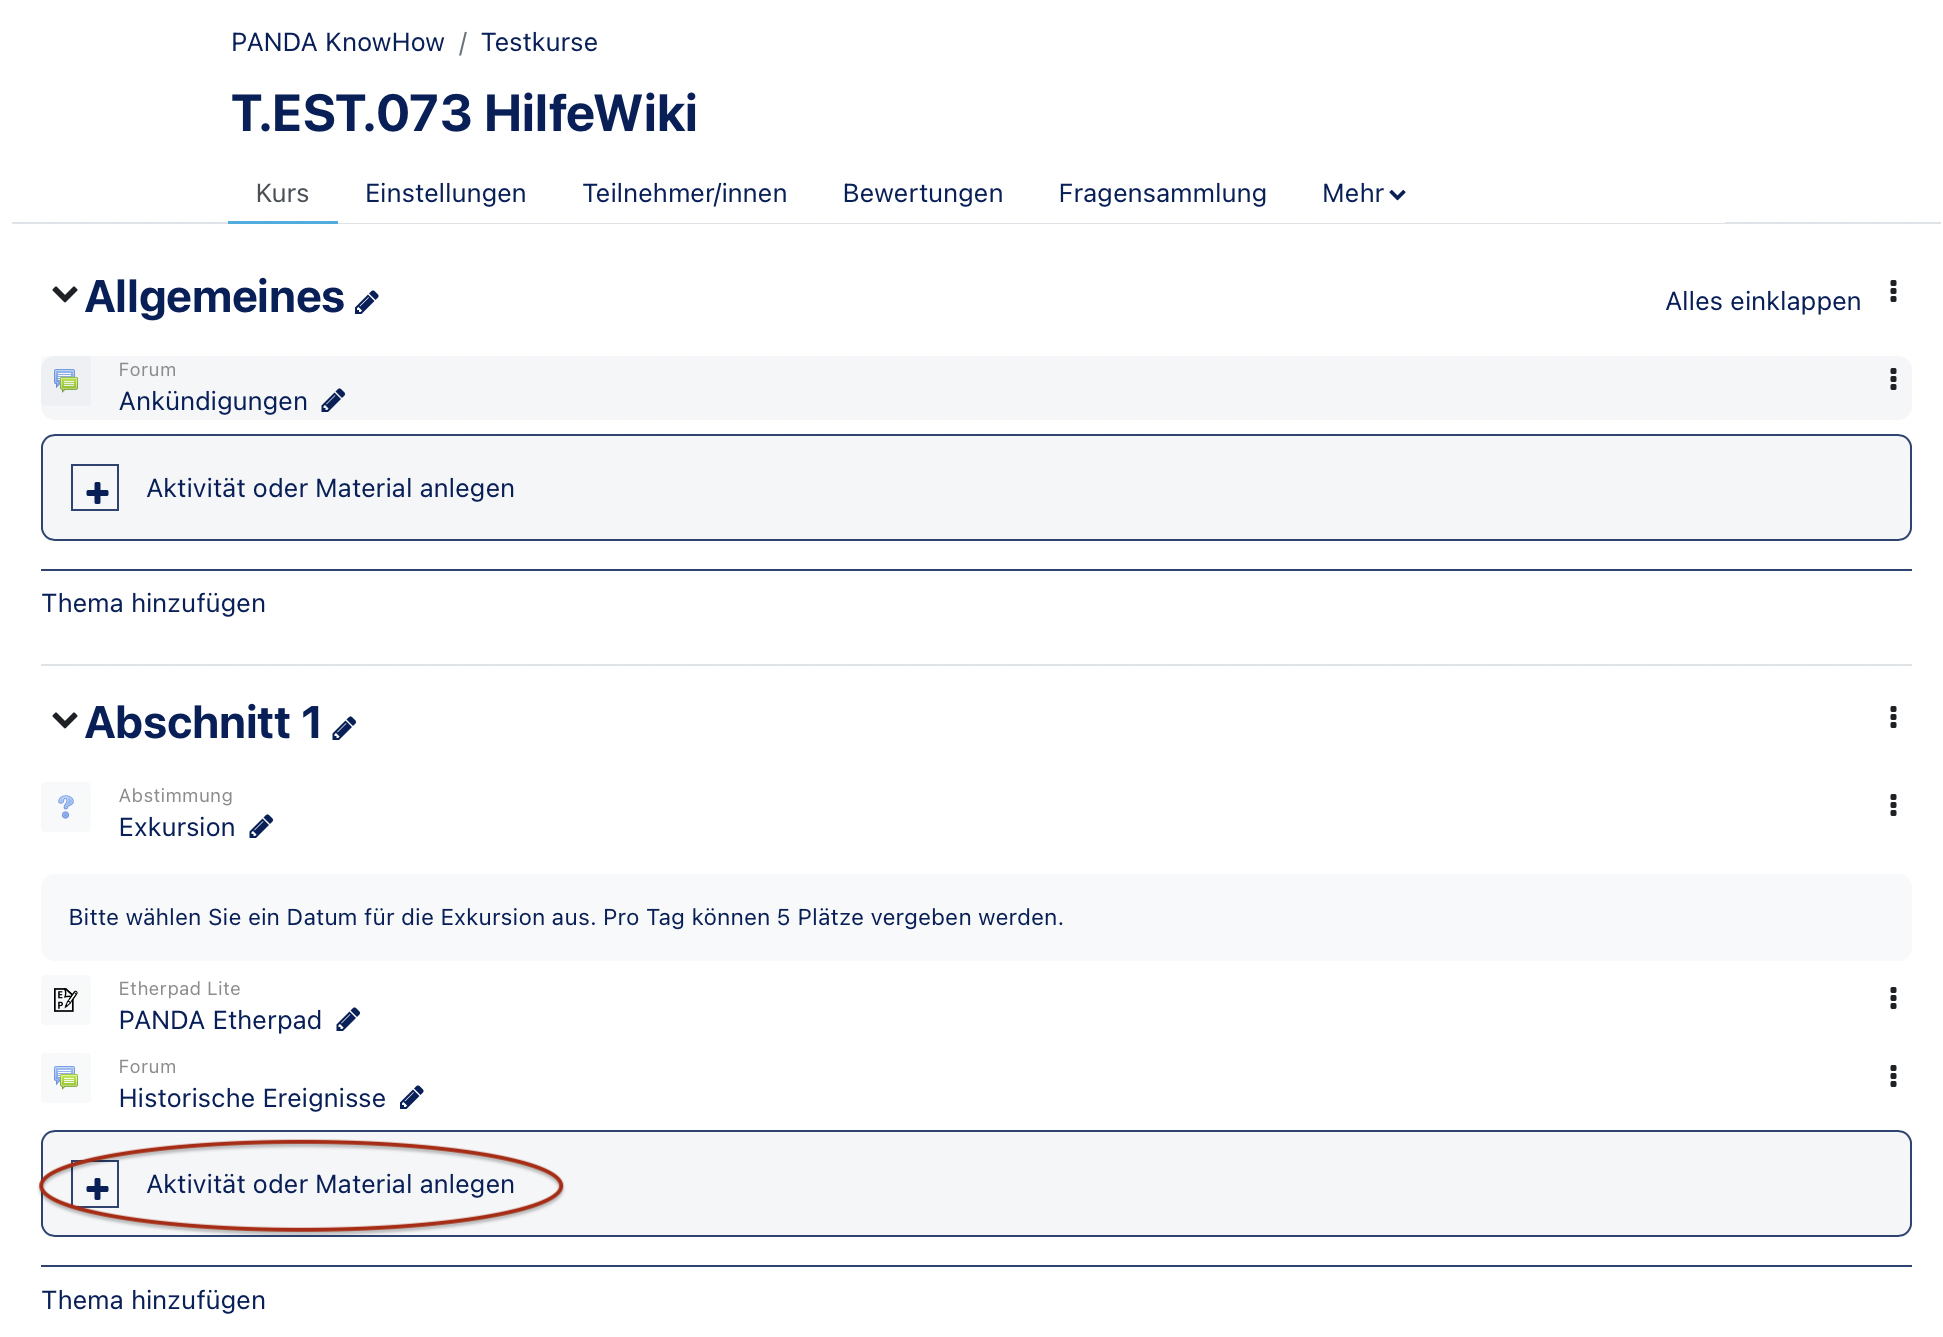
- (Figure 2): Basically you can add materials to individual topics by simply dragging and dropping them onto the appropriate topic section.
- With the cross (1) , which appears in front of topics, materials and activities, it is possible to move them in order.
- By clicking on Add material or activity (2) a window opens where course contents can be added.
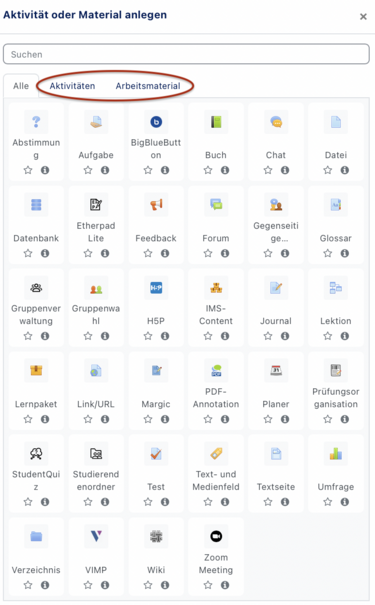
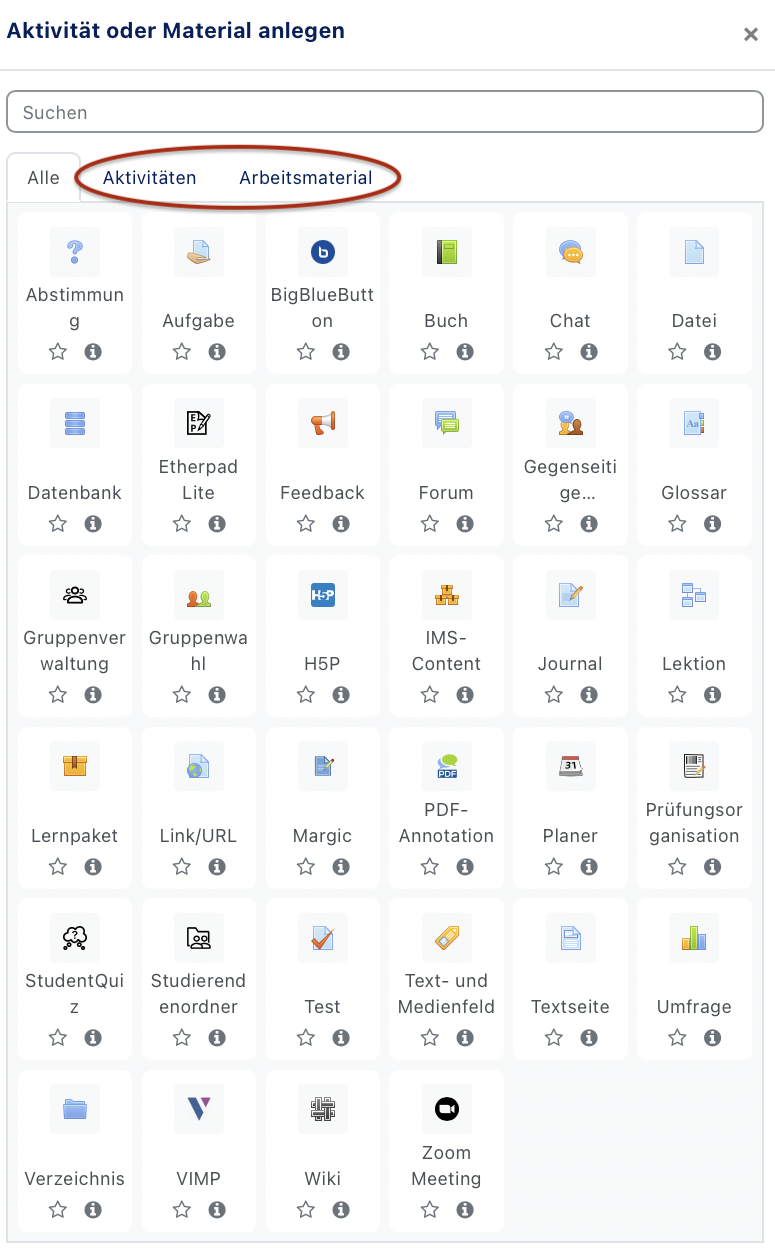
- (Figure 3): The window that then opens looks like this and is divided into Activities (1) (Figure 3) and Work material(2).
Add work material[Bearbeiten | Quelltext bearbeiten]
Here the material to be added is listed alphabetically. We recommend working with the following materials:
- File - If a learning material is available as a file, it can easily be uploaded in the course. All file formats are possible. Make sure that your participants can open the file formats used.
- Link / URL - With a URL you link to existing pages in the Internet. Linking avoids copyright problems when copying content, but should be checked regularly for still working links, especially if you are copying courses. In principle, links and URLs can also be integrated into any other page or activity using the text editor.
- Text field - A text field will be displayed on the course page, e.g. as headline, as hint, as short learning content or for orientation. A text field can also contain multimedia elements, e.g. video or audio.
- Text Page - On a text page you compile content for participants. The page can contain texts, images, audio files, videos and links. It can be set to automatically link terms from the glossary to text pages. The text page is easier to edit than an uploaded file. When using mobile devices, the content can be displayed better.
- Directory - or folder. If you want to provide a larger number of files in your course create a directory. Load files into that directory and structure everything clearly in subdirectories.
The materials Book and IMS - Content offer nice possibilities for advanced users. With the book a learning unit with short texts and activities inserted in between is created. An IMS Content Package is a collection of learning content created with an external authoring software.
Add file[Bearbeiten | Quelltext bearbeiten]
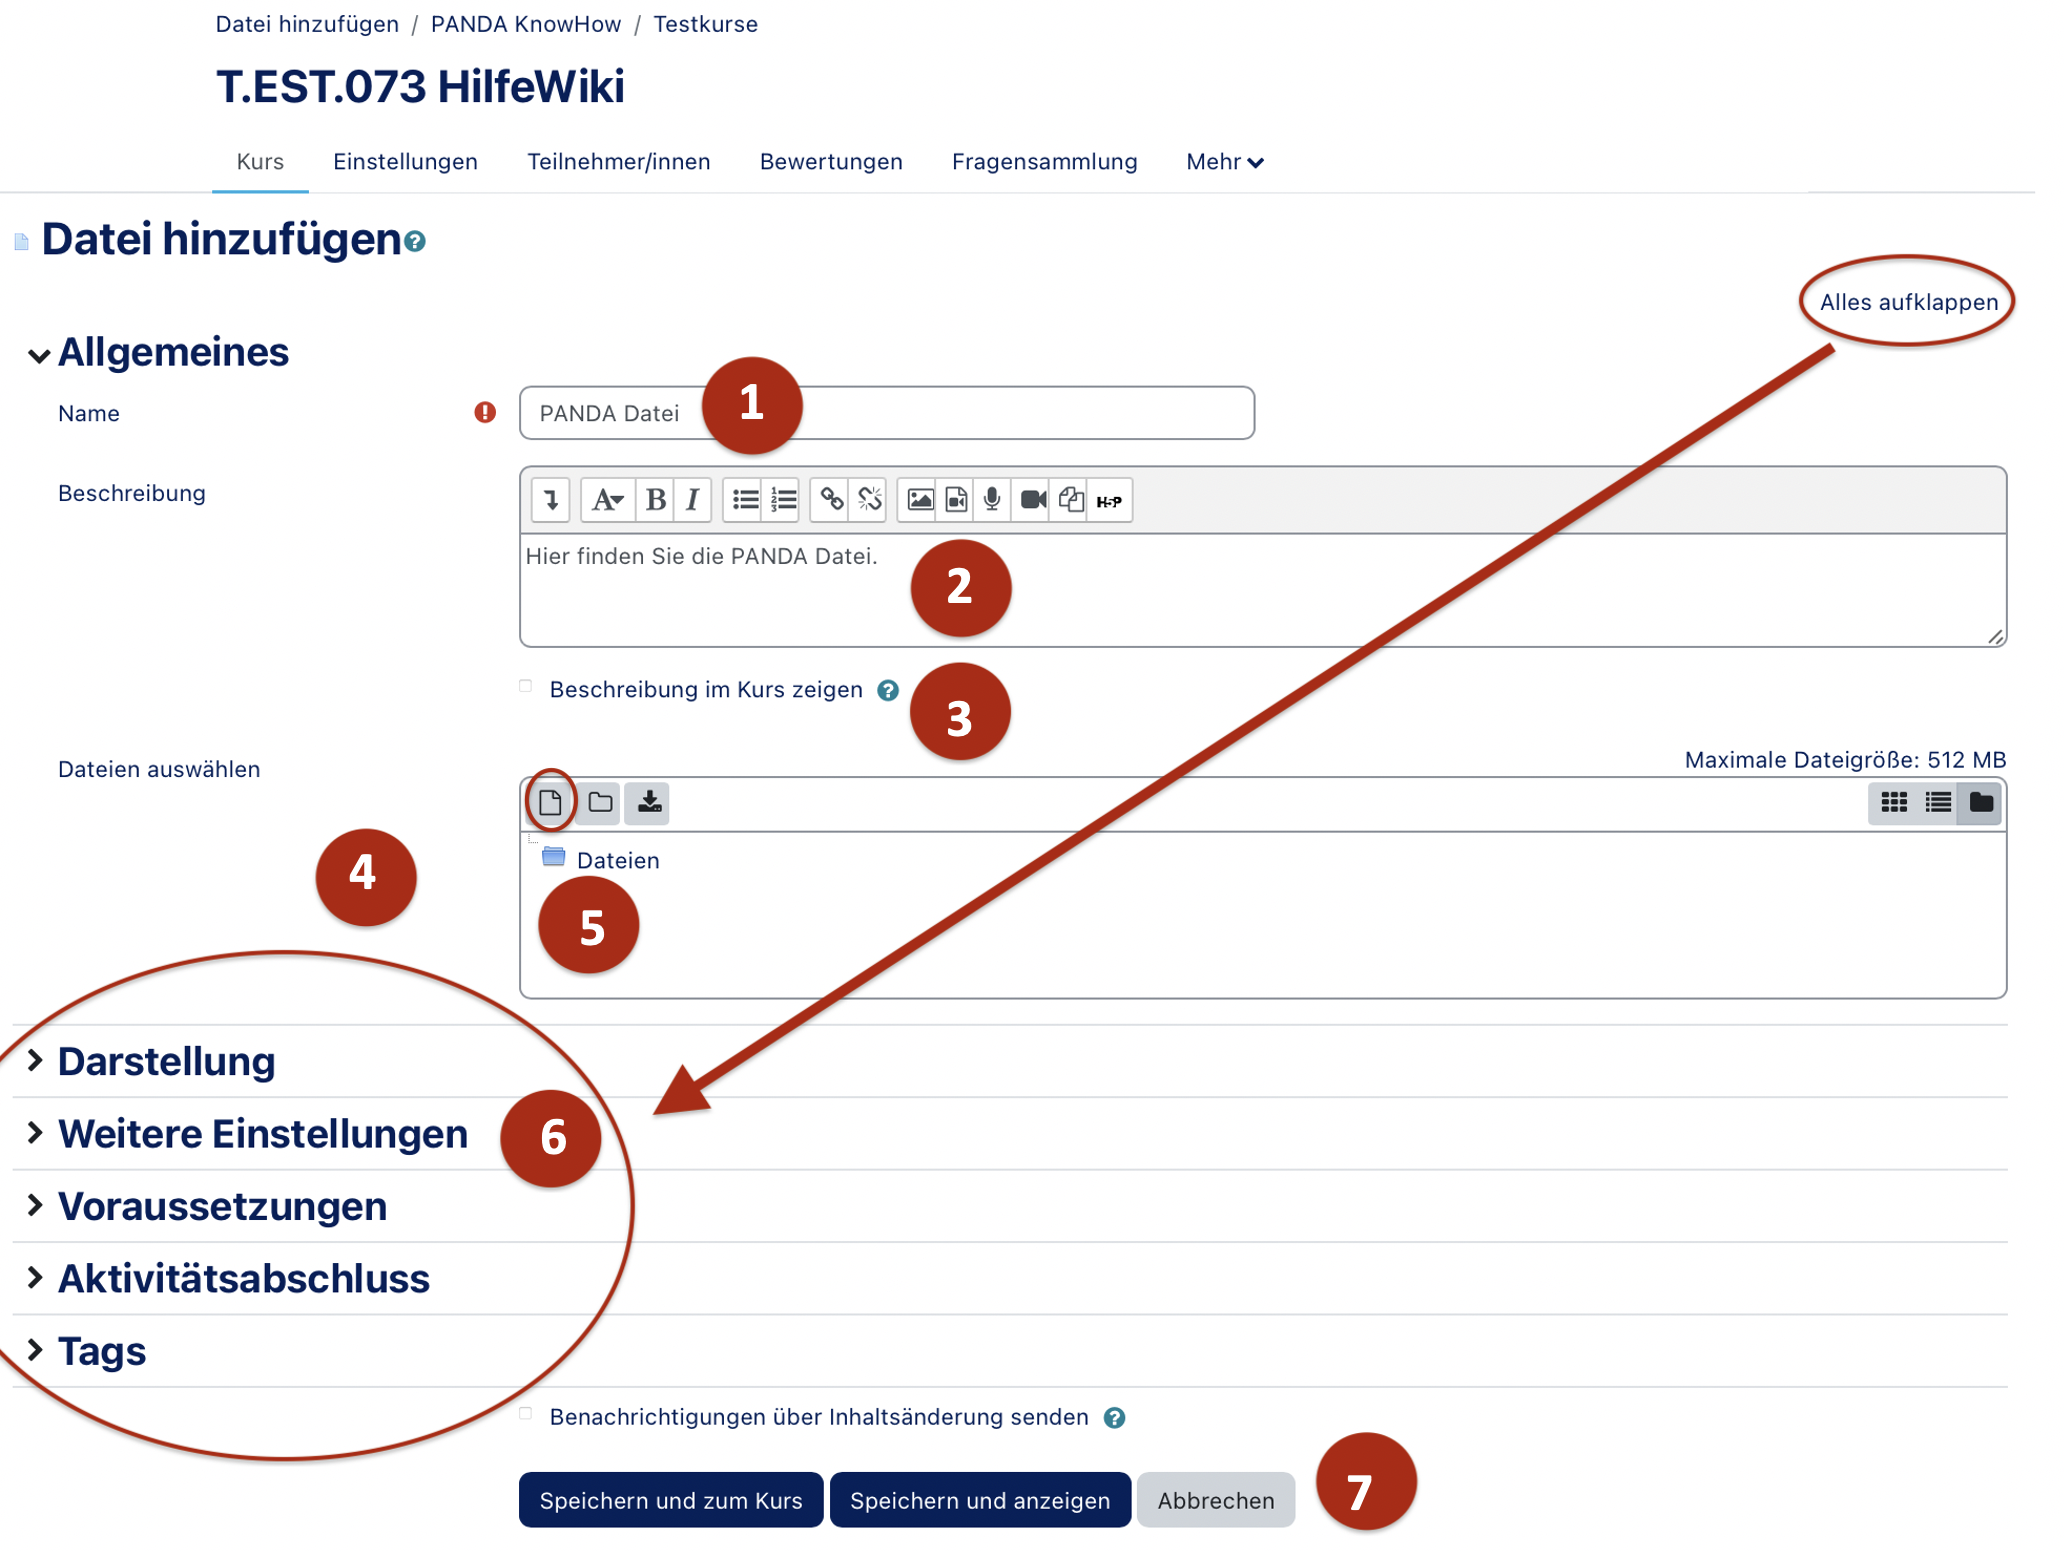
After you have selected Add File, Add File to Topic 1 will open in the Main Course Window:
- Name (1) - enter the name you want to appear in the quote list, it does not have to be identical to the file name.
- Description (2) - optionally you can add a description. This description will also be displayed on the course page if you check the box Show description in course (3).
- Select files (4) - to upload files you can add them via the PANDA file selection. This can be accessed by clicking on the corresponding symbol (5).
In addition, other settings (6) can be made, such as the file format to be displayed or the conditions for obtaining the file. More on this below.
The PANDA file selection offers many different options, which are explained in detail here.
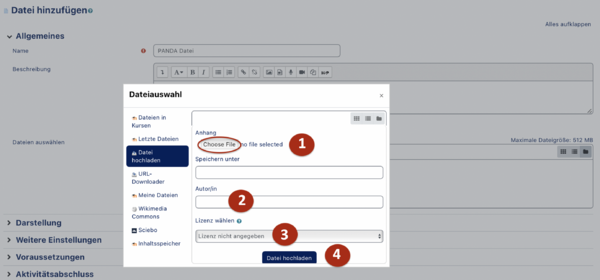
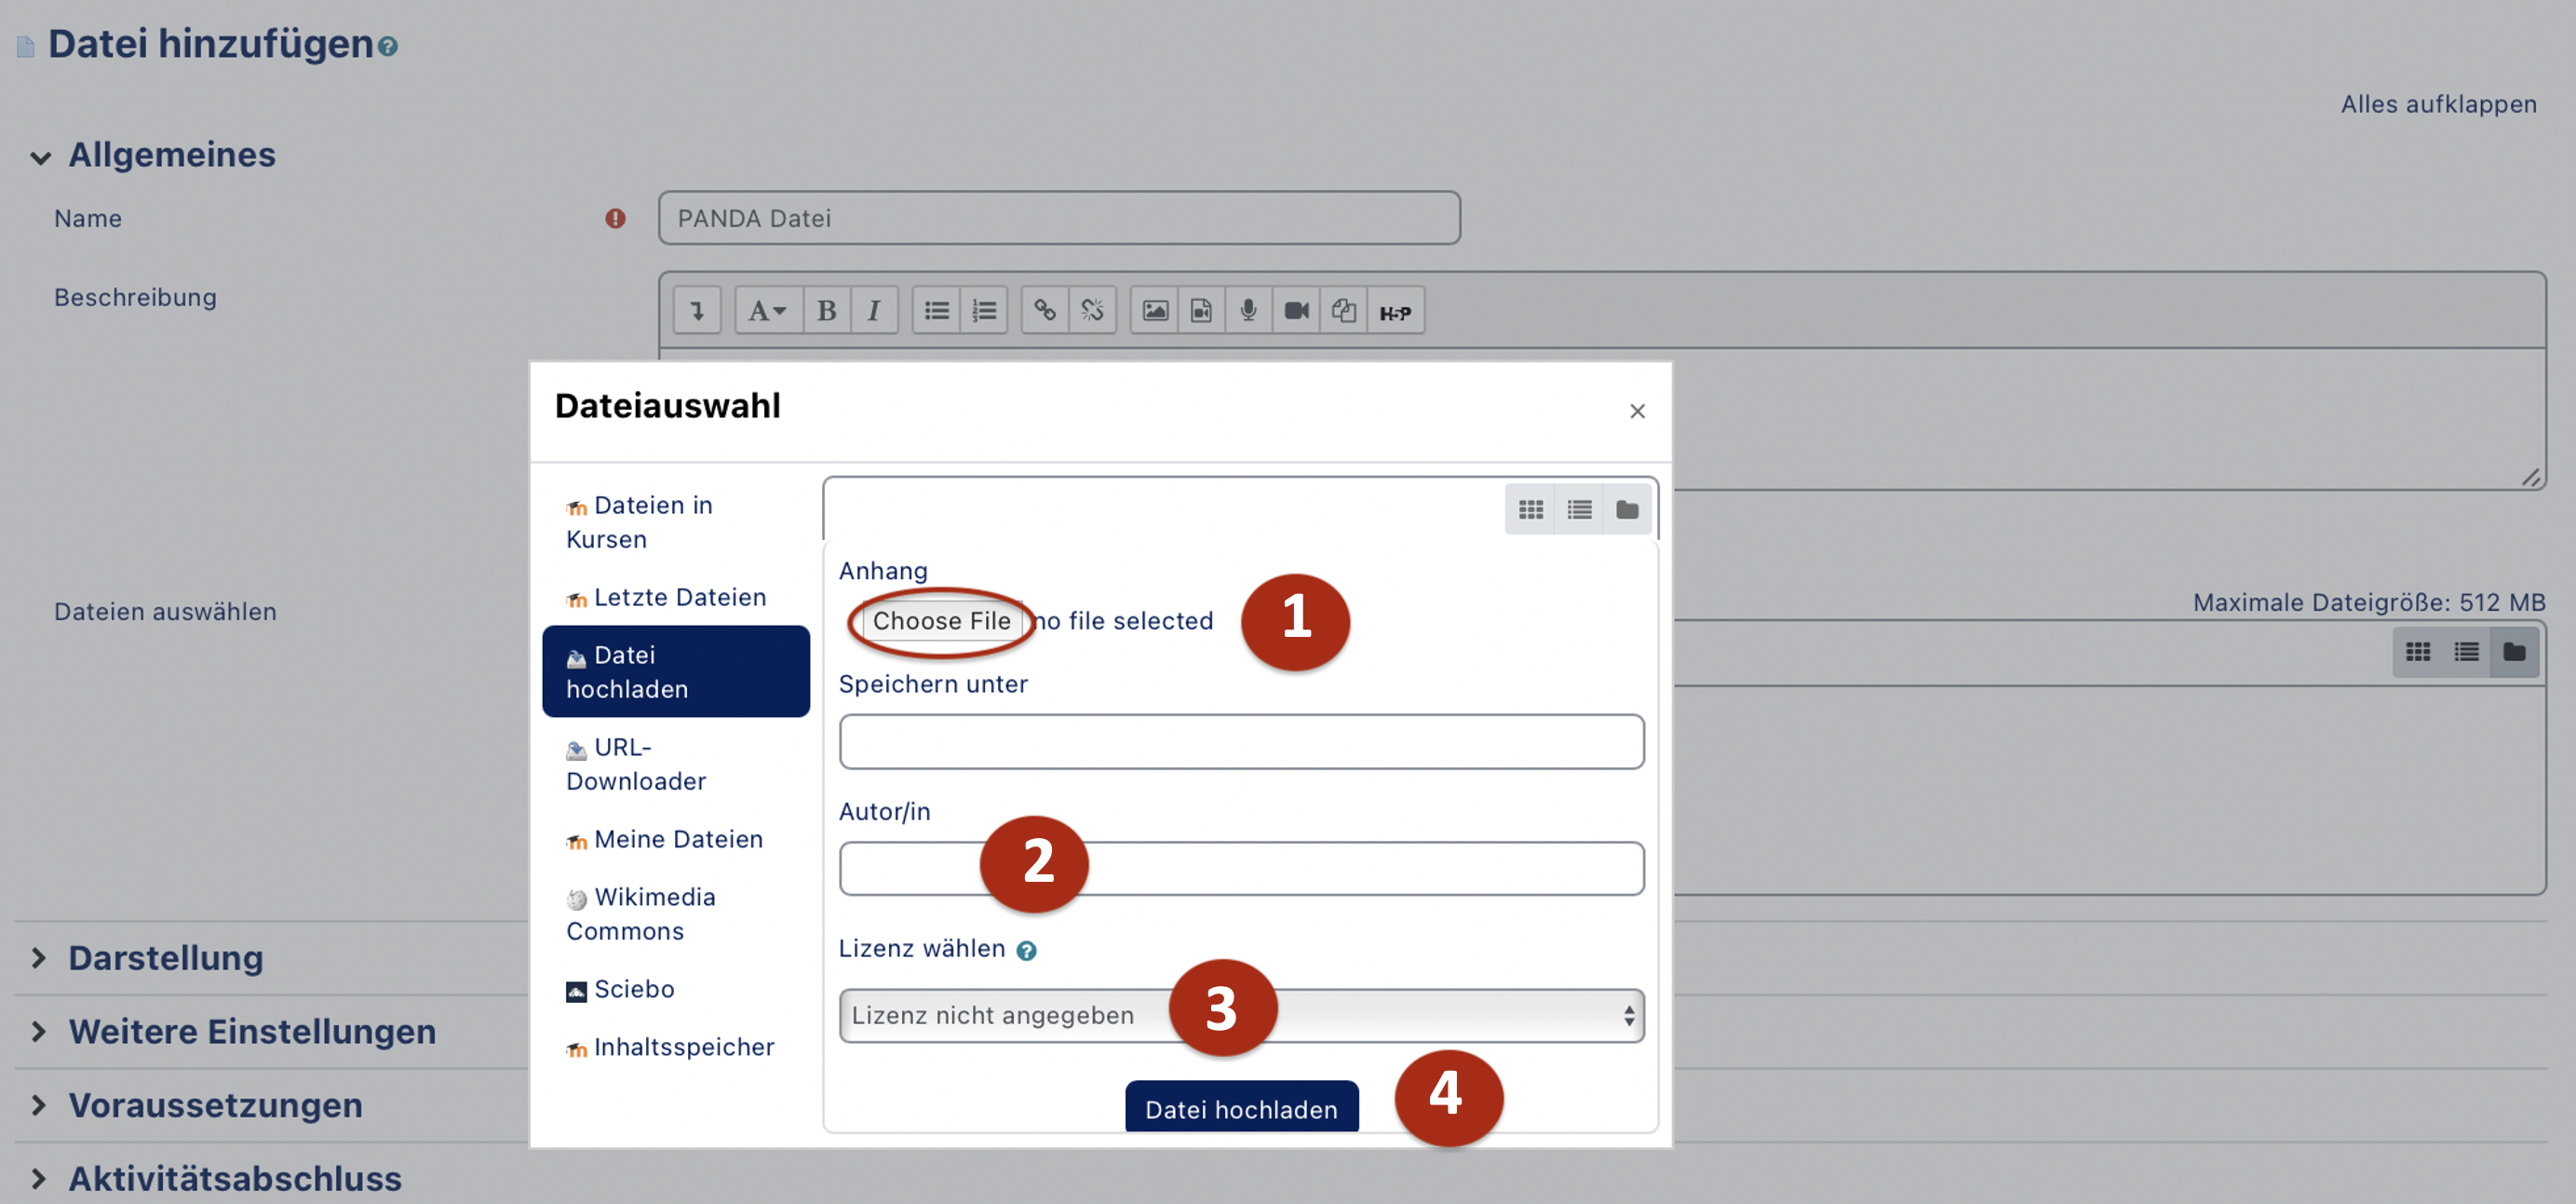
- (Figure 6): Clicking on the corresponding symbol (see (5) in Figure 5) opens the PANDA file selection and an upload area. Clicking on Select file (1) opens a corresponding upload window on the computer, where you can navigate until you find the file you want to upload. The Author of the file is automatically entered by PANDA as the logged in user (2), and under License (3) you should also specify whether the file was created by yourself, others have the rights to the file or the file is under a CC license.
By clicking on Upload file (4) the selected file will be uploaded and saved in your course.
Alternatively, you can also add the file via Drag and Drop, to do this, simply drag the file from your Windows Explorer with the right mouse button pressed into the "File insert field". This way of inserting the file is very fast, but you can't enter any information about the author and the license when inserting the file.
Topic overview - file representation/display[Bearbeiten | Quelltext bearbeiten]
If the file was added as in the example, it looks like this. Left screenshot with description displayed on the course page, right screenshot with description not displayed.
Configuration options[Bearbeiten | Quelltext bearbeiten]
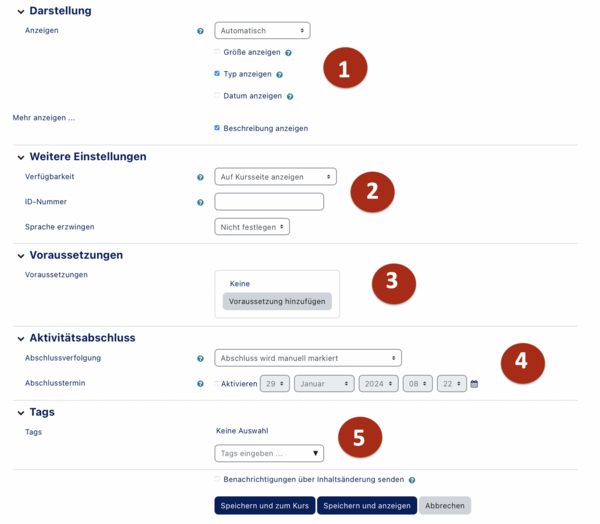
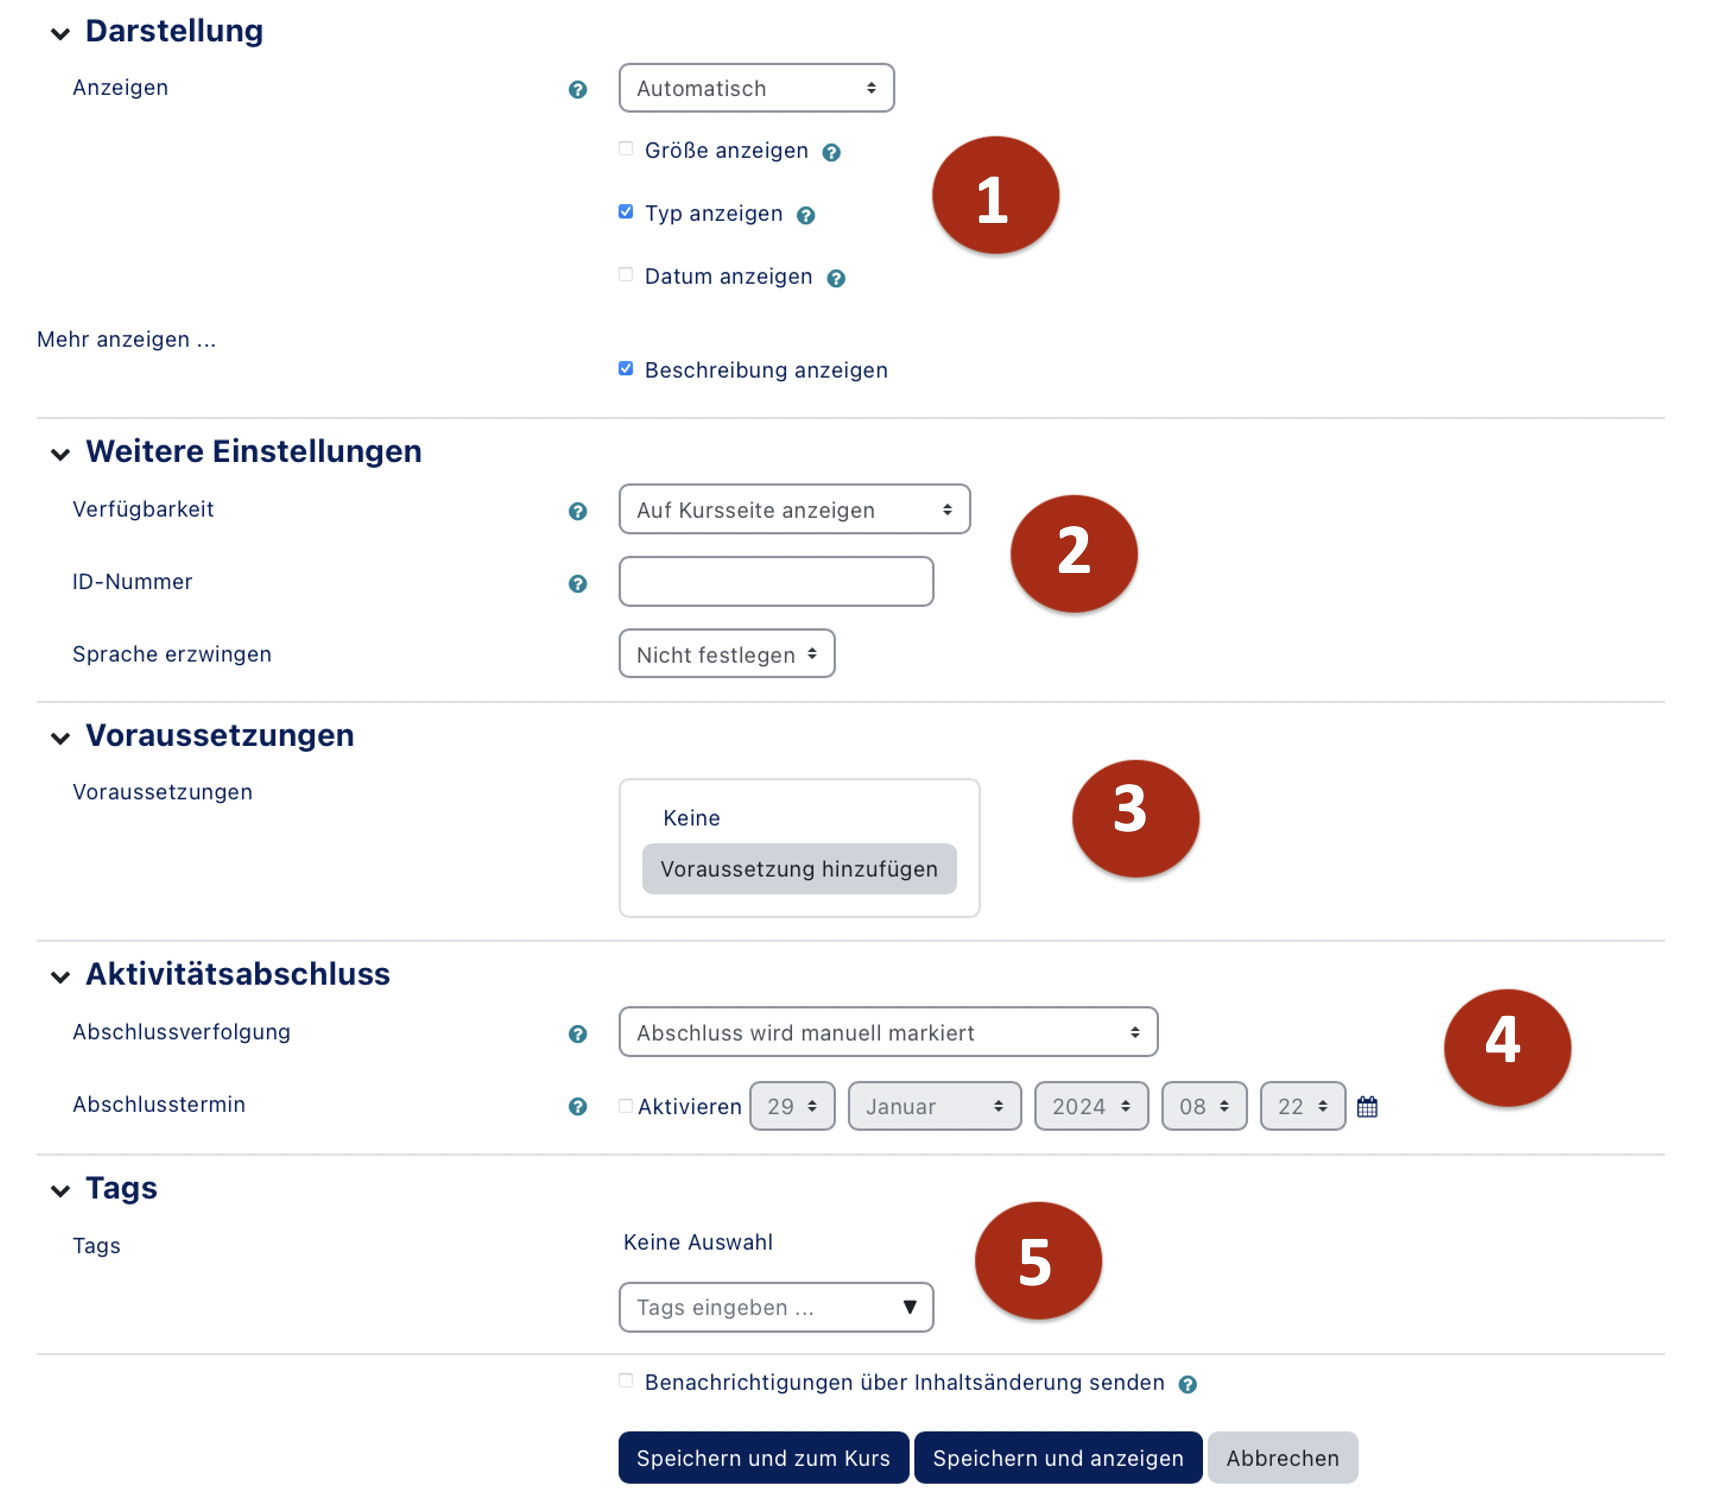
Add more configuration options at File. Under Expand all all setting options can be displayed. In our view, the options Display (1) and Requirements (3) are particularly relevant. For the sake of completeness, however, all settings are explained.
- Representation (1) - under Representation you can define how the file is to be displayed, e.g. on the course main page you can show which file type the file is, how big it is and when it was deposited in the course. Furthermore it can be determined whether the file is to be displayed or downloaded.
- Further Settings (2) - Here you can on the one hand set your visibility and on the other hand assign a PANDA-internal ID number that can be used for evaluations. Normally it is not necessary.
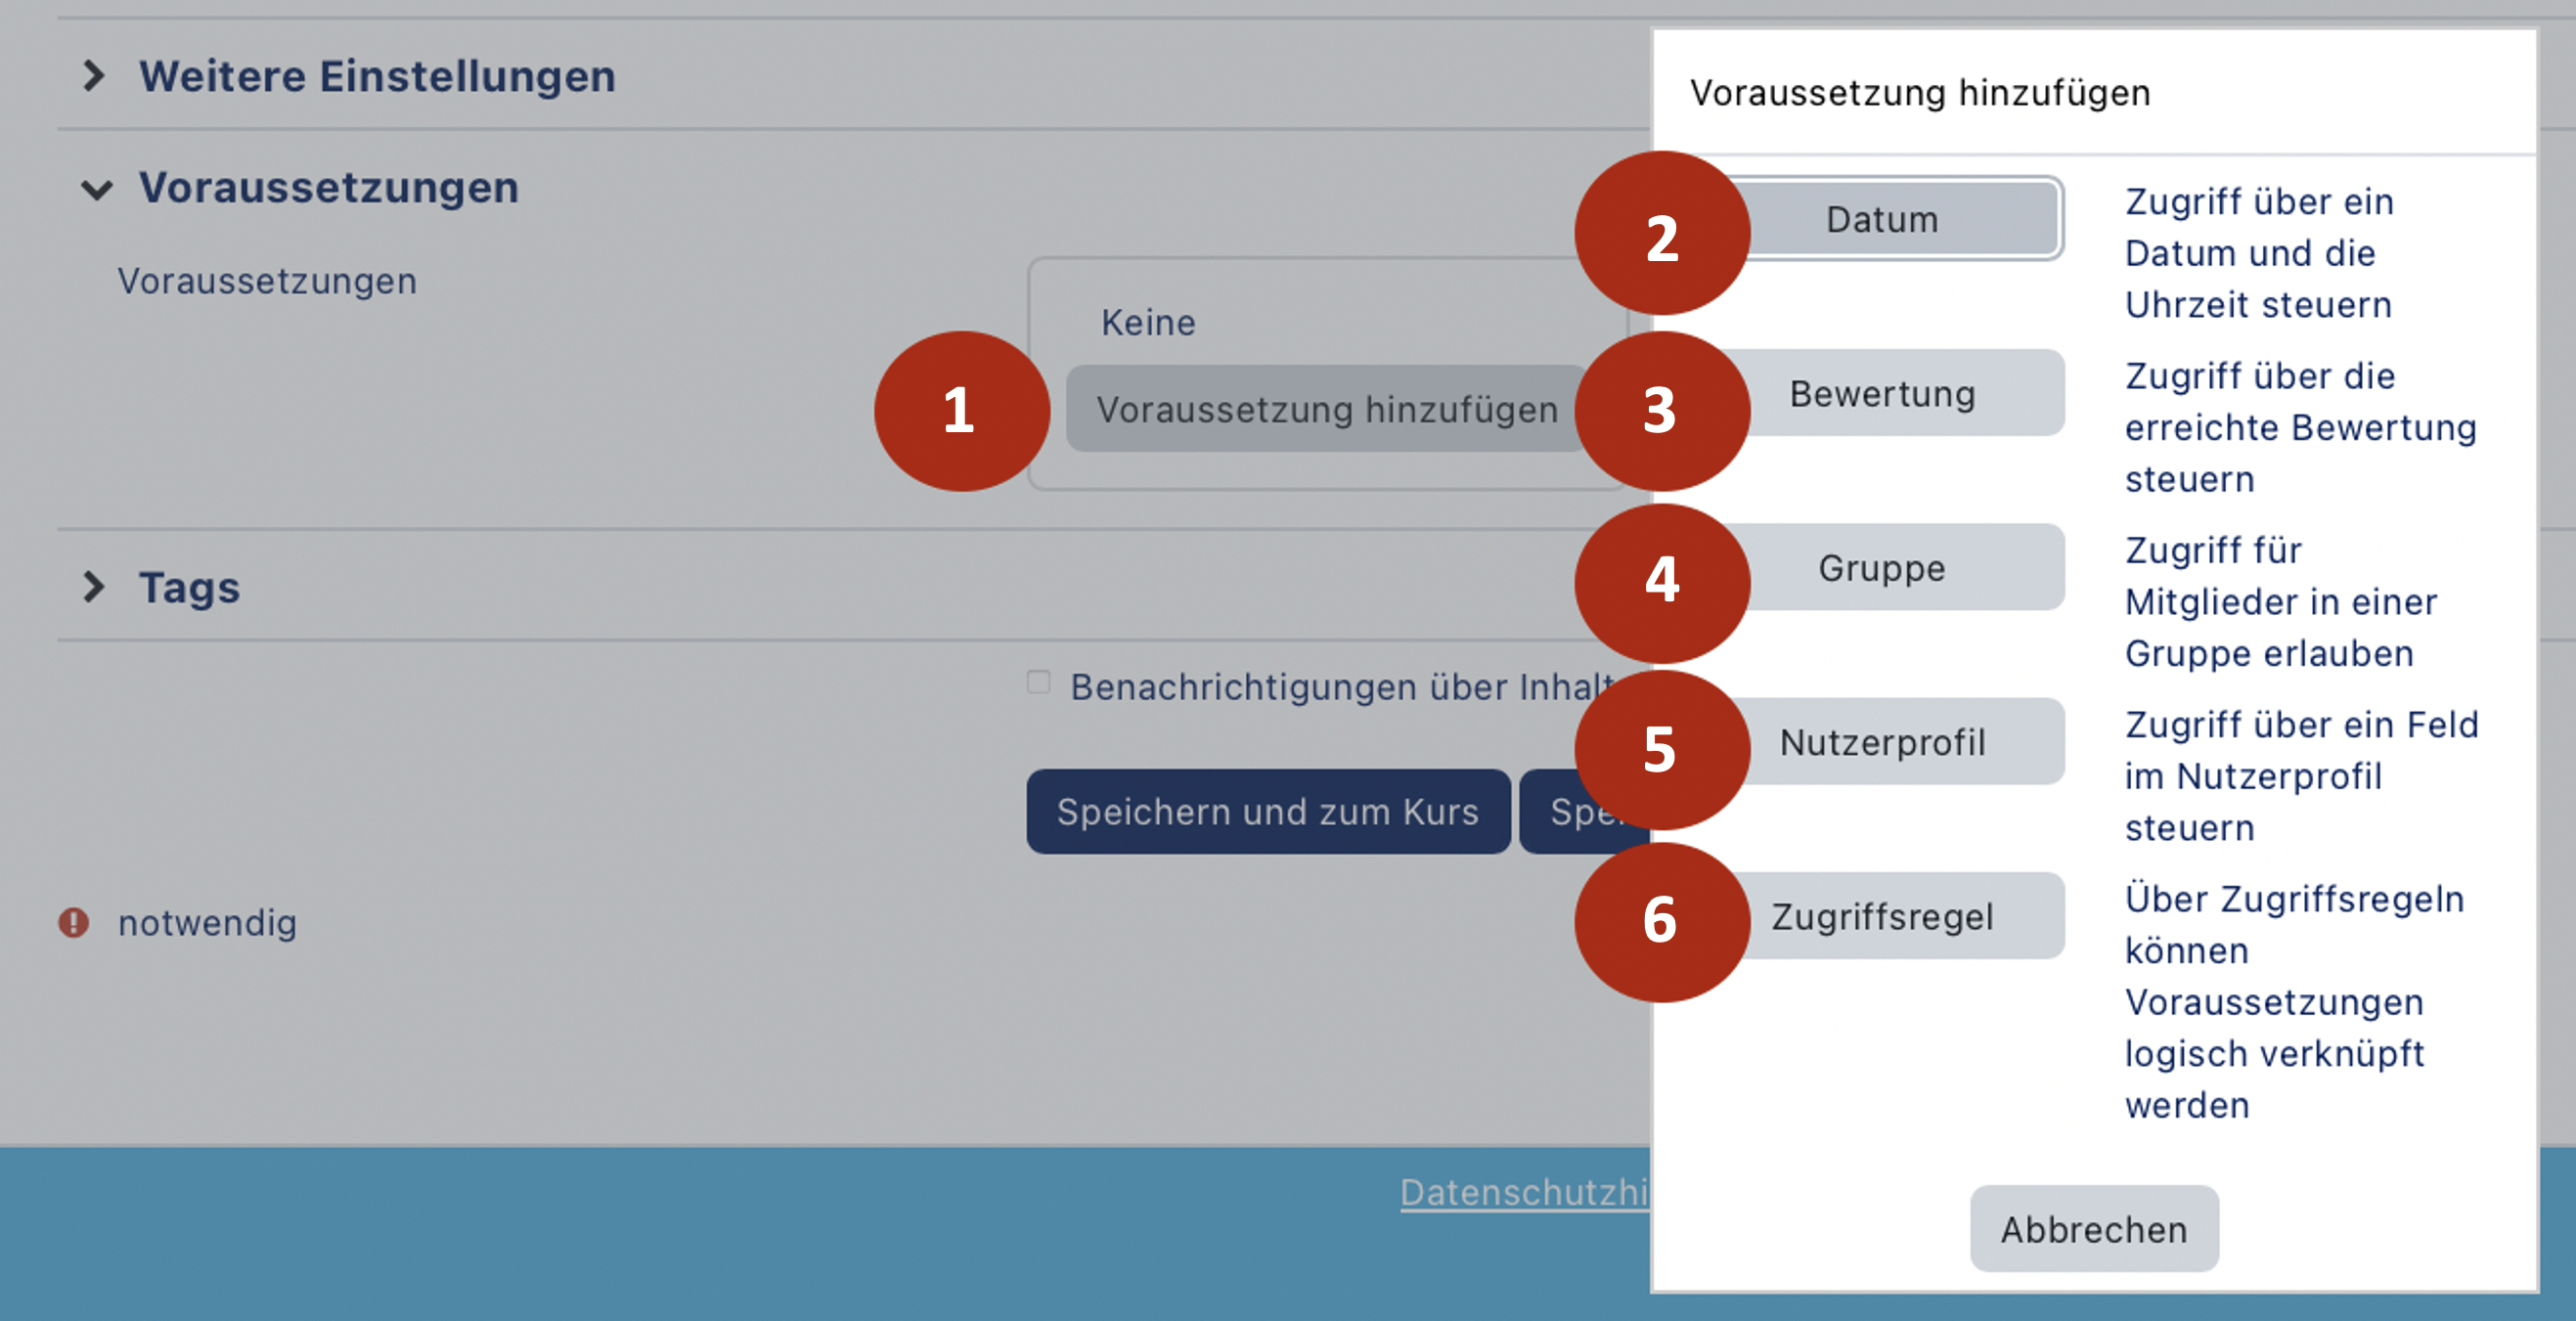
- Requirements (3) - under Requirements you can define when or for whom the object (material or activity) is visible.
- Keywords (4) - Here you can add keywords to the object under which users can find it, e.g. if the "keyword block" is activated in a course.
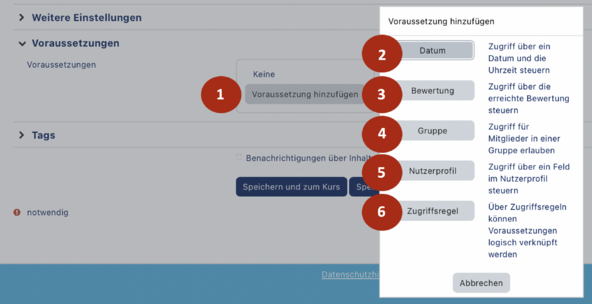
(Figure 10): To do this, click on Add requirement (1), whereupon a context menu opens.
- Under Date (2) you can set that the object is visible or hidden, e.g. from May 15th.
- You can use Assessment (3) to set that certain preliminary work must be done in PANDA, e.g. hand in a test at 80%, hand in a task so that the object is visible.
- Under Group (4) access can be allowed for members of a selected group.
- The User Profile (5) area cannot be used, since the PANDA user data does not contain any additional information, such as the course of study.
- Under Access Rules (6) different rules can be linked together.
Topic overview - Positioning/visibility[Bearbeiten | Quelltext bearbeiten]
Click "Edit (1)" next to the element you want to change. A context menu opens.
- Under Settings (1) you can change all the settings that were available when you created the object (material or activity).
- Move to the right (3) means that the object is displayed indented. In the screenshot this is the file with the course information.
- With Hide (4) you can switch off the visibility of the object for course participants. TIP: Under Preconditions Settings you can control visibility by date.
- With Duplicate (5) you can duplicate an object without having to reset all settings.
- With Assign roles (6) you can assign different rights for one object, e.g. you can give all / or some participants of your course in a directory lecturer rights so that they can upload and delete files there.
- With Delete (7) - you remove the object. Please note that PANDA does not occupy a Recycle Bin. This operation cannot be undone.
Video - Add materials[Bearbeiten | Quelltext bearbeiten]
