Important change
The VPN servers where changed over at the following times:
- UNI-VPN: 2 December 2025
- Selected group VPN: 3 December 2025
Please note the following:
- You need an up-to-date configuration file to connect to the VPN.
- Downloading and installing configuration files is explained in this article.
- A new network certificate is usually not required.
VPN (Virtual Private Network) is needed if you want to use services from outside Paderborn University that are only accessible within the university network. VPN guarantees secure access to the University network through other networks (dial-in via other providers, external company or university networks).
You need VPN if you[Bearbeiten | Quelltext bearbeiten]
- want to access licensed databases of the University Library,
- want to access a Network drive/ group storage
- use the green sockets within the university (these are only available via VPN for security reasons)
- use a license server of the university,
- want to access secured pages of the university,
- would like to work with the CMS TYPO3 from home.
You do not need VPN if you[Bearbeiten | Quelltext bearbeiten]
- want to read your e-mails on webmail,
- want to send e-mails via the ZIM mail server (see Mail).
- want to use BigBlueButton or other services for conferences.
Simultaneous connections[Bearbeiten | Quelltext bearbeiten]
🛈
Do you want to connect your laptop and your mobile phone to the VPN in addition to your PC? You can set up VPN connections on multiple devices. However, each person can only establish one connection per VPN at the same time.
What does that mean?
Uni-VPN
- If you use the Uni-VPN, you can only establish one connection at a time.
- You cannot establish a connection to the Uni-VPN on another device at the same time.
- You must disconnect the existing connection first.
Group VPN
- If you use a group VPN, you cannot establish a second VPN connection to this group VPN on another device at the same time.
- You must disconnect the existing connection first.
- However, you can establish a parallel connection to the Uni VPN or another group VPN on another device.
What needs to be done?[Bearbeiten | Quelltext bearbeiten]
- Install personal network certificate
- Install OpenVPN.
- Start OpenVPN
- Download configuration file:
Note: You can click on "Download" here and download your configuration file. This is not a screenshot ;-)
- Import configuration file
- Establish a VPN connection
Step-by-step instructions[Bearbeiten | Quelltext bearbeiten]
Install network certificate[Bearbeiten | Quelltext bearbeiten]
In order to use OpenVPN, a personal network certificate must be installed on your PC.
Are you already using the Eduroam WiFi network on this PC?
- Then you already have a personal network certificate. Skip this step.
Are you not using the Eduroam WiFi network on this PC yet?
Then click here for help with certificate installation.
Access using a browser, e.g. Firefox or Edge, go to the service portal and log in with your user name and password from your university account.
- Go to Benutzerverwaltung and then Netzwerkeinstellungen.
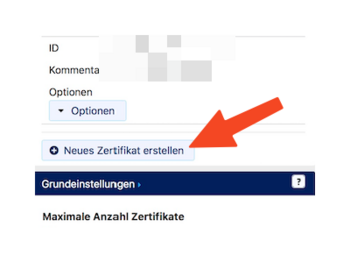
- Click Neues Zertifikat erstellen.
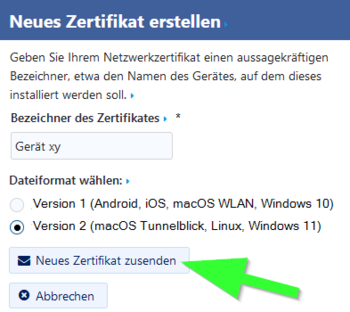
- Give the certificate a unique name (e.g.: cell phone)
- For Windows 11, select Version 2 as the file format.
- For older versions such as Windows 10 please use version 1.
- Then click on Neues Zertifikat zusenden.

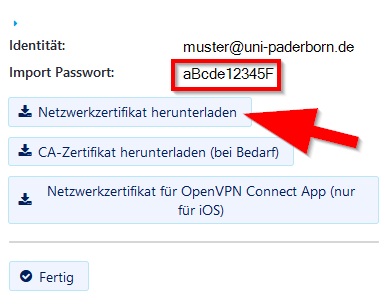
- A new network certificate has been created for you.
- First copy the Import Password to the clipboard.
- Now click on Download Network Certificate.
After saving it on the computer, the network certificate must be installed under the account that is to be used with Eduroam. Open the certificate with a double click. The certificate import wizard then starts automatically.
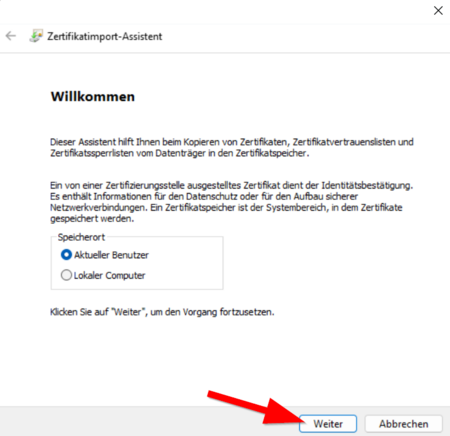
- Click on Continue.
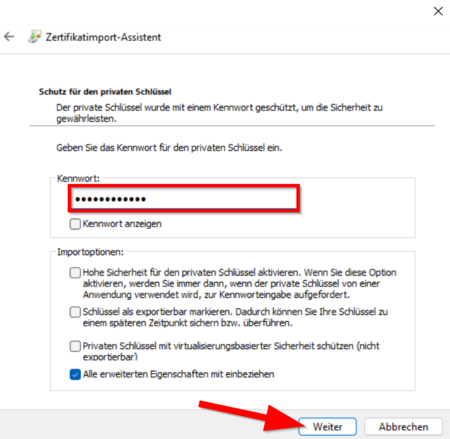
- Paste the import password that we just copied.
- Leave the default settings intact.
- Note: It is not allowed to tick "Activate high security for the private key". The Windows WLAN client currently does not support this function and therefore no connection to eduroam would be possible.
- Then click Next
- In the following window, if necessary, click on Next and finally on Finish.
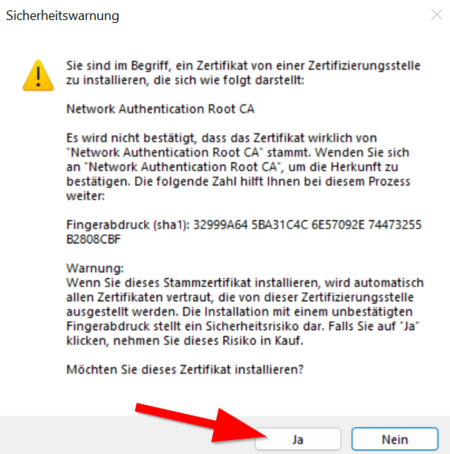
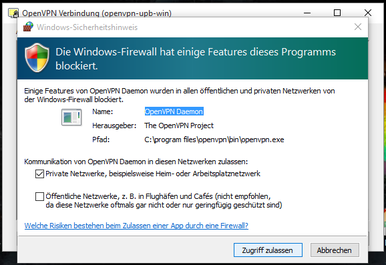
- If a security warning appears, click Yes.
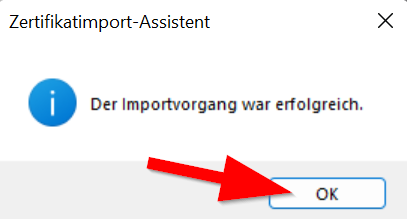
- Now click on "OK".
Note: Now open the same certificate again and install it a second time. This allows us to work around an error in the Windows certificate manager. Do not create a new certificate for this!
Note: Only one network certificate from the University of Paderborn may be installed. Multiple certificates can cause problems. More about this here.
Download OpenVPN[Bearbeiten | Quelltext bearbeiten]
Download the OpenVPN Open Source Community Edition from the following page:
- https://openvpn.net/community/
- OpenVPN is available for Windows in different versions.
- For most Windows devices, the 64-bit Intel/AMD version should be the right choice.
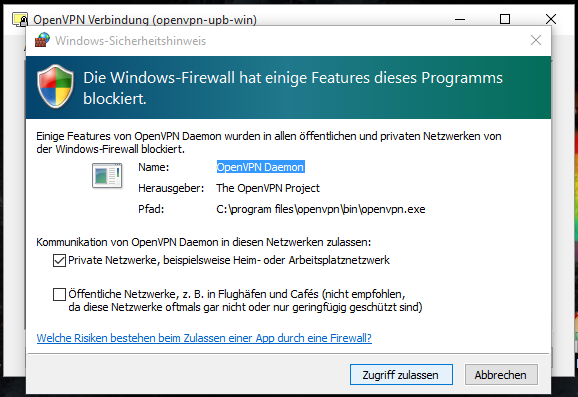
After successful installation, the new "OpenVPN GUI" icon will appear on your desktop.
 Step 8: The OpenVPN client is started using this symbol.
Download configuration file[Bearbeiten | Quelltext bearbeiten]
Download the configuration file, select the VPN you want to connect to in the box below and click on Download.
Normally "Uni-VPN (Standard)" should be the right choice, but if you have problems with the connection, try "Uni-VPN-TCP" instead.
Note: You can click "Download" here and download your configuration file. This is not a screenshot ;-)
Direct all internet traffic through the tunnel?
- Accessing online resources may require that you route all network traffic through the tunnel.
- You do not need this option to simply access the network drives.
Start OpenVPN[Bearbeiten | Quelltext bearbeiten]
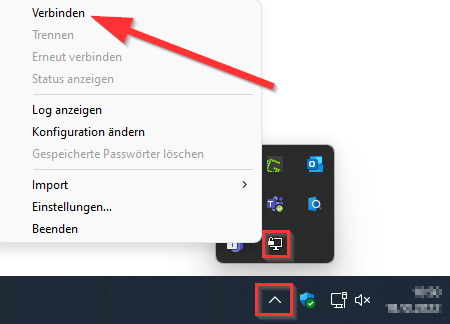
If OpenVPN is not already started (see tray icon), start it using the "OpenVPN GUI" icon on your desktop.
- The OpenVPN client is started via this symbol.
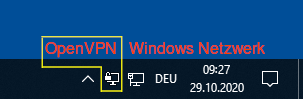
- An icon with a small lock will now appear at the bottom of the taskbar.
- Do not confuse it with the Windows network icon.
Load configuration[Bearbeiten | Quelltext bearbeiten]
Open the configuration file with a double click. Alternatively, you can also do the following:

- Right-click on the OpenVPN icon at the bottom right of the task bar.
- Then click Import File.
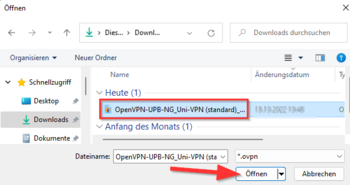
- Now open the configuration file - You have just downloaded it.
Establish connection[Bearbeiten | Quelltext bearbeiten]
Now we set up a VPN connection.

You can see the status of the VPN by the color of the symbol:
| No VPN connection active | |
| VPN connection is being established | |
| VPN connection active |
As soon as a green status is displayed, you are connected to the internal university network.
Disconnect[Bearbeiten | Quelltext bearbeiten]
Disconnect the VPN connection when you no longer need it.
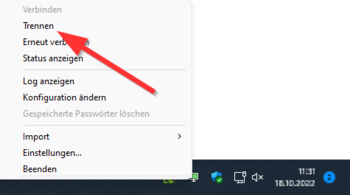
- Click on the OpenVPN icon.
- Click Disconnect.
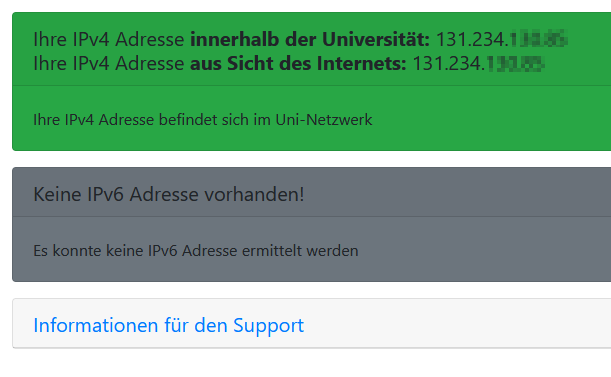
Check VPN[Bearbeiten | Quelltext bearbeiten]
You can check the functionality of the VPN by visiting:
Your IP will be displayed there and it will show whether you are in the university network.

Updating OpenVPN[Bearbeiten | Quelltext bearbeiten]
If you want to install a newer version of the OpenVPN client, proceed as follows:
- Download the latest Open Source Community Edition from the following page: https://openvpn.net/community/.
- If OpenVPN is currently active on your device, close the program. To do this, right-click on the OpenVPN icon and select "Exit OpenVPN".
- Then open the new version in your Downloads folder and run the installer. This will update OpenVPN.
Troubleshooting[Bearbeiten | Quelltext bearbeiten]
Red status messages[Bearbeiten | Quelltext bearbeiten]
There are some red status messages when connecting, but these are completely normal and do not represent a real problem. See:
VPN Declaration of Messages (Log)
Error messages[Bearbeiten | Quelltext bearbeiten]
Cannot load certificate
Error message:
Cannot load certificate "SUBJ:@uni-paderborn.de" from Microsoft Certificate Store
This can have two reasons:
- You do not have a certificate installed
- Install a network certificate (see above)
- You have installed too many network certificates
- Press "Win" + "R" to bring up the "Run" dialog.
- Type the following:
certmgr.msc
- Then click OK.
- Go to the My Certificates folder and then Certificates folder.
- There should only be one certificate with the identifier "username@uni-paderborn.de" in this folder.
- Further certificates with the identifier "username@uni-paderborn.de" should be deleted.
- If there are several, you can identify the active one by the serial number.
- Double click on the certificate, details, serial number.
- You can find the active certificates with the corresponding serial number in the service portal.
Private Key in legacy Store
On some systems, the personal user certificate must be installed twice. If you find the following error message in the log:
"WARNING: cryptoapicert: private key is in a legacy store. Restricting TLS version to 1.1"
Install your personal network certificate a second time. The error message should then disappear.
Group VPN ports are blocked - TLS Handshake failed after a timeout (60 sec)
Group VPN connections are established over specific UDP ports. Normally these port sharings are problem-free because they do not overlap with other protocols. However, if your Internet access is of a restrictive nature and only allows certain ports, a connection problem may arise. This affects some university institutions or company networks. Home networks generally do not have this.
Solution:
- change your location or network
- Release the required port or talk to the IT department whether this is possible
- You can find the port used for your group network within the config file.
- If it is the hpc-pc2 network, contact the PC2 for alternative SSH access
Configuration file[Bearbeiten | Quelltext bearbeiten]
Add configuration file manually
As an alternative to the "Import file" function, you can also import the configuration file "OpenVPN-UPB-NG_*.ovpn" directly into the folder
C:/Users/<username>/OpenVPN/config/
place.
You can also delete old configuration files there.
This directory may only be created when OpenVPN is started for the first time.
Files in this folder are only available to the current user account.
Note: Drive C: represents the drive with the Windows installation.
Alternatively, configuration files can also be stored in the program folder
C:\Program Files\OpenVPN\config
Here they are available to all users of the computer.
Various other topics[Bearbeiten | Quelltext bearbeiten]
Modify Configuration File
You can add any number of VPN connections via configuration files. To do this, follow the instructions in the #Load Configuration section.
Remove Configuration File
You can remove VPN connections that are no longer needed. To do this, you must delete the folder for the respective configuration file. Press the Windows key + R and enter the following path in the "Run" field:
%userprofile%\OpenVPN\config
Delete the folders for the VPN connections you want to remove. For the changes to take effect, OpenVPN must be closed and restarted.
Add configuration file manually
As an alternative to the "Import file" function, you can also place the configuration file directly in the configuration files folder. Press the Windows key + R and enter the following path in the "Run" field:
%userprofile%\OpenVPN\config
You can also delete old configuration files there.
This directory may only be created the first time you start OpenVPN.
Files in this folder are only available to the current user account.
Alternatively, configuration files can also be placed in the program folder:
C:\Program Files\OpenVPN\config
Here they are available to all users of the computer.
Delete Network Certificate
When installing a new network certificate, you should delete the old network certificate from your device to avoid problems.
- Press the Windows key + R to open the Run dialog box.
- Type the following:
certmgr.msc
- Then click OK.
- Navigate to the Personal Certificates folder and then to Certificates.
- This folder should contain only one certificate with the identifier username@uni-paderborn.de.
- Delete any other certificates with the identifier username@uni-paderborn.de.
- If multiple certificates are present, you can identify the active certificate by its serial number.
- * ... * Double-click the respective certificate to open the certificate information. The serial number can be found under "Details."
- Active certificates with their corresponding serial numbers can be found in the Service Portal.


