Jnk (Diskussion | Beiträge) (Änderung IMT auf ZIM) |
|||
| (Eine dazwischenliegende Version desselben Benutzers wird nicht angezeigt) | |||
| Zeile 7: | Zeile 7: | ||
<br clear=all> | <br clear=all> | ||
| − | ==== You need VPN | + | ==== You need VPN if you ==== |
* want to access licensed databases of the University Library, | * want to access licensed databases of the University Library, | ||
* want to access a [[Netzlaufwerk_einbinden_(Windows_10)|Network drive/ group storage]] | * want to access a [[Netzlaufwerk_einbinden_(Windows_10)|Network drive/ group storage]] | ||
| Zeile 16: | Zeile 16: | ||
<br clear=all> | <br clear=all> | ||
| − | ==== You do not need VPN | + | ==== You do <span style="color:red">not</span> need VPN if you ==== |
* want to read your e-mails on webmail, | * want to read your e-mails on webmail, | ||
* want to send e-mails via the ZIM mail server (see [[Mail]]). | * want to send e-mails via the ZIM mail server (see [[Mail]]). | ||
| Zeile 22: | Zeile 22: | ||
== What needs to be done? == | == What needs to be done? == | ||
| − | * | + | * Install personal network certificate |
* Install [https://openvpn.net/community-downloads/ OpenVPN]. | * Install [https://openvpn.net/community-downloads/ OpenVPN]. | ||
| − | * | + | * Start OpenVPN |
| − | + | *Download configuration file: | |
| − | * | ||
| − | |||
| − | |||
| − | == | + | <span style="color:green"> Note:</span> You can click on "Download" here and download your configuration file. This is not a screenshot ;-) |
| − | + | <center><iframe key="infoboard" width="600" height="330" path="vpn-config/index.php?group=uni&os=win&redirect_gateway=1" /></center> | |
| + | * Import configuration file | ||
| + | * Establish a VPN connection | ||
| − | + | ==Step-by-step instructions== | |
| − | |||
| − | |||
| − | |||
| − | |||
| − | |||
| − | |||
| − | |||
| − | |||
| − | |||
| − | |||
| − | |||
| − | |||
| + | ===Install network certificate=== | ||
| + | In order to use OpenVPN, a personal network certificate must be installed on your PC. | ||
| + | <br> | ||
<br clear=all> | <br clear=all> | ||
| − | + | '''Are you already using the Eduroam WiFi network on this PC?''' | |
| − | + | * Then you already have a personal network certificate. Skip this step. | |
| − | |||
| − | |||
| − | |||
| − | |||
| − | |||
| − | |||
| − | |||
| − | |||
| − | |||
| − | |||
| − | |||
| − | |||
| − | |||
| − | |||
| − | |||
| − | |||
| − | |||
| − | |||
| − | |||
| − | |||
| − | |||
| − | |||
| − | |||
| − | |||
| − | |||
<br clear=all> | <br clear=all> | ||
| − | + | '''Are you not using the Eduroam WiFi network on this PC yet?''' | |
| − | + | <bootstrap_accordion> | |
| − | + | <bootstrap_panel heading="Then click here for help with certificate installation."> | |
| − | + | Access using a browser, e.g. Firefox or Edge, go to the [http://sp.upb.de service portal] and log in with your user name and password from your university account. | |
| − | < | + | * Go to '''Benutzerverwaltung''' and then '''Netzwerkeinstellungen'''. |
| − | |||
| − | |||
| − | |||
<br clear=all> | <br clear=all> | ||
| − | + | [[Datei:Eduroam-unter-android-4.png|links|mini|ohne|350px]] | |
| − | + | <br> | |
| − | + | * Click '''Neues Zertifikat erstellen'''. | |
<br clear=all> | <br clear=all> | ||
| − | + | [[Datei:Netzwerkzertifikat-container-v2.png|links|mini|ohne|350px]] | |
| − | + | <br> | |
| + | * Give the certificate a unique name (e.g.: cell phone) | ||
| + | * For Windows 11, select '''Version 2''' as the file format. | ||
| + | * For older versions such as Windows 10 please use '''version 1'''. | ||
| + | * Then click on '''Neues Zertifikat zusenden'''. | ||
<br clear=all> | <br clear=all> | ||
| − | + | [[Datei:Netzwerkzertifikat-download.png|links|mini|ohne|350px]] | |
| − | + | <br> | |
| − | + | * A new network certificate has been created for you. | |
| − | + | * First copy the '''Import Password''' to the clipboard. | |
| − | + | * Now click on ''''Download Network Certificate'''. | |
| − | [[Datei: | ||
| − | |||
<br clear=all> | <br clear=all> | ||
Version vom 6. Juli 2024, 23:59 Uhr
VPN (Virtual Private Network) is needed if you want to use services from outside the University of Paderborn that are only accessible within the university network. VPN guarantees secure access to the University network through other networks (dial-in via other providers, external company or university networks).
You need VPN if you[Bearbeiten | Quelltext bearbeiten]
- want to access licensed databases of the University Library,
- want to access a Network drive/ group storage
- use the green sockets within the university (these are only available via VPN for security reasons)
- use a license server of the university,
- want to access secured pages of the university,
- would like to work with the CMS TYPO3 from home.
You do not need VPN if you[Bearbeiten | Quelltext bearbeiten]
- want to read your e-mails on webmail,
- want to send e-mails via the ZIM mail server (see Mail).
What needs to be done?[Bearbeiten | Quelltext bearbeiten]
- Install personal network certificate
- Install OpenVPN.
- Start OpenVPN
- Download configuration file:
Note: You can click on "Download" here and download your configuration file. This is not a screenshot ;-)
- Import configuration file
- Establish a VPN connection
Step-by-step instructions[Bearbeiten | Quelltext bearbeiten]
Install network certificate[Bearbeiten | Quelltext bearbeiten]
In order to use OpenVPN, a personal network certificate must be installed on your PC.
Are you already using the Eduroam WiFi network on this PC?
- Then you already have a personal network certificate. Skip this step.
Are you not using the Eduroam WiFi network on this PC yet?
<bootstrap_accordion>
<bootstrap_panel heading="Then click here for help with certificate installation.">
Access using a browser, e.g. Firefox or Edge, go to the service portal and log in with your user name and password from your university account.
- Go to Benutzerverwaltung and then Netzwerkeinstellungen.
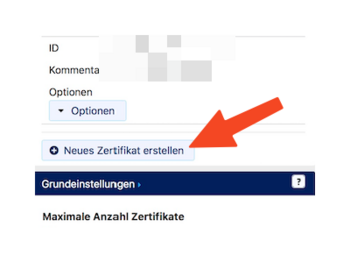
- Click Neues Zertifikat erstellen.
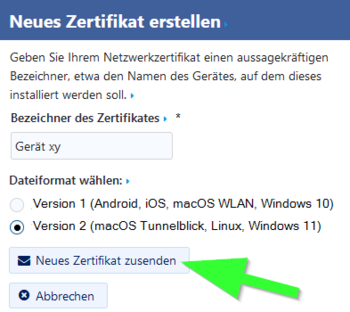
- Give the certificate a unique name (e.g.: cell phone)
- For Windows 11, select Version 2 as the file format.
- For older versions such as Windows 10 please use version 1.
- Then click on Neues Zertifikat zusenden.

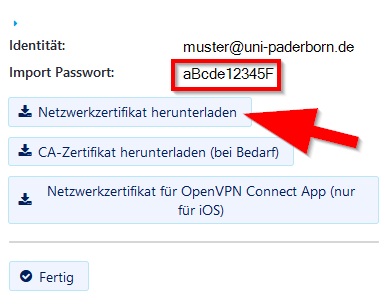
- A new network certificate has been created for you.
- First copy the Import Password to the clipboard.
- Now click on 'Download Network Certificate.

