| (Eine dazwischenliegende Version desselben Benutzers wird nicht angezeigt) | |||
| Zeile 11: | Zeile 11: | ||
You need VPN (Virtual Private Network) if you want to use services from outside the University of Paderborn that are only accessible within the university network. VPN ensures secure access to the university network from external networks (dial-in via other providers, external company or university networks). | You need VPN (Virtual Private Network) if you want to use services from outside the University of Paderborn that are only accessible within the university network. VPN ensures secure access to the university network from external networks (dial-in via other providers, external company or university networks). | ||
<br clear=all> | <br clear=all> | ||
| − | |||
== What needs to be done? - Quick guide == | == What needs to be done? - Quick guide == | ||
| − | |||
| − | |||
| − | |||
| − | |||
| − | |||
| − | |||
| − | |||
| − | |||
| − | |||
| − | |||
| − | |||
| − | |||
| − | |||
| − | |||
| − | |||
| − | |||
| − | |||
| − | |||
| − | |||
| − | |||
| − | |||
| − | |||
| − | |||
| − | |||
| − | |||
| − | |||
# Install Tunnelblick in the latest stable version. [https://tunnelblick.net/downloads.html Tunnelblick] | # Install Tunnelblick in the latest stable version. [https://tunnelblick.net/downloads.html Tunnelblick] | ||
# Generate your '''personal network certificate''' in the [https://serviceportal.uni-paderborn.de/web/portal/willkommen service portal]. | # Generate your '''personal network certificate''' in the [https://serviceportal.uni-paderborn.de/web/portal/willkommen service portal]. | ||
| Zeile 56: | Zeile 29: | ||
| − | == Step by step instructions: Preparation == | + | == Step-by-step instructions: Preparation == |
=== Install Tunnelblick === | === Install Tunnelblick === | ||
| − | [[ | + | [[Datei:Tunnelblick Download.png|links|mini|531x531px]] |
<br> | <br> | ||
* Install [https://tunnelblick.net/downloads.html Tunnelblick] in the latest stable version. | * Install [https://tunnelblick.net/downloads.html Tunnelblick] in the latest stable version. | ||
| Zeile 71: | Zeile 44: | ||
* https://serviceportal.uni-paderborn.de | * https://serviceportal.uni-paderborn.de | ||
* Log in with your university account. | * Log in with your university account. | ||
| − | * Then click on ''' | + | * Then click on '''Netzwerkeinstellungen''' under '''Benutzerverwaltung''' in the top menu. |
<br clear=all> | <br clear=all> | ||
| − | [[ | + | [[Datei:Eduroam-unter-android-4.png|links|mini|ohne|350px]] |
<br> | <br> | ||
| − | * Click ''' | + | * Click '''"Neues Zertifikat erstellen"'''. |
<br clear=all> | <br clear=all> | ||
| − | [[ | + | [[Datei:Netzwerkzertifikat-container-v2.png|links|mini|ohne|350px]] |
<br> | <br> | ||
| − | * Give the certificate a unique name ( | + | * Give the certificate a unique name (Example: MacBook VPN) |
* Select '''<span style="color:red">Version 2</span>''' as the file format! | * Select '''<span style="color:red">Version 2</span>''' as the file format! | ||
| − | * Then click on ''' | + | * Then click on '''"Neues Zertifikat zusenden"'''. |
<br clear=all> | <br clear=all> | ||
| − | [[ | + | [[Datei:Netzwerkzertifikat-download.png|links|mini|ohne|350px]] |
<br> | <br> | ||
* A new network certificate has been created for you. | * A new network certificate has been created for you. | ||
* First copy the '''Import Password''' to the clipboard. | * First copy the '''Import Password''' to the clipboard. | ||
| − | * Now click on ''' | + | * Now click on '''"Download Network Certificate"'''. |
<br clear=all> | <br clear=all> | ||
You have now downloaded your personal network certificates. | You have now downloaded your personal network certificates. | ||
| − | ==Set up | + | ==Set up Tunnelblick == |
Download the configuration file, select the VPN you want to connect to and click Download. | Download the configuration file, select the VPN you want to connect to and click Download. | ||
| − | Normally, "'''Uni-VPN (Standard)'''" should be the right choice, but if you have problems with the connection, try "Uni-VPN-TCP" | + | Normally, "'''Uni-VPN (Standard)'''" should be the right choice, but if you have problems with the connection, try "Uni-VPN-TCP" instead. |
<center><iframe key="infoboard" width="600" height="330" path="vpn-config/index.php?group=uni&os=mac&redirect_gateway=1" /></center> | <center><iframe key="infoboard" width="600" height="330" path="vpn-config/index.php?group=uni&os=mac&redirect_gateway=1" /></center> | ||
<br clear=all> | <br clear=all> | ||
| Zeile 109: | Zeile 82: | ||
</bootstrap_accordion> | </bootstrap_accordion> | ||
| − | [[ | + | [[Datei:VPN Ordner.png|links|mini|ohne|350px|create folder]] |
<br> | <br> | ||
* Create a new folder - For example, name it ''"vpn-upb"''. | * Create a new folder - For example, name it ''"vpn-upb"''. | ||
| Zeile 130: | Zeile 103: | ||
</bootstrap_accordion> | </bootstrap_accordion> | ||
| − | [[ | + | [[Datei:VPN Suffix.png|links|mini|ohne|350px|rename folder]] |
<br> | <br> | ||
* Now rename the folder and add the file extension <code>.tblk</code> to it. | * Now rename the folder and add the file extension <code>.tblk</code> to it. | ||
| Zeile 136: | Zeile 109: | ||
<br clear=all> | <br clear=all> | ||
| − | [[ | + | [[Datei:Vpn-unter-macos-12.png|links|mini|ohne|350px|add suffix]] |
<br> | <br> | ||
* You must now confirm the change. | * You must now confirm the change. | ||
| Zeile 142: | Zeile 115: | ||
<br clear=all> | <br clear=all> | ||
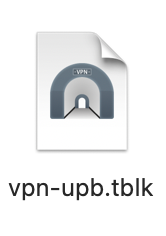
| − | [[ | + | [[Datei:VPN tblk.png|links|mini|ohne|150px|Install configuration]] |
<br> | <br> | ||
* You have now created a configuration for Tunnelblick - This now needs to be installed. | * You have now created a configuration for Tunnelblick - This now needs to be installed. | ||
| Zeile 148: | Zeile 121: | ||
<br clear=all> | <br clear=all> | ||
| − | [[ | + | [[Datei:Vpn-unter-macos-13.png|links|mini|ohne|350px|Install configuration for this user]] |
<br> | <br> | ||
* You will be asked which user you want to install the configuration for. | * You will be asked which user you want to install the configuration for. | ||
| − | * Select ''' | + | * Select '''"Only for this user"'''. |
<br clear=all> | <br clear=all> | ||
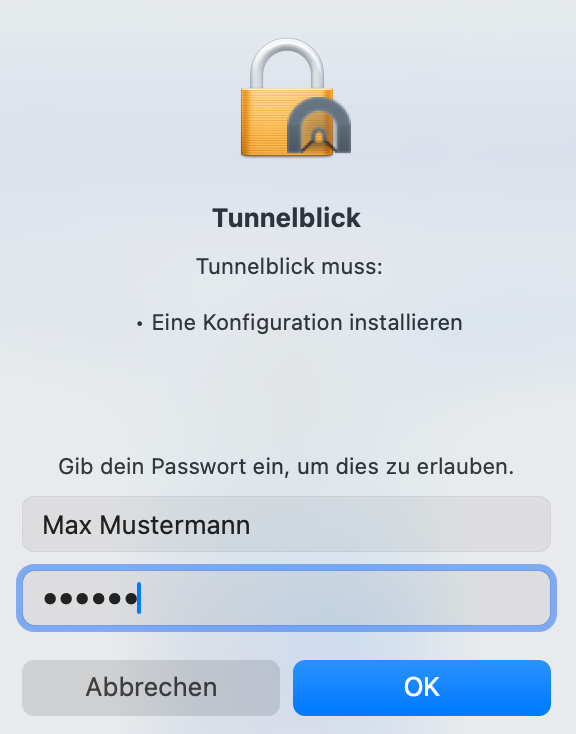
| − | [[ | + | [[Datei:VPN Konfiguration.png|links|mini|ohne|250px|enter Mac password]] |
<br> | <br> | ||
* You will be prompted to enter your Mac password to install the configuration. | * You will be prompted to enter your Mac password to install the configuration. | ||
<br clear=all> | <br clear=all> | ||
| − | [[ | + | [[Datei:VPN verbinden.png|links|mini|ohne|450px]] |
<br> | <br> | ||
* Now click on the '''tunnel vision symbol''' in the menu bar at the top. | * Now click on the '''tunnel vision symbol''' in the menu bar at the top. | ||
| Zeile 167: | Zeile 140: | ||
<br clear=all> | <br clear=all> | ||
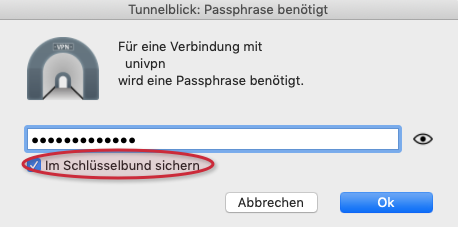
| − | [[ | + | [[Datei:VPN Passwort.png|links|mini|ohne|450px]] |
<br> | <br> | ||
* In the next step you will be asked to enter a password. Enter the '''import password''' mentioned above that belongs to the certificate. | * In the next step you will be asked to enter a password. Enter the '''import password''' mentioned above that belongs to the certificate. | ||
| − | * In addition, be sure to select the ''' | + | * In addition, be sure to select the '''"Save to Keychain"''' option so that the password is saved (otherwise you will have to keep re-entering the import password). |
<br clear=all> | <br clear=all> | ||
| − | [[ | + | [[Datei:VPN verbunden.png|links|mini|ohne|450px]] |
<br> | <br> | ||
* Wait until the font turns ''green'' and you are ''connected''. | * Wait until the font turns ''green'' and you are ''connected''. | ||
| Zeile 189: | Zeile 162: | ||
[[File:Vpn-under-macos-09.png|left|mini|without|450px]] | [[File:Vpn-under-macos-09.png|left|mini|without|450px]] | ||
<br> | <br> | ||
| − | * Click | + | * Click '''Cancel'''. |
<br clear=all> | <br clear=all> | ||
| Zeile 195: | Zeile 168: | ||
<br> | <br> | ||
* Click on the '''tunnel vision icon''' in the menu bar. | * Click on the '''tunnel vision icon''' in the menu bar. | ||
| − | * Then click on | + | * Then click on '''VPN Details'''. |
<br clear=all> | <br clear=all> | ||
| Zeile 202: | Zeile 175: | ||
# Click '''"Configuration"''' in the top bar. | # Click '''"Configuration"''' in the top bar. | ||
# Select your VPN configuration on the left side. | # Select your VPN configuration on the left side. | ||
| − | # Click on the | + | # Click on the '''Settings''' tab. |
# Select the following setting: | # Select the following setting: | ||
#* OpenVPN Version: '''2.6.9 - OpenSSL v1.1.1w''' | #* OpenVPN Version: '''2.6.9 - OpenSSL v1.1.1w''' | ||
| Zeile 331: | Zeile 304: | ||
</bootstrap_accordion> | </bootstrap_accordion> | ||
| − | == | + | ==Common Issues== |
===Configuration file not readable=== | ===Configuration file not readable=== | ||
When downloading, the '''.ovpn file''' may be turned into a '''.txt file'''.<br> | When downloading, the '''.ovpn file''' may be turned into a '''.txt file'''.<br> | ||
| Zeile 380: | Zeile 353: | ||
==See also== | ==See also== | ||
| − | * [[ | + | * [[Netzwerk]] |
| − | * [[VPN | + | * [[VPN Problembehandlung]] |
Aktuelle Version vom 7. Juli 2024, 12:56 Uhr
Use Tunnelblick version 4.0.1 or newer. There is no longer any need to downgrade the OpenSSL version. Those who have set OpenSSL to version 1.1.1w as a temporary solution should create a new VPN connection for Tunnelblick with a new certificate and a new configuration file following these instructions. To do this, start at step Generate network certificate.
You need VPN (Virtual Private Network) if you want to use services from outside the University of Paderborn that are only accessible within the university network. VPN ensures secure access to the university network from external networks (dial-in via other providers, external company or university networks).
What needs to be done? - Quick guide[Bearbeiten | Quelltext bearbeiten]
- Install Tunnelblick in the latest stable version. Tunnelblick
- Generate your personal network certificate in the service portal.
- Download the configuration file
- Click on Download in the selection menu above!
- Create a new folder on your desktop that you name with the name you want your connection to have, for example “VPN Uni”.
- Put your personal network certificate and configuration file in the folder created earlier.
- Delete the serial number in the filename from your network certificate so that e.g. Network_Certificate_<username>_******.p12 -> Network_Certificate.p12 becomes.
- Add the file extension .tblk to this folder by selecting the folder, pressing cmd + i and under "Name & Suffix" e.g. from VPN Uni VPN Uni. tblk do.
- Now you can double-click the file created from the folder and install the connection.
- You will be asked to enter your Mac password to allow configuration.
- Now click on the Tunnelblick symbol at the top of the menu bar and select your connection, which is now called the same as your folder before. Enter the import password, which you can find in the service portal under Network Settings. Select the option to save the password in the keychain.
- Wait until the font turns green. You are now connected.
Step-by-step instructions: Preparation[Bearbeiten | Quelltext bearbeiten]
Install Tunnelblick[Bearbeiten | Quelltext bearbeiten]
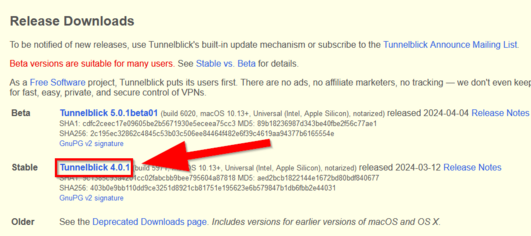
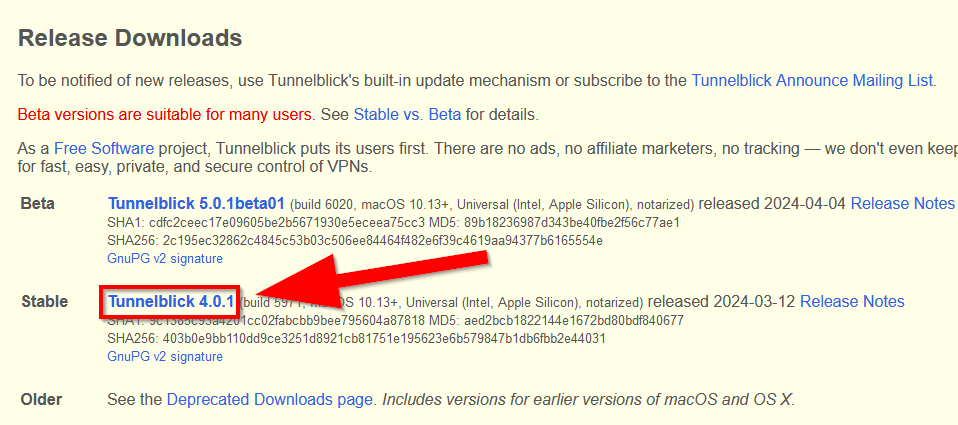
- Install Tunnelblick in the latest stable version.
- To do this, click on the link provided and then on the version marked "Stable".
- Then open your downloads and then double-click on the Tunnelblick download. Tunnelblick now installs itself.
Generate network certificate[Bearbeiten | Quelltext bearbeiten]
You need a network certificate for the VPN connection.
Access the service portal:
- https://serviceportal.uni-paderborn.de
- Log in with your university account.
- Then click on Netzwerkeinstellungen under Benutzerverwaltung in the top menu.
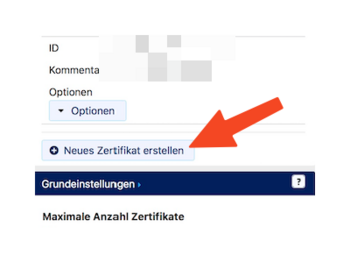
- Click "Neues Zertifikat erstellen".
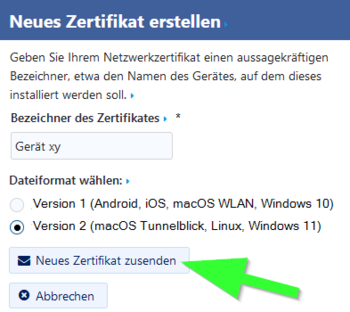
- Give the certificate a unique name (Example: MacBook VPN)
- Select Version 2 as the file format!
- Then click on "Neues Zertifikat zusenden".

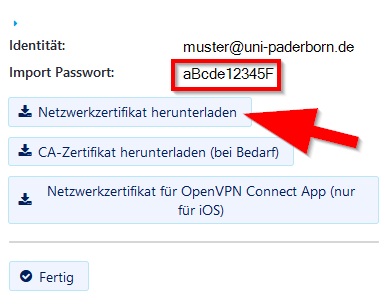
- A new network certificate has been created for you.
- First copy the Import Password to the clipboard.
- Now click on "Download Network Certificate".
You have now downloaded your personal network certificates.
Set up Tunnelblick[Bearbeiten | Quelltext bearbeiten]
Download the configuration file, select the VPN you want to connect to and click Download. Normally, "Uni-VPN (Standard)" should be the right choice, but if you have problems with the connection, try "Uni-VPN-TCP" instead.
Note: You can click "Download" here and download your configuration file. This is not a screenshot ;-)
Direct all internet traffic through the tunnel?
- Accessing online resources may require that you route all network traffic through the tunnel.
- You do not need this option to simply access the network drives.
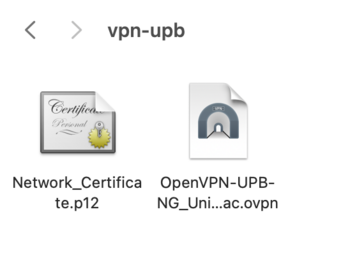
- Create a new folder - For example, name it "vpn-upb".
- This is what your VPN connection will be called later.
- Now put the personal network certificate and configuration file in this folder.
- Rename your personal network certificate to
Network_Certificate.p12 - Example: Change the file name
Network_Certificate_muster_078B30.p12toNetwork_Certificate.p12 - The configuration file should have an icon like the screenshot and end with
.ovpn.
My configuration file looks different! - What now? -Click here-
- When downloading, it can happen that the .ovpn file becomes a .txt file. However, we can change the file extension again relatively easily.
- Click on the configuration file. Now press cmd + i on the keyboard.
- "Name & Suffix" may now read .ovpn.txt.
- Delete the .txt.
- Then press the Enter key.
- Click Add.

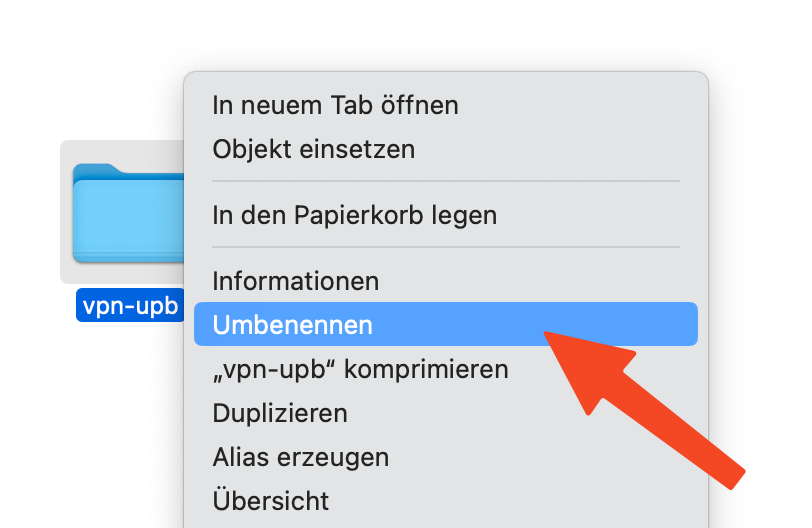
- Now rename the folder and add the file extension
.tblkto it. - You can use the context menu or right-click for this.

- You must now confirm the change.
- Click Add.
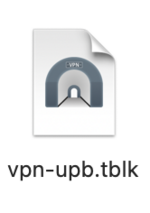
- You have now created a configuration for Tunnelblick - This now needs to be installed.
- Open this file with a double click.
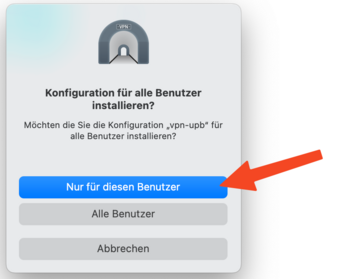
- You will be asked which user you want to install the configuration for.
- Select "Only for this user".

- You will be prompted to enter your Mac password to install the configuration.
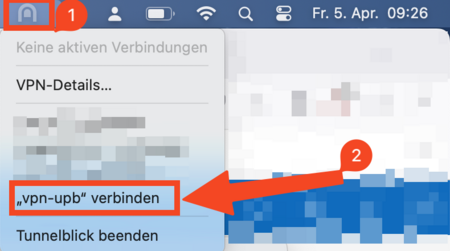
- Now click on the tunnel vision symbol in the menu bar at the top.
- Click connect on the desired VPN connection.
- In our example this is "connect vpn-upb"
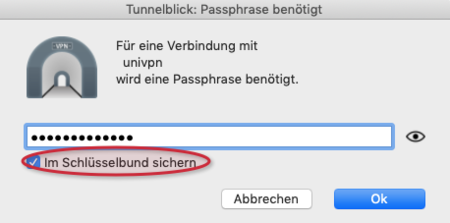
- In the next step you will be asked to enter a password. Enter the import password mentioned above that belongs to the certificate.
- In addition, be sure to select the "Save to Keychain" option so that the password is saved (otherwise you will have to keep re-entering the import password).
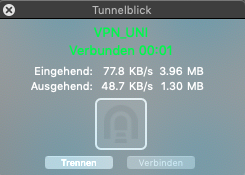
- Wait until the font turns green and you are connected.
- You can quickly connect and disconnect the connection using the Tunnelblick symbol.
Swap configuration file[Bearbeiten | Quelltext bearbeiten]
If you have been using VPN access for a while, it may be necessary at some point to update the configuration file to the latest version. Below we explain how this works.
Details
- Download the new configuration file.
- Select the configuration file.
- Open the context menu with a right click.
- Select "Open with". (1)
- Then click on "Other...". (2)
- Select "TextEdit" from the list. (1)
- Then click "Open". (2)
- Copy the entire contents of the configuration file to the clipboard.
- The quickest way to do this is to use the following key combinations:
cmd+A(Select all)cmd+C(copy)
- Click on the tunnel vision symbol in the menu bar at the top right. (1)
- Then click on '"VPN Details". (2)
- Select the 'Configurations' menu. (1)
- On the left side, select the configuration you want to edit. (2)
- Then click on the circle with the three dots at the bottom.
- Scroll down a little in the menu that opens.
- Click "Edit OpenVPN configuration file..." (3)
- Do you want to keep your old configuration file and create a new one instead?
- On the old configuration file, click "Duplicate configuration".
- Then select the copy and continue with (3).
- Now the configuration file opens.
- You can see how current your configuration file is by looking at "Date" and "Version". (1)
- Delete the contents of the configuration file and replace it with the contents of the clipboard.
- The easiest way to do this is to use the following key combinations:
cmd+A(Select all)- Delete
cmd+V(insert)
- You can see that you have made changes by the note "Edited'. (2)
- Close the window by clicking on the red X. (3)
You have now replaced the contents of the configuration file with the new version.
The first time you connect to the modified configuration file, you will receive the following information:
- Click 'Save configuration.
- From now on you can connect to the new configuration file.
- Have you made a mistake and want to undo the changes?
- Press "Return to last saved copy.
Common Issues[Bearbeiten | Quelltext bearbeiten]
Configuration file not readable[Bearbeiten | Quelltext bearbeiten]
When downloading, the .ovpn file may be turned into a .txt file.
Select the configuration file. Press the key combination cmd and i. If the file under Suffix ends in .txt, delete this part. The name should end with .ovpn.
Group VPN ports are blocked - TLS handshake failed after a timeout (60 sec)[Bearbeiten | Quelltext bearbeiten]
Group VPN connections are established over specific UDP ports. Normally these port sharings are problem-free because they do not overlap with other protocols. However, if your Internet access is of a restrictive nature and only allows certain ports, a connection problem may arise. This affects some university institutions or company networks. Home networks generally do not have this.
Solution:
- change your location or network
- Release the required port or talk to the IT department whether this is possible
- You can find the port used for your group network within the config file.
- If it is the hpc-pc2 network, contact the PC2 for alternative SSH access


