Jnk (Diskussion | Beiträge) |
|||
| (5 dazwischenliegende Versionen von 2 Benutzern werden nicht angezeigt) | |||
| Zeile 7: | Zeile 7: | ||
{{ambox | {{ambox | ||
|type=notice | |type=notice | ||
| − | |text=Linux is only rudimentarily supported by the | + | |text=Linux is only rudimentarily supported by the ZIM. Info is addressed to "professionals". Use at your own risk. |
}} | }} | ||
| − | |||
| − | |||
| − | |||
VPN (Virtual Private Network) is needed if you want to use your computer from outside the university to access services that are only accessible within the university network. VPN guarantees secure access to the university network through other networks (dial-up via other providers, external company or university networks). | VPN (Virtual Private Network) is needed if you want to use your computer from outside the university to access services that are only accessible within the university network. VPN guarantees secure access to the university network through other networks (dial-up via other providers, external company or university networks). | ||
| Zeile 28: | Zeile 25: | ||
== Step-by-step instructions == | == Step-by-step instructions == | ||
| − | === Create | + | |
| − | Open the | + | ===Create certificate === |
| + | You need a network certificate for the VPN connection. If you already have a certificate for Eduroam, you can use that too and skip this step. | ||
| + | <br> | ||
| + | Open the service portal and log in with your university account. | ||
* http://sp.upb.de | * http://sp.upb.de | ||
<br> | <br> | ||
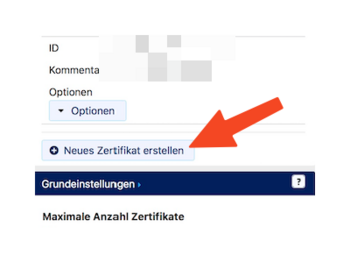
| − | * | + | * Go to '''User Management''' and then '''Network Settings'''. |
<br clear=all> | <br clear=all> | ||
| − | [[ | + | [[File:Eduroam-unter-android-4.png|links|mini|ohne|350px]] |
| − | Click | + | <br> |
| + | * Click '''Create New Certificate'''. | ||
<br clear=all> | <br clear=all> | ||
| − | [[ | + | [[File:Netzwerkzertifikat-container-v2.png|links|mini|ohne|350px]] |
<br> | <br> | ||
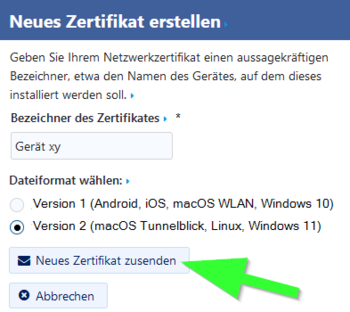
| − | * | + | * Give the certificate a unique name (Ex: Laptop VPN) |
| − | * | + | * Select '''Version 2''' as the file format. |
| + | * Then click on '''Send new certificate'''. | ||
<br clear=all> | <br clear=all> | ||
| − | [[ | + | [[File:Netzwerkzertifikat-download.png|links|mini|ohne|350px]] |
<br> | <br> | ||
| − | * | + | * A new network certificate has been created for you. |
| − | * | + | * First copy the '''Import Password''' to the clipboard. |
| − | * | + | * Now click on '''Download Network Certificate'''. |
<br clear=all> | <br clear=all> | ||
| − | === VPN | + | === Configure VPN on Linux === |
| − | Download the configuration file, select the VPN you want to connect to and click | + | Download the configuration file, select the VPN you want to connect to and click Download. |
| − | + | Normally "Uni-VPN (Standard)" should be the right choice, but if you have problems with the connection, try "Uni-VPN-TCP" again. | |
| − | |||
<iframe key="infoboard" width="600" height="330" path="vpn-config/index.php?group=uni&os=lin&redirect_gateway=1" /> | <iframe key="infoboard" width="600" height="330" path="vpn-config/index.php?group=uni&os=lin&redirect_gateway=1" /> | ||
<br clear=all> | <br clear=all> | ||
| − | <span style="color:green"> | + | <span style="color:green"> Note:</span> You can click on '''"Download"''' here and download your configuration file. This is not a screenshot ;-) |
<br clear=all> | <br clear=all> | ||
<bootstrap_accordion> | <bootstrap_accordion> | ||
| − | <bootstrap_panel heading=" | + | <bootstrap_panel heading="Direct all internet traffic through the tunnel?"> |
| − | * | + | *Accessing online resources may require that you route all network traffic through the tunnel. |
| − | * | + | * You do not need this option for pure access to network drives. |
</bootstrap_panel> | </bootstrap_panel> | ||
</bootstrap_accordion> | </bootstrap_accordion> | ||
===Create folder=== | ===Create folder=== | ||
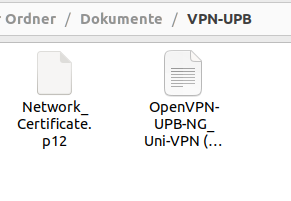
| − | * Create a | + | * Create a folder and put the network certificate and configuration file there. |
| − | * Choose the location carefully - you must not move or rename the folder later. | + | * Choose the storage location carefully - you must not move or rename the folder later. |
| − | * Rename the network certificate | + | * Rename the network certificate to <code>Network_Certificate.p12</code> |
| − | [[ | + | [[File:Vpn-unter-linux-01.png|links|mini|ohne|350px|Folder for VPN]] |
<br> | <br> | ||
| − | * | + | * This is what the contents of the folder should look like. |
<br clear=all> | <br clear=all> | ||
| − | === | + | ===Set up VPN=== |
| − | [[ | + | [[File:Vpn-unter-linux-02.png|links|mini|ohne|350px|Network]] |
<br> | <br> | ||
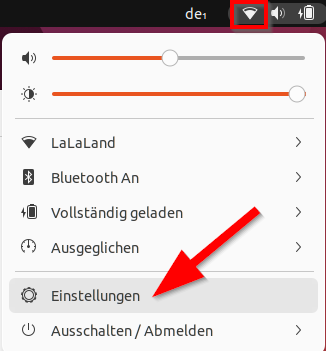
| − | * Click on the | + | * Click on the ''"network icon"''. |
| − | * | + | * Then click on '''Settings'''. |
<br clear=all> | <br clear=all> | ||
| − | [[ | + | [[File:VPN-unter-linux-03.png|links|mini|ohne|350px|Add VPN]] |
<br> | <br> | ||
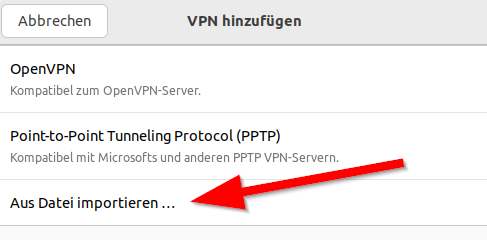
| − | * | + | * In the VPN section, click the <code>+</code> to add. |
<br clear=all> | <br clear=all> | ||
| − | [[ | + | [[File:Vpn-unter-linux-04.png|links|mini|ohne|350px|Import from file]] |
<br> | <br> | ||
| − | * | + | * Select '''"Import from file..."'''. |
<br clear=all> | <br clear=all> | ||
| − | [[ | + | [[File:Vpn-unter-linux-05.png|links|mini|ohne|350px|configuration file]] |
<br> | <br> | ||
| − | * | + | * Open the folder we just created. |
| − | * Select the ''' | + | * Select the '''configuration file'''. |
| − | * | + | * Then click '''"Open"'''. |
<br clear=all> | <br clear=all> | ||
| − | [[ | + | [[File:VPN-unter-linux-06.png|links|mini|ohne|350px|VPN settings]] |
<br> | <br> | ||
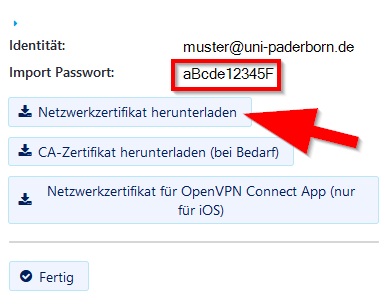
| − | * The VPN settings | + | * The VPN settings were taken from the configuration file. |
| − | * | + | * Enter the ''"import password"''' for the network certificate. (1) |
| − | * | + | * Then click '''Add'''. (2) |
<br clear=all> | <br clear=all> | ||
| − | [[ | + | [[File:VPN-unter-linux-07.png|links|mini|ohne|350px|Connect VPN]] |
<br> | <br> | ||
| − | * | + | * With one click on the switch you can connect to the VPN. |
<br clear=all> | <br clear=all> | ||
===Connect VPN=== | ===Connect VPN=== | ||
| − | [[ | + | [[File:VPN-unter-linux-08.png|links|mini|ohne|350px|Connect VPN]] |
<br> | <br> | ||
| − | * | + | * Or connect via the network menu. |
<br clear=all> | <br clear=all> | ||
| − | ==Disconnect VPN== | + | ===Disconnect VPN=== |
| − | [[ | + | [[File:VPN-unter-linux-09.png|links|mini|ohne|350px|Disconnect VPN]] |
<br> | <br> | ||
| − | * | + | * You can disconnect the VPN connection from the network menu. |
<br clear=all> | <br clear=all> | ||
==Check VPN== | ==Check VPN== | ||
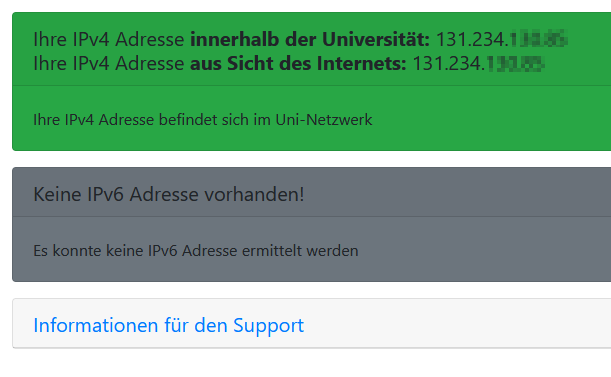
| − | You can check | + | You can check the functionality of the VPN by calling: |
: [https://go.upb.de/ip https://go.upb.de/ip] | : [https://go.upb.de/ip https://go.upb.de/ip] | ||
| + | Your IP will be displayed there and whether you are on the university network. | ||
| − | [[ | + | [[File:OpenVPN verbunden - go_ip.png|mitte|400px|mini|ohne|Example: Existing connection to the university network.]] |
<br clear=all> | <br clear=all> | ||
| − | == | + | ==For advanced users== |
| − | * '''OpenVPN 2.4''' | + | * At least version '''OpenVPN 2.4''' is required. |
| − | + | There is also the option to set up the connection via Ubuntu's network manager. | |
| − | + | ||
| + | To use the network manager, the previously created network certificate must be unpacked: | ||
: <code>$ openssl pkcs12 -in Network_Certificate.p12 -out Network_Certificate_OPVPN.crt.pem -clcerts -nokeys </code> | : <code>$ openssl pkcs12 -in Network_Certificate.p12 -out Network_Certificate_OPVPN.crt.pem -clcerts -nokeys </code> | ||
: <code>$ openssl pkcs12 -in Network_Certificate.p12 -out Network_Certificate_OPVPN.key.pem -nocerts -nodes </code> | : <code>$ openssl pkcs12 -in Network_Certificate.p12 -out Network_Certificate_OPVPN.key.pem -nocerts -nodes </code> | ||
| − | The | + | The two new files are copied to a safe location in the user directory with the network certificate. |
| − | : | + | : According to user reports, an additional parameter <code>-legacy</code> may be necessary under OpenSSL 3.0.2. |
| − | : | + | : If this doesn't work, it may be necessary (e.g. with Arch) to install the package "openssl-1.1" and call the top two commands with "openssl-1.1" instead of "openssl". |
| − | + | To do this, you must first install the necessary packages using the terminal: | |
: <code># sudo apt-get install openvpn network-manager-openvpn network-manager-openvpn-gnome</code> | : <code># sudo apt-get install openvpn network-manager-openvpn network-manager-openvpn-gnome</code> | ||
Aktuelle Version vom 14. Juni 2024, 11:19 Uhr
Linux is only rudimentarily supported by the ZIM. Info is addressed to "professionals". Use at your own risk. |
VPN (Virtual Private Network) is needed if you want to use your computer from outside the university to access services that are only accessible within the university network. VPN guarantees secure access to the university network through other networks (dial-up via other providers, external company or university networks).
This guide is based on Ubuntu 22.04.2 LTS. Other distributions may work similarly. We cannot provide a guide for every distribution.
What needs to be done?[Bearbeiten | Quelltext bearbeiten]
- Download personal network certificate.
- Download configuration file:
- Store network certificate and configuration file in a folder. Don't change the path later.
- Rename the certificate.
- Setup VPN
Step-by-step instructions[Bearbeiten | Quelltext bearbeiten]
Create certificate[Bearbeiten | Quelltext bearbeiten]
You need a network certificate for the VPN connection. If you already have a certificate for Eduroam, you can use that too and skip this step.
Open the service portal and log in with your university account.
- Go to User Management and then Network Settings.
- Click Create New Certificate.
- Give the certificate a unique name (Ex: Laptop VPN)
- Select Version 2 as the file format.
- Then click on Send new certificate.

- A new network certificate has been created for you.
- First copy the Import Password to the clipboard.
- Now click on Download Network Certificate.
Configure VPN on Linux[Bearbeiten | Quelltext bearbeiten]
Download the configuration file, select the VPN you want to connect to and click Download.
Normally "Uni-VPN (Standard)" should be the right choice, but if you have problems with the connection, try "Uni-VPN-TCP" again.
Note: You can click on "Download" here and download your configuration file. This is not a screenshot ;-)
Direct all internet traffic through the tunnel?
- Accessing online resources may require that you route all network traffic through the tunnel.
- You do not need this option for pure access to network drives.
Create folder[Bearbeiten | Quelltext bearbeiten]
- Create a folder and put the network certificate and configuration file there.
- Choose the storage location carefully - you must not move or rename the folder later.
- Rename the network certificate to
Network_Certificate.p12
- This is what the contents of the folder should look like.
Set up VPN[Bearbeiten | Quelltext bearbeiten]
- Click on the "network icon".
- Then click on Settings.
- In the VPN section, click the
+to add.

- Select "Import from file...".
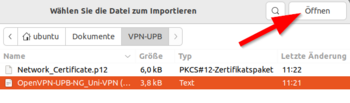
- Open the folder we just created.
- Select the configuration file.
- Then click "Open".
- The VPN settings were taken from the configuration file.
- Enter the "import password"' for the network certificate. (1)
- Then click Add. (2)
- With one click on the switch you can connect to the VPN.
Connect VPN[Bearbeiten | Quelltext bearbeiten]
- Or connect via the network menu.
Disconnect VPN[Bearbeiten | Quelltext bearbeiten]
- You can disconnect the VPN connection from the network menu.
Check VPN[Bearbeiten | Quelltext bearbeiten]
You can check the functionality of the VPN by calling:
Your IP will be displayed there and whether you are on the university network.

For advanced users[Bearbeiten | Quelltext bearbeiten]
- At least version OpenVPN 2.4 is required.
There is also the option to set up the connection via Ubuntu's network manager.
To use the network manager, the previously created network certificate must be unpacked:
$ openssl pkcs12 -in Network_Certificate.p12 -out Network_Certificate_OPVPN.crt.pem -clcerts -nokeys$ openssl pkcs12 -in Network_Certificate.p12 -out Network_Certificate_OPVPN.key.pem -nocerts -nodes
The two new files are copied to a safe location in the user directory with the network certificate.
- According to user reports, an additional parameter
-legacymay be necessary under OpenSSL 3.0.2. - If this doesn't work, it may be necessary (e.g. with Arch) to install the package "openssl-1.1" and call the top two commands with "openssl-1.1" instead of "openssl".
To do this, you must first install the necessary packages using the terminal:
# sudo apt-get install openvpn network-manager-openvpn network-manager-openvpn-gnome


