| (32 dazwischenliegende Versionen von 5 Benutzern werden nicht angezeigt) | |||
| Zeile 4: | Zeile 4: | ||
|translated title=VPN on Linux | |translated title=VPN on Linux | ||
}} | }} | ||
| − | + | {{Vpn-new-config-en}} | |
| + | {{ambox | ||
| + | |type=notice | ||
| + | |text=Linux is only rudimentarily supported by the ZIM. Info is addressed to "professionals". Use at your own risk. | ||
| + | }} | ||
| − | = | + | <bootstrap_alert color=warning> |
| − | + | ⚠ If you receive an error message such as <code>Decoding PKCS12 failed. Probably wrong password or unsupported/legacy encryption</code> or similar when connecting:<br> | |
| − | + | Do not adjust your OpenSSL configuration! Instead, create a new certificate in version 2 (AES-256 container). Details below. Adjusting the OpenSSL configuration can create security risks. | |
| − | + | </bootstrap_alert> | |
| − | < | ||
| − | |||
| − | |||
| − | * | + | You need a VPN (Virtual Private Network) if you want to use services from your computer at home that are only accessible within the university network. VPN ensures secure access to the university network from external networks (dial-up via other providers, external company or university networks). |
| + | <br><br> | ||
| + | |||
| + | These instructions are based on Ubuntu 22.04.2 LTS. Other distributions may work in a similar way. We cannot offer instructions for every distribution. | ||
| + | |||
| + | ==Simultaneous connections== | ||
| + | <bootstrap_alert color=info> | ||
| + | <span style='font-size:30px;'>🛈</span> | ||
| + | <br> | ||
| + | Do you want to connect your laptop and your mobile phone to the VPN in addition to your PC? You can set up VPN connections on multiple devices. However, each person can only establish one connection per VPN at the same time. | ||
| + | </bootstrap_alert> | ||
| + | |||
| + | <bootstrap_accordion> | ||
| + | <bootstrap_panel heading="What does that mean?" color="info"> | ||
| + | '''Uni-VPN''' | ||
| + | * If you use the Uni-VPN, you can only establish one connection at a time. | ||
| + | * You cannot establish a connection to the Uni-VPN on another device at the same time. | ||
| + | * You must disconnect the existing connection first. | ||
| + | |||
| + | '''Group VPN''' | ||
| + | * If you use a group VPN, you cannot establish a second VPN connection to this group VPN on another device at the same time. | ||
| + | * You must disconnect the existing connection first. | ||
| + | |||
| + | * However, you can connect to the Uni VPN or another group VPN on another device at the same time. | ||
| + | </bootstrap_panel> | ||
| + | </bootstrap_accordion> | ||
| + | |||
| + | == What do I need to do? == | ||
| + | * Download personal network certificate. | ||
| + | * Download configuration file: | ||
| + | <iframe key="vpnconfig" width="600" height="450" path="/openvpn/en/?group=upb&os=linux&redirect=1"/> | ||
| + | * Save network certificate and configuration file in a fixed folder. | ||
| + | * Rename network certificate. | ||
| + | * Set up VPN. | ||
== Step-by-step instructions == | == Step-by-step instructions == | ||
| − | === Create | + | === Create certificate === |
| − | + | You need a network certificate for the VPN connection. If you already have a certificate for Eduroam, you can use that and skip this step. | |
| + | <br> | ||
| + | Open the service portal and log in with your university account. | ||
| + | * http://sp.upb.de | ||
| + | <br> | ||
| − | + | * Go to '''User management''' and then to '''Network settings'''. | |
| + | <br clear=all> | ||
| − | === Configuring VPN | + | [[File:Eduroam-unter-android-4.png|links|mini|ohne|350px]] |
| + | <br> | ||
| + | * Click on '''"Create new certificate"'''. | ||
| + | <br clear=all> | ||
| + | |||
| + | [[Datei:Netzwerkzertifikat-container-v2.png|links|mini|ohne|350px]] | ||
| + | <br> | ||
| + | * Give the certificate a unique name (e.g. Laptop VPN) | ||
| + | * Select '''Version 2''' as the file format. | ||
| + | * Then click on '''"Send new certificate"'''. | ||
| + | <br clear=all> | ||
| + | |||
| + | [[Datei:Netzwerkzertifikat-download.png|links|mini|ohne|350px]] | ||
| + | <br> | ||
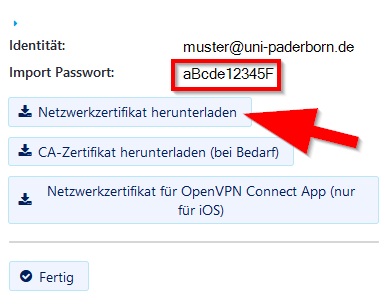
| + | * A new network certificate has been created for you. | ||
| + | * First copy the '''import password''' to the clipboard. | ||
| + | * Now click on '''"Download network certificate"'''. | ||
| + | <br clear=all> | ||
| + | |||
| + | === Configuring VPN under Linux === | ||
Download the configuration file, select the VPN you want to connect to and click on Download. | Download the configuration file, select the VPN you want to connect to and click on Download. | ||
| − | + | Normally, "Uni-VPN (Standard)" should be the right choice, but if you have problems with the connection, try "Uni-VPN-TCP" again.<span style="color:green"> Note:</span> You can click on '''"Download"''' here and download your configuration file. This is not a screenshot ;-) | |
| − | Normally "Uni-VPN (Standard)" should be the right choice, but if you have problems with the connection, try "Uni-VPN-TCP" again. | + | <center><iframe key="vpnconfig" width="600" height="450" path="/openvpn/en/?group=upb&os=linux&redirect=1"/> |
| − | <center> | ||
| − | <iframe key=" | ||
</center> | </center> | ||
| + | <br clear=all> | ||
| + | <bootstrap_accordion> | ||
| + | <bootstrap_panel heading="Route all Internet traffic through the tunnel?"> | ||
| + | * Accessing online resources may require that you route all network traffic through the tunnel. | ||
| + | * You do not need this option for pure access to network drives. | ||
| + | </bootstrap_panel> | ||
| + | </bootstrap_accordion> | ||
| − | + | ===Create folder=== | |
| + | * Create a folder and place the network certificate and configuration file there. | ||
| + | ** On distributions that use SELinux (e.g. RedHad, Fedora, CentOS etc.) you need to make sure that the location has the correct labels | ||
| + | ** These can be checked with <code>ls -laZ PATH</code> and need a label in the form of <code>unconfined_u:object_r:home_cert_t:s0</code> | ||
| + | ** By default the directory <code>~/.cert/</code> should have the correct labels for the network certificate | ||
| + | ** Debian/Ubuntu based distributions normally '''do not''' use SELinux and should therefore not be affected by this | ||
| + | * Choose the location carefully - you must not move or rename the folder later. | ||
| + | * Rename the network certificate to <code>Network_Certificate.p12</code> | ||
| − | + | [[Datei:Vpn-unter-linux-01.png|links|mini|ohne|350px|Folder for VPN]] | |
| − | + | <br> | |
| + | * This is what the contents of the folder should look like. | ||
| + | <br clear=all> | ||
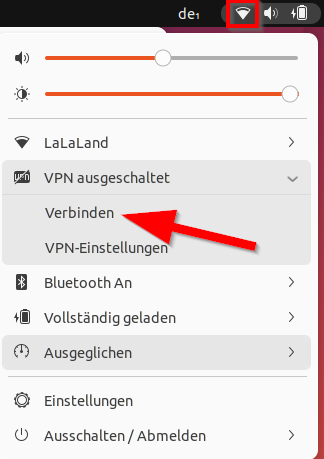
| − | + | ===Set up VPN=== | |
| − | : | + | [[Datei:Vpn-unter-linux-02.png|links|mini|ohne|350px|Network]] |
| − | + | <br> | |
| + | * Click on the '''"Network symbol"'''. | ||
| + | * Then click on '''"Settings"'''. | ||
| + | <br clear=all> | ||
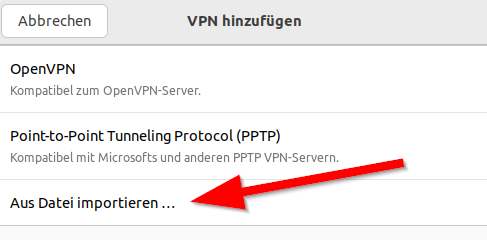
| − | + | [[File:Vpn-unter-linux-03.png|left|mini|without|350px|Add VPN]] | |
| + | <br> | ||
| + | * In the VPN area, click on the <code>+</code> to add. | ||
| + | <br clear=all> | ||
| + | [[Datei:Vpn-unter-linux-04.png|links|mini|ohne|350px|Import from file]] | ||
| + | <br> | ||
| + | * Select '''"Import from file..."'''. | ||
| + | <br clear=all> | ||
| − | + | [[Datei:Vpn-unter-linux-05.png|links|mini|ohne|350px|Configuration file]] | |
| − | + | <br> | |
| + | * Open the folder we just created. | ||
| + | * Select the '''"Configuration file"'''. | ||
| + | * Then click '''"Open"'''. | ||
| + | <br clear=all> | ||
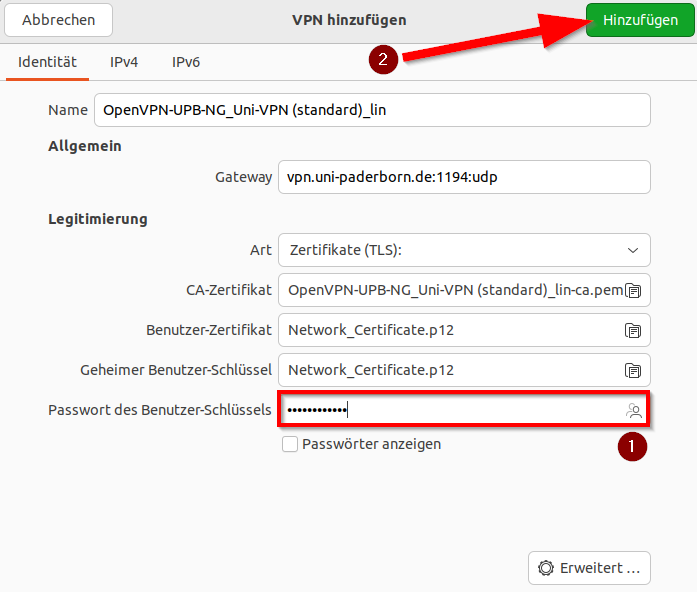
| − | + | [[Datei:Vpn-unter-linux-06.png|links|mini|ohne|350px|VPN settings]] | |
| + | <br> | ||
| + | * The VPN settings have been imported from the configuration file. | ||
| + | * Enter the '''"Import password"''' for the network certificate. (1) | ||
| + | * Then click on '''"Add"'''. (2) | ||
| + | <br clear=all> | ||
| − | [[Datei: | + | [[Datei:Vpn-unter-linux-07.png|links|mini|ohne|350px|Connect VPN]] |
| + | <br> | ||
| + | * You can connect to the VPN by clicking on the switch. | ||
| + | <br clear=all> | ||
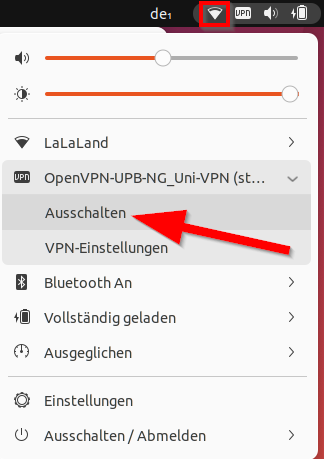
| + | ===Connect VPN=== | ||
| + | [[Datei:Vpn-unter-linux-08.png|links|mini|ohne|350px|Connect VPN]] | ||
| + | <br> | ||
| + | * Or establish the connection via the network menu. | ||
<br clear=all> | <br clear=all> | ||
| + | ===Disconnect VPN=== | ||
| + | [[Datei:Vpn-unter-linux-09.png|links|mini|ohne|350px|Disconnect VPN]] | ||
| + | <br> | ||
| + | * You can disconnect the VPN connection via the network menu. | ||
| + | <br clear=all> | ||
| + | |||
| + | ==Unpack container== | ||
| + | If there are problems using the certificate in its container format with the export password provided, it may help to unpack the container into certificate and key. | ||
| + | <br> | ||
| + | These problems occur, for example, with the old container format under distributions that use OpenSSL 3 or newer. Here you can either unpack the previous container (in order to reference the key and certificate directly) or request a new certificate with the new container format in the service portal. | ||
| + | <br> | ||
| + | |||
| + | The OpenSSL version can be checked as follows: | ||
| + | <pre>$ openssl version</pre> | ||
| + | |||
| + | The container can be unpacked as follows: | ||
| + | <pre> | ||
| + | $ openssl pkcs12 -in Network_Certificate.p12 -out Network_Certificate_cert.pem -clcerts -nokeys | ||
| + | $ openssl pkcs12 -in Network_Certificate.p12 -out Network_Certificate_key.pem -nocerts -nodes | ||
| + | </pre> | ||
| + | |||
| + | The two new files are copied to a safe location in the user directory with the network certificate. | ||
| + | When unpacking the old container format, an additional parameter <code>-legacy</code> is required under OpenSSL 3, otherwise this will be refused. | ||
| + | |||
| + | ==Edit configuration== | ||
| + | If you do not select the certificates via the GUI, but use the configuration file via the command line, you must ensure that the files are named appropriately for the configuration file. If you have unpacked the container, you must adjust the configuration file accordingly.<br> | ||
| − | + | '''Configuration file without changes''' | |
| + | <pre> | ||
| + | #### Betriebssystemanpassungen für Linux #################### | ||
| − | < | + | pkcs12 Network_Certificate.p12 |
| − | + | resolv-retry 5 | |
| − | < | + | auth-nocache |
| + | # oder getrennt: | ||
| + | # cert Network_Certificate_cert.pem | ||
| + | # key Network_Certificate_key.pem | ||
| + | </pre> | ||
| + | |||
| + | '''If you have unpacked the container in certificate and key:''' | ||
| + | <pre> | ||
| + | #### Betriebssystemanpassungen für Linux #################### | ||
| + | |||
| + | # pkcs12 Network_Certificate.p12 | ||
| + | resolv-retry 5 | ||
| + | auth-nocache | ||
| + | # oder getrennt: | ||
| + | cert Network_Certificate_cert.pem | ||
| + | key Network_Certificate_key.pem | ||
| + | </pre> | ||
| + | |||
| + | ==Troubleshooting== | ||
| + | On systemd distributions (Ubuntu, Linux Mint, Arch Linux, Fedora, etc.), check the following steps if problems occur. | ||
| + | |||
| + | View the backend logs: | ||
| − | + | <pre>journalctl -u wpa_supplicant.service</pre> | |
| − | + | View the frontend logs (NetworkManager): | |
| − | + | <pre>journalctl -u NetworkManager.service</pre> | |
| − | + | If wpa_supplicant reports errors with missing permissions, the user's network certificate and the CA certificate (HARICA) may need to be marked with execution bits. This can be done as follows: | |
| − | |||
| + | <pre>-r-xr-xr-x HARICA-TLS-Root-2021-RSA.crt</pre> | ||
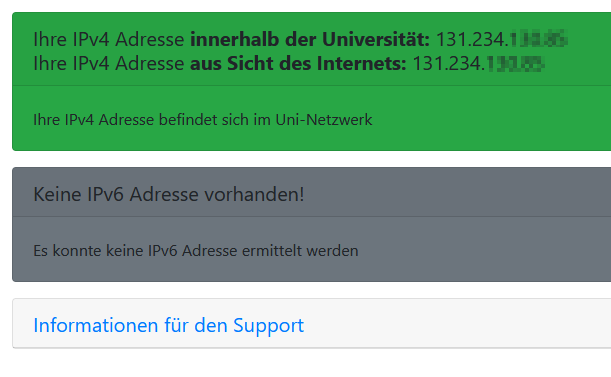
| − | [ | + | ==Check VPN== |
| − | + | You can check the VPN function by calling: | |
| + | : [https://go.upb.de/ip https://go.upb.de/ip] | ||
| + | Your IP is displayed there and whether you are on the university network. | ||
| + | [[Datei:OpenVPN verbunden - go_ip.png|mitte|400px|mini|ohne|Example: Existing connection to the university network.]] | ||
<br clear=all> | <br clear=all> | ||
| + | |||
| + | ==See also== | ||
| + | * [[Netzwerk]] | ||
| + | * [[VPN Problembehandlung]] | ||
Aktuelle Version vom 4. Februar 2026, 20:34 Uhr
Important change
The VPN servers where changed over at the following times:
- UNI-VPN: 2 December 2025
- Selected group VPN: 3 December 2025
Please note the following:
- You need an up-to-date configuration file to connect to the VPN.
- Downloading and installing configuration files is explained in this article.
- A new network certificate is usually not required.
Linux is only rudimentarily supported by the ZIM. Info is addressed to "professionals". Use at your own risk. |
⚠ If you receive an error message such as Decoding PKCS12 failed. Probably wrong password or unsupported/legacy encryption or similar when connecting:
Do not adjust your OpenSSL configuration! Instead, create a new certificate in version 2 (AES-256 container). Details below. Adjusting the OpenSSL configuration can create security risks.
You need a VPN (Virtual Private Network) if you want to use services from your computer at home that are only accessible within the university network. VPN ensures secure access to the university network from external networks (dial-up via other providers, external company or university networks).
These instructions are based on Ubuntu 22.04.2 LTS. Other distributions may work in a similar way. We cannot offer instructions for every distribution.
Simultaneous connections[Bearbeiten | Quelltext bearbeiten]
🛈
Do you want to connect your laptop and your mobile phone to the VPN in addition to your PC? You can set up VPN connections on multiple devices. However, each person can only establish one connection per VPN at the same time.
What does that mean?
Uni-VPN
- If you use the Uni-VPN, you can only establish one connection at a time.
- You cannot establish a connection to the Uni-VPN on another device at the same time.
- You must disconnect the existing connection first.
Group VPN
- If you use a group VPN, you cannot establish a second VPN connection to this group VPN on another device at the same time.
- You must disconnect the existing connection first.
- However, you can connect to the Uni VPN or another group VPN on another device at the same time.
What do I need to do?[Bearbeiten | Quelltext bearbeiten]
- Download personal network certificate.
- Download configuration file:
- Save network certificate and configuration file in a fixed folder.
- Rename network certificate.
- Set up VPN.
Step-by-step instructions[Bearbeiten | Quelltext bearbeiten]
Create certificate[Bearbeiten | Quelltext bearbeiten]
You need a network certificate for the VPN connection. If you already have a certificate for Eduroam, you can use that and skip this step.
Open the service portal and log in with your university account.
- Go to User management and then to Network settings.
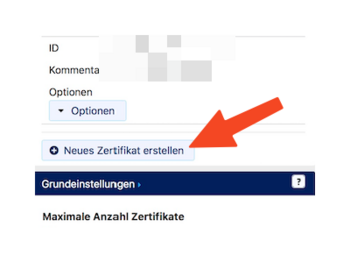
- Click on "Create new certificate".
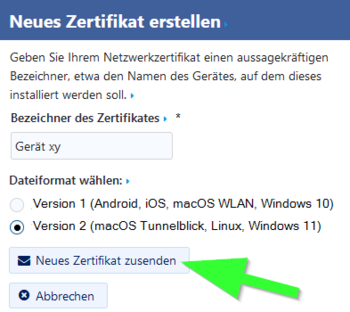
- Give the certificate a unique name (e.g. Laptop VPN)
- Select Version 2 as the file format.
- Then click on "Send new certificate".

- A new network certificate has been created for you.
- First copy the import password to the clipboard.
- Now click on "Download network certificate".
Configuring VPN under Linux[Bearbeiten | Quelltext bearbeiten]
Download the configuration file, select the VPN you want to connect to and click on Download. Normally, "Uni-VPN (Standard)" should be the right choice, but if you have problems with the connection, try "Uni-VPN-TCP" again. Note: You can click on "Download" here and download your configuration file. This is not a screenshot ;-)
Route all Internet traffic through the tunnel?
- Accessing online resources may require that you route all network traffic through the tunnel.
- You do not need this option for pure access to network drives.
Create folder[Bearbeiten | Quelltext bearbeiten]
- Create a folder and place the network certificate and configuration file there.
- On distributions that use SELinux (e.g. RedHad, Fedora, CentOS etc.) you need to make sure that the location has the correct labels
- These can be checked with
ls -laZ PATHand need a label in the form ofunconfined_u:object_r:home_cert_t:s0 - By default the directory
~/.cert/should have the correct labels for the network certificate - Debian/Ubuntu based distributions normally do not use SELinux and should therefore not be affected by this
- Choose the location carefully - you must not move or rename the folder later.
- Rename the network certificate to
Network_Certificate.p12
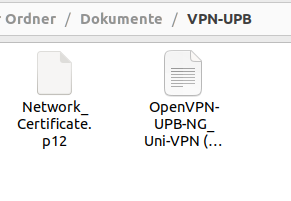
- This is what the contents of the folder should look like.
Set up VPN[Bearbeiten | Quelltext bearbeiten]
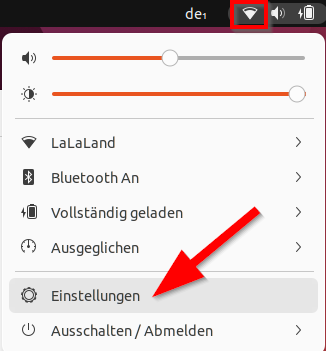
- Click on the "Network symbol".
- Then click on "Settings".
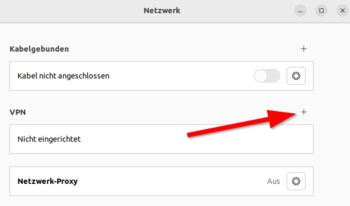
- In the VPN area, click on the
+to add.

- Select "Import from file...".
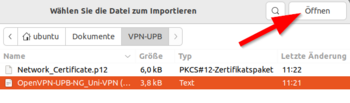
- Open the folder we just created.
- Select the "Configuration file".
- Then click "Open".
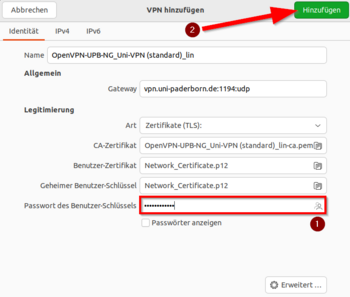
- The VPN settings have been imported from the configuration file.
- Enter the "Import password" for the network certificate. (1)
- Then click on "Add". (2)
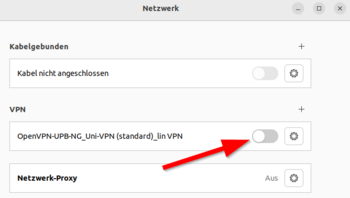
- You can connect to the VPN by clicking on the switch.
Connect VPN[Bearbeiten | Quelltext bearbeiten]
- Or establish the connection via the network menu.
Disconnect VPN[Bearbeiten | Quelltext bearbeiten]
- You can disconnect the VPN connection via the network menu.
Unpack container[Bearbeiten | Quelltext bearbeiten]
If there are problems using the certificate in its container format with the export password provided, it may help to unpack the container into certificate and key.
These problems occur, for example, with the old container format under distributions that use OpenSSL 3 or newer. Here you can either unpack the previous container (in order to reference the key and certificate directly) or request a new certificate with the new container format in the service portal.
The OpenSSL version can be checked as follows:
$ openssl version
The container can be unpacked as follows:
$ openssl pkcs12 -in Network_Certificate.p12 -out Network_Certificate_cert.pem -clcerts -nokeys
$ openssl pkcs12 -in Network_Certificate.p12 -out Network_Certificate_key.pem -nocerts -nodes
The two new files are copied to a safe location in the user directory with the network certificate.
When unpacking the old container format, an additional parameter -legacy is required under OpenSSL 3, otherwise this will be refused.
Edit configuration[Bearbeiten | Quelltext bearbeiten]
If you do not select the certificates via the GUI, but use the configuration file via the command line, you must ensure that the files are named appropriately for the configuration file. If you have unpacked the container, you must adjust the configuration file accordingly.
Configuration file without changes
#### Betriebssystemanpassungen für Linux ####################

pkcs12 Network_Certificate.p12
resolv-retry 5
auth-nocache
# oder getrennt:
# cert Network_Certificate_cert.pem
# key Network_Certificate_key.pem
If you have unpacked the container in certificate and key:
#### Betriebssystemanpassungen für Linux ####################

# pkcs12 Network_Certificate.p12
resolv-retry 5
auth-nocache
# oder getrennt:
cert Network_Certificate_cert.pem
key Network_Certificate_key.pem
Troubleshooting[Bearbeiten | Quelltext bearbeiten]
On systemd distributions (Ubuntu, Linux Mint, Arch Linux, Fedora, etc.), check the following steps if problems occur.
View the backend logs:
journalctl -u wpa_supplicant.service
View the frontend logs (NetworkManager):
journalctl -u NetworkManager.service
If wpa_supplicant reports errors with missing permissions, the user's network certificate and the CA certificate (HARICA) may need to be marked with execution bits. This can be done as follows:
-r-xr-xr-x HARICA-TLS-Root-2021-RSA.crt
Check VPN[Bearbeiten | Quelltext bearbeiten]
You can check the VPN function by calling:
Your IP is displayed there and whether you are on the university network.


