Mfunk (Diskussion | Beiträge) (Neue Übersetzung und grundlegende Überarbeitung) |
|||
| Zeile 4: | Zeile 4: | ||
|translated title=Participant management: Open course | |translated title=Participant management: Open course | ||
}} | }} | ||
| − | + | Unter '''"offenen Kursen"''' versteht man PANDA-Kurse, in die sich Teilnehmer/innen ohne Passwort selbst einschreiben können.<br> | |
| − | + | Diese Anleitung zeigt Ihnen, wie Sie eine Selbsteinschreibung hinzufügen und diese entsprechend ohne Passwort einstellen. | |
<br clear=all> | <br clear=all> | ||
| − | == | + | == Was ist zu tun? == |
| − | * | + | * Gewünschten Kurs aufrufen |
| − | * | + | * Einstellungen für Einschreibemethoden (unter dem Reiter ''Teilnehmer/innen'') |
| − | * | + | * Einschreibemethoden auswählen |
| − | * | + | * Vorhandene Selbsteinschreibung auswählen oder neue hinzufügen |
| − | ** | + | ** KEIN Passwort hinterlegen |
| − | + | == Call up enrollment methods == | |
| − | + | ||
| − | First | + | First, log in to [https://panda.uni-paderborn.de PANDA]. |
| − | Then | + | Then, open the course you want to edit. |
[[Datei:Einschreibemethoden auswählen.png|links|miniatur|400px]] | [[Datei:Einschreibemethoden auswählen.png|links|miniatur|400px]] | ||
| − | : Click on '''participants''' in the course view | + | : Click on '''participants''' in the course view. |
| − | :: | + | :: At the top left, you will find a pull-down menu where you can select the enrollment methods, among other things. |
| − | :: | + | :: The important option here is self-enrollment (participant). |
| − | |||
<br clear=all> | <br clear=all> | ||
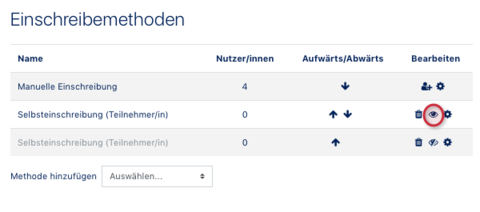
| − | + | This will take you to an overview of all enrollment methods set up for the course: | |
| − | + | *'''Manual enrollment (always active) (1):''' This method allows instructors and teaching assistants to manually enroll participants and staff. Please do NOT make any changes! | |
| − | + | *'''Self-enrollment (student) (2):''' You can edit/activate this method, which allows participants to enroll themselves in the course. | |
| − | * | + | *'''Add method (3):''' You can use this menu item to activate a new/additional self-enrollment method. |
| − | + | ||
| − | * | + | You will also find the following icons: |
| + | * [[Datei:Löschen icon.png]]: Deletes the method completely (caution: if you delete an enrollment method that is already in use, the participants will be automatically removed from the course). | ||
| + | * [[Datei:Sichtbar icon.png]]: Method is active and visible. Can be set to inactive/invisible by clicking on it. | ||
| + | ** [[Datei:unsichtbar icon.png]]: Method is inactive/invisible. | ||
| + | * [[Datei:Einstellungen Icon.png]]: Edit settings for the method. | ||
| + | * [[Datei:Nutzer einschreiben Icon.png]]: Here you can add users with a single click. | ||
| + | |||
| + | == Activate self-enrollment == | ||
| + | This section of the instructions assumes that self-enrollment has not yet been activated.[[Datei:koaLA-NG Selbsteinschreibung konfigurieren 03.png|links|mini|455x455px]] | ||
| + | Now click on the '''Edit''' icon for self-enrollment. | ||
| + | |||
<br clear=all> | <br clear=all> | ||
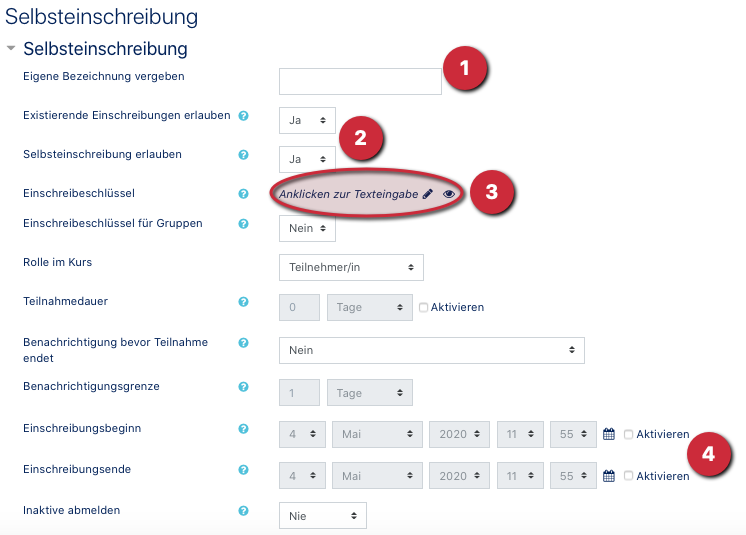
| + | You will be taken to the self-enrollment overview. There are many settings here, but only four of them are really important for activation. | ||
| + | # '''Custom instance name (1):''' Here you can set the name of the registration method. We recommend, for example, “Participant Registration” as the title. This will then be displayed to those registering. | ||
| + | # '''Keep current self enrolments active (2):''' If the option is disabled, all existing self-enrollments will be disabled and will no longer have access to the course. This is relevant if you have set up multiple self-enrollments. | ||
| + | # '''Enrolment key (3):''' This is the crucial field that you must leave blank to enable registration without a password. | ||
| + | # '''Custom welcome message (4):''' If desired, you can leave a welcome message here for newly registered participants. | ||
| + | # Finally, click on "Save changes." | ||
| + | [[Datei:Offener Kurs3.png|links|mini|667x667px]] | ||
| + | |||
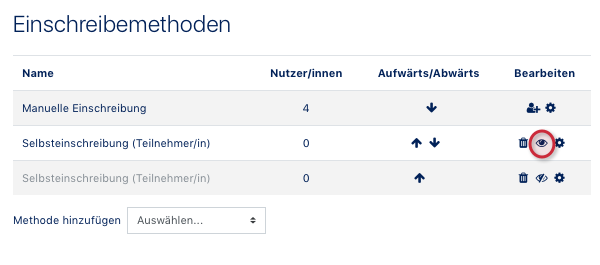
| + | Then activate the registration method by clicking on the eye icon. | ||
| − | + | === Additional settings === | |
| − | [[Datei: | + | * '''Default assigned role:''' Defines the role of the enrolled user. |
| + | * '''Enrolment duration:''' By checking the ''Enrolment duration'' checkbox, you can define a time limit for participation. | ||
| + | * '''Start and End date:''' By activating the respective checkboxes, you can specify the start and/or end time of the period during which students can register for the course. | ||
| + | * '''Unenrol inactive after:''' After a certain number of days, it can be specified that inactive students will be automatically removed from the course. | ||
| + | *'''Max enrolled users:''' Maximum number of people who can register using this enrollment method. There may be more people in the course (e.g., via manual enrollment or other self-enrollment methods). | ||
| + | |||
| + | == Disable self-enrollment == | ||
| + | |||
| + | [[Datei:koaLA-NG Selbsteinschreibung konfigurieren 06.png|links|mini|480x480px]] | ||
<br> | <br> | ||
| − | |||
| − | |||
| − | |||
| − | |||
| − | |||
| − | |||
| − | + | Click on the visible/active icon to deactivate self-enrollment. | |
| − | |||
| − | |||
| − | |||
| − | |||
| − | + | '''Please note''': All persons who have enrolled in the course via self-enrollment will be set to “Inactive” status upon deactivation. This means that participating students will still be enrolled, but will no longer be able to actively access the course. | |
| − | |||
| − | |||
| − | |||
| − | |||
| − | |||
| − | |||
| − | |||
| − | == View for | + | ==View for students== |
[[Datei:Offener Kurs7.png|links|mini|539x539px]] | [[Datei:Offener Kurs7.png|links|mini|539x539px]] | ||
<br> | <br> | ||
| − | * | + | * PANDA users can now search for your course in PANDA and enroll themselves by clicking on '''Enroll''' in the course. |
| − | * It | + | * It will also be indicated that no enrollment key is required. |
<br clear=all> | <br clear=all> | ||
Version vom 6. Februar 2026, 10:45 Uhr
Unter "offenen Kursen" versteht man PANDA-Kurse, in die sich Teilnehmer/innen ohne Passwort selbst einschreiben können.
Diese Anleitung zeigt Ihnen, wie Sie eine Selbsteinschreibung hinzufügen und diese entsprechend ohne Passwort einstellen.
Was ist zu tun?[Bearbeiten | Quelltext bearbeiten]
- Gewünschten Kurs aufrufen
- Einstellungen für Einschreibemethoden (unter dem Reiter Teilnehmer/innen)
- Einschreibemethoden auswählen
- Vorhandene Selbsteinschreibung auswählen oder neue hinzufügen
- KEIN Passwort hinterlegen
Call up enrollment methods[Bearbeiten | Quelltext bearbeiten]
First, log in to PANDA. Then, open the course you want to edit.
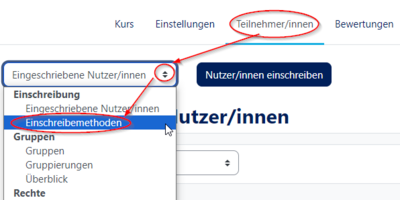
- Click on participants in the course view.
- At the top left, you will find a pull-down menu where you can select the enrollment methods, among other things.
- The important option here is self-enrollment (participant).
This will take you to an overview of all enrollment methods set up for the course:
- Manual enrollment (always active) (1): This method allows instructors and teaching assistants to manually enroll participants and staff. Please do NOT make any changes!
- Self-enrollment (student) (2): You can edit/activate this method, which allows participants to enroll themselves in the course.
- Add method (3): You can use this menu item to activate a new/additional self-enrollment method.
You will also find the following icons:
 : Deletes the method completely (caution: if you delete an enrollment method that is already in use, the participants will be automatically removed from the course).
 : Method is active and visible. Can be set to inactive/invisible by clicking on it.
 : Method is inactive/invisible.
 : Edit settings for the method.
 : Here you can add users with a single click.
Activate self-enrollment[Bearbeiten | Quelltext bearbeiten]
This section of the instructions assumes that self-enrollment has not yet been activated.
Now click on the Edit icon for self-enrollment.
You will be taken to the self-enrollment overview. There are many settings here, but only four of them are really important for activation.
- Custom instance name (1): Here you can set the name of the registration method. We recommend, for example, “Participant Registration” as the title. This will then be displayed to those registering.
- Keep current self enrolments active (2): If the option is disabled, all existing self-enrollments will be disabled and will no longer have access to the course. This is relevant if you have set up multiple self-enrollments.
- Enrolment key (3): This is the crucial field that you must leave blank to enable registration without a password.
- Custom welcome message (4): If desired, you can leave a welcome message here for newly registered participants.
- Finally, click on "Save changes."

Then activate the registration method by clicking on the eye icon.
Additional settings[Bearbeiten | Quelltext bearbeiten]
- Default assigned role: Defines the role of the enrolled user.
- Enrolment duration: By checking the Enrolment duration checkbox, you can define a time limit for participation.
- Start and End date: By activating the respective checkboxes, you can specify the start and/or end time of the period during which students can register for the course.
- Unenrol inactive after: After a certain number of days, it can be specified that inactive students will be automatically removed from the course.
- Max enrolled users: Maximum number of people who can register using this enrollment method. There may be more people in the course (e.g., via manual enrollment or other self-enrollment methods).
Disable self-enrollment[Bearbeiten | Quelltext bearbeiten]
Click on the visible/active icon to deactivate self-enrollment.
Please note: All persons who have enrolled in the course via self-enrollment will be set to “Inactive” status upon deactivation. This means that participating students will still be enrolled, but will no longer be able to actively access the course.
View for students[Bearbeiten | Quelltext bearbeiten]

- PANDA users can now search for your course in PANDA and enroll themselves by clicking on Enroll in the course.
- It will also be indicated that no enrollment key is required.
See also[Bearbeiten | Quelltext bearbeiten]


