Eduroam unter Linux/en
Jnk (Diskussion | Beiträge) (Die Seite wurde neu angelegt: „{{translated page |origin=Eduroam unter Linux |lang=en |translated title=eduroam on Linux }} Diese Anleitung zur Einrichtung des WLANs eduroam an der Universit…“) |
Jnk (Diskussion | Beiträge) |
||
| Zeile 4: | Zeile 4: | ||
|translated title=eduroam on Linux | |translated title=eduroam on Linux | ||
}} | }} | ||
| − | + | This tutorial describes how to set up the Wi-Fi eduroam on Linux. In this example a Ubuntu 14.04 LTS system with Gnome Desktop is used. Other distributions may look different. | |
| − | == | + | == What needs to be done? == |
| − | * | + | * Create and download a user certificate. |
| − | * | + | * Download the '''telesec certificate'''. |
| − | * | + | * Configure the eduroam network. |
| + | * Delete the webauth network if used. | ||
| − | == | + | == Step-by-step instructions == |
| − | === | + | ===Download certificates === |
| − | + | * Visit the [http://sp.upb.de ServicePortal] with your Browser. | |
| − | + | * Log in with your university account. | |
| + | * Visit '''Benutzerverwaltung''' and click on '''Netzwerk Einstellungen'''. | ||
| + | * Click on '''Neues Zertifikat erstellen'''. | ||
| + | * Give the certificate an identifier like "Laptop". | ||
| + | * Click on '''Neues Zertifikat zusenden''' | ||
| + | <br> | ||
[[Datei:Netzwerkzertifikat passwort generierung.PNG|links|mini|ohne|350px]] | [[Datei:Netzwerkzertifikat passwort generierung.PNG|links|mini|ohne|350px]] | ||
| − | + | <br> | |
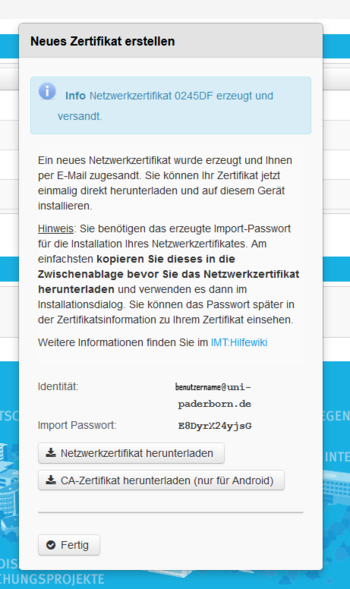
| + | * Copy the import password. | ||
| + | * Click on '''Netzwerkzertifikat herunterladen'''. | ||
| + | * Click on '''CA-Zertifikat herunterladen'''. | ||
<br clear=all> | <br clear=all> | ||
| + | * Save the certificates on your computer. Choose your folder wisely. Don't move or delete the certificates afterwards. | ||
| + | * Open the certificates and import them. | ||
| − | + | ===Configure eduroam === | |
| − | |||
| − | === | ||
[[Datei:Eduroam unter Linux_01.png|links|mini|ohne|350px]] | [[Datei:Eduroam unter Linux_01.png|links|mini|ohne|350px]] | ||
<br> | <br> | ||
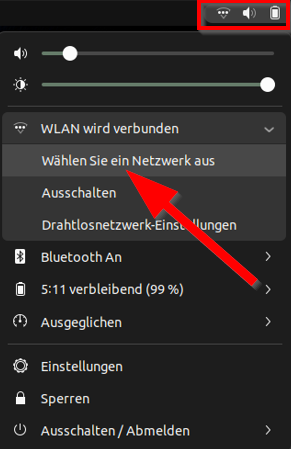
| − | * | + | * Open your '''Networkmanager''' or your prefered tool to configure your Wi-Fi connections: |
<br clear=all> | <br clear=all> | ||
[[Datei:Eduroam unter Linux_02.png|links|mini|ohne|350px]] | [[Datei:Eduroam unter Linux_02.png|links|mini|ohne|350px]] | ||
<br> | <br> | ||
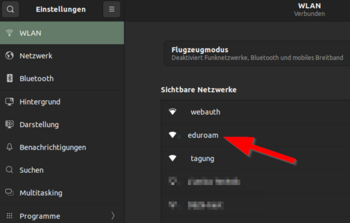
| − | * | + | * Create a new connection: |
<br clear=all> | <br clear=all> | ||
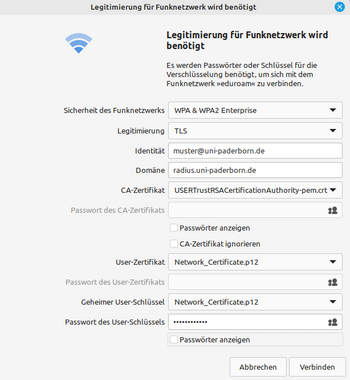
| − | + | Choose the following settings: | |
| − | |||
[[Datei:Eduroam unter Linux_03.png|links|mini|ohne|350px]] | [[Datei:Eduroam unter Linux_03.png|links|mini|ohne|350px]] | ||
<br> | <br> | ||
| − | * ''' | + | * '''Name:''' Free to choose |
| − | * '''SSID''' eduroam | + | * '''SSID:''' eduroam |
| − | * ''' | + | * '''Security:''' WPA & WPA2 Enterprise |
| − | * ''' | + | * '''Legitimacy:''' TLS |
| − | * ''' | + | * '''Usercertificate:''' None |
| − | * '''CA- | + | * '''CA-Certificate''' Choose the "T-Telesec Globalroot Class 2". |
| − | * ''' | + | * '''Secret Key''' Choose your usercertificate. |
| − | * ''' | + | * '''Password for the secret key''' The import password for the user certificate - We copied that one in the ServicePortal. |
<br clear=all> | <br clear=all> | ||
| − | === | + | === Troubleshooting === |
| − | + | In some network manager the field '''Usercertificate''' is not allowed to be empty. You can insert a random file like a 0-byte-file or the telekom cert. Now you should be able to click on '''connect'''. | |
| − | |||
| − | |||
| − | |||
| − | |||
| − | |||
| − | |||
| − | |||
| − | |||
| − | |||
| − | |||
| − | |||
| − | |||
| − | |||
| − | |||
| − | |||
| − | |||
| − | = | + | <div style="text-align:right;"><i> Many thanks to Katarina Ebert for the screenshots and Stefan Löwen for the certificate hint!</i></div> |
| − | |||
Version vom 14. Oktober 2020, 08:54 Uhr
Die deutsche Version finden Sie auf der Seite Eduroam unter Linux
This tutorial describes how to set up the Wi-Fi eduroam on Linux. In this example a Ubuntu 14.04 LTS system with Gnome Desktop is used. Other distributions may look different.
What needs to be done?[Bearbeiten | Quelltext bearbeiten]
- Create and download a user certificate.
- Download the telesec certificate.
- Configure the eduroam network.
- Delete the webauth network if used.
Step-by-step instructions[Bearbeiten | Quelltext bearbeiten]
Download certificates[Bearbeiten | Quelltext bearbeiten]
- Visit the ServicePortal with your Browser.
- Log in with your university account.
- Visit Benutzerverwaltung and click on Netzwerk Einstellungen.
- Click on Neues Zertifikat erstellen.
- Give the certificate an identifier like "Laptop".
- Click on Neues Zertifikat zusenden
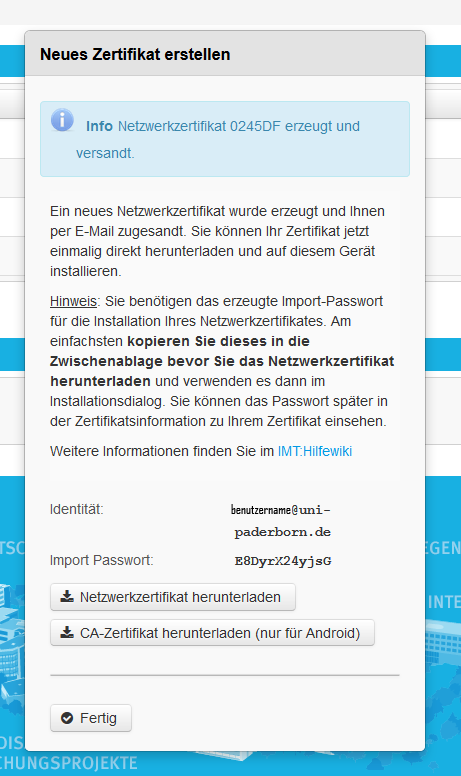
- Copy the import password.
- Click on Netzwerkzertifikat herunterladen.
- Click on CA-Zertifikat herunterladen.
- Save the certificates on your computer. Choose your folder wisely. Don't move or delete the certificates afterwards.
- Open the certificates and import them.
Configure eduroam[Bearbeiten | Quelltext bearbeiten]
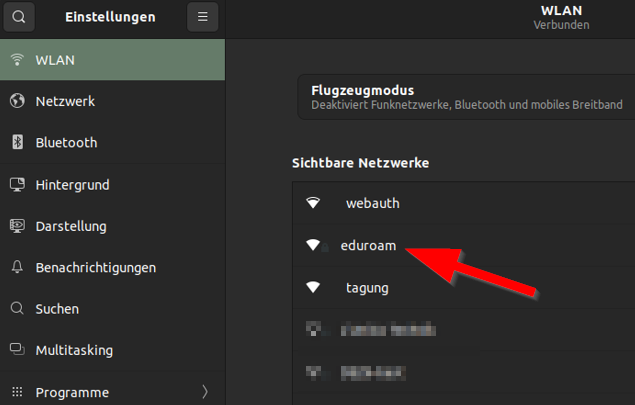
- Open your Networkmanager or your prefered tool to configure your Wi-Fi connections:
- Create a new connection:
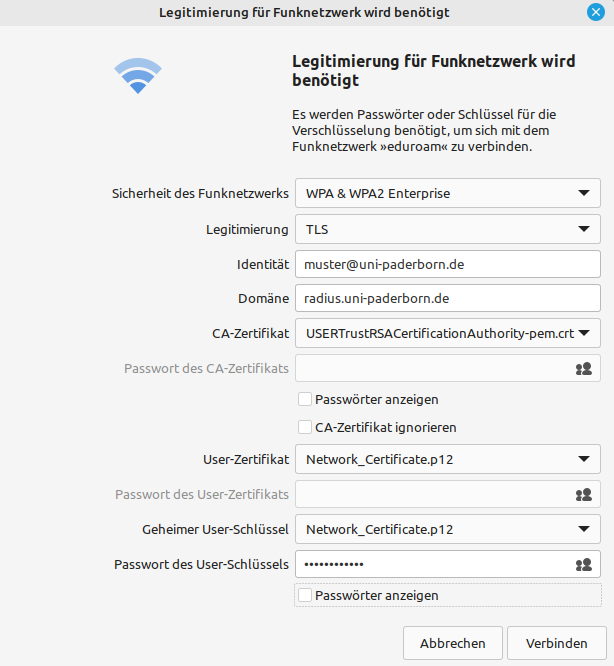
Choose the following settings:
- Name: Free to choose
- SSID: eduroam
- Security: WPA & WPA2 Enterprise
- Legitimacy: TLS
- Usercertificate: None
- CA-Certificate Choose the "T-Telesec Globalroot Class 2".
- Secret Key Choose your usercertificate.
- Password for the secret key The import password for the user certificate - We copied that one in the ServicePortal.
Troubleshooting[Bearbeiten | Quelltext bearbeiten]
In some network manager the field Usercertificate is not allowed to be empty. You can insert a random file like a 0-byte-file or the telekom cert. Now you should be able to click on connect.
Many thanks to Katarina Ebert for the screenshots and Stefan Löwen for the certificate hint!
