Jnk (Diskussion | Beiträge) (Die Seite wurde neu angelegt: „{{translated page |origin=Eduroam unter Windows 10 |lang=en |translated title=eduroam on Windows 10 }} Diese Anleitung zur Einrichtung des WLANs eduroam an der…“) |
Jnk (Diskussion | Beiträge) |
||
| Zeile 4: | Zeile 4: | ||
|translated title=eduroam on Windows 10 | |translated title=eduroam on Windows 10 | ||
}} | }} | ||
| − | + | This tutorial describes how to set up the Wi-Fi eduroam on '''Windows 10'''. | |
| − | == | + | == Step-by-step description == |
| − | + | === Create certificate === | |
| − | + | Visit the [http://sp.upb.de ServicePortal] and log in with your university account. | |
| − | + | * Go to '''Benutzerverwaltung''' and click on '''Netzwerk Einstellungen'''. | |
| − | |||
| − | |||
| − | |||
| − | |||
| − | |||
| − | |||
| − | |||
| − | === | ||
| − | |||
| − | * | ||
<br clear=all> | <br clear=all> | ||
[[Datei:eduroam-win10-1.png]] | [[Datei:eduroam-win10-1.png]] | ||
| − | + | * Click on '''Neues Zertifikat erstellen'''. | |
<br clear=all> | <br clear=all> | ||
[[Datei:eduroam-win10-2.png|links|mini|ohne|350px]] | [[Datei:eduroam-win10-2.png|links|mini|ohne|350px]] | ||
<br> | <br> | ||
| − | * | + | * Insert an identifier like "Laptop <Example>". |
| − | * | + | * Click on '''Neues Zertifikat zusenden'''. |
<br clear=all> | <br clear=all> | ||
[[Datei:Eduroam-ios-3.png|links|mini|ohne|350px]] | [[Datei:Eduroam-ios-3.png|links|mini|ohne|350px]] | ||
<br> | <br> | ||
| − | * | + | * Copy the '''Import Passwort'''. |
| − | + | * Click on '''"Netzwerkzertifikat herunterladen"'''. | |
| − | * | ||
<br clear=all> | <br clear=all> | ||
| − | + | Open the downloaded certificate. The import assistant start automatically. | |
[[Datei:Unbenannt.png|links|mini|ohne|350px]] | [[Datei:Unbenannt.png|links|mini|ohne|350px]] | ||
<br> | <br> | ||
| − | * | + | * Klick on '''Next'''. |
| − | * | + | * Insert the '''Import Password'''. |
| − | * | + | * Use the defalt settings. |
| − | * | + | * Click on '''Next''' and '''Finish'''. |
| − | * | + | * Click on '''Yes''' if necessary. |
<br clear=all> | <br clear=all> | ||
| − | <span style="color:orange">''' | + | <span style="color:orange">'''Info:''' The box for "High security for private key" needs to be disabled. The Windows client doesn't support this option at the moment and no connection to eduroam will be established.</span> |
| − | + | {{warning|Install the certificate twice as shown in the previous step. Otherwise the connection to eduroam may not work. Windows has currently a problem with the certificate installation.}} | |
| − | === | + | === Connect to eduroam === |
[[Datei:Win10-edu-1.png|links|mini|ohne|350px]] | [[Datei:Win10-edu-1.png|links|mini|ohne|350px]] | ||
<br> | <br> | ||
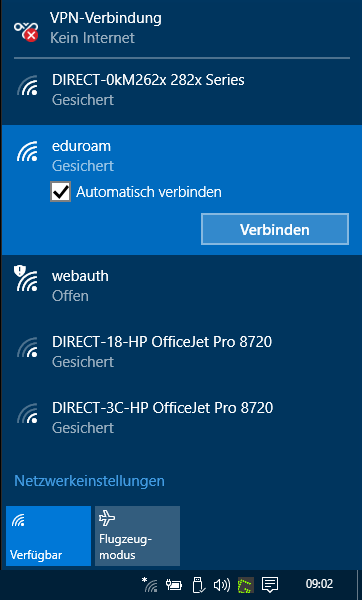
| − | * | + | * Open the '''Wi-Fi settings'''. |
| − | * | + | * Click on '''eduroam'''. |
| − | * | + | * Check the box for '''Connect automatically'''. |
| − | * | + | * Click on '''Connect''' |
<br clear=all> | <br clear=all> | ||
[[Datei:Win10-edu-2.png|links|mini|ohne|350px]] | [[Datei:Win10-edu-2.png|links|mini|ohne|350px]] | ||
<br> | <br> | ||
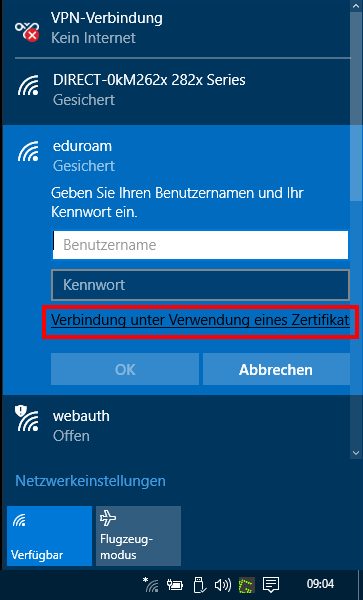
| − | * | + | * Click on '''Connect by using a certificate'''. |
| − | * <span style="color:red"> | + | * <span style="color:red">Important: Leave the field for username and password empty! </span> |
<br clear=all> | <br clear=all> | ||
| − | + | Your device should now connect to '''eduroam'''. | |
| − | == | + | ==Troubleshooting== |
| − | === | + | ===No connection possible=== |
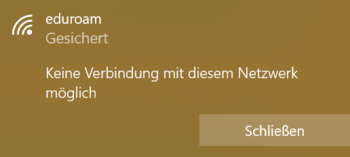
| − | + | If you get the error message ''' "No connection to this network possible" '''. | |
[[Datei:Eduroam-unter-windows10-7.png|links|mini|ohne|350px]] | [[Datei:Eduroam-unter-windows10-7.png|links|mini|ohne|350px]] | ||
<br clear=all> | <br clear=all> | ||
| − | + | Go trough the following steps! | |
| − | ==== | + | ====Reinstall certificate==== |
| − | + | Deinstall and reinstall network certificate. | |
| − | ==== | + | ====Check date and time==== |
| − | + | '''Check the follwing settings:''' | |
| − | ''' | + | * Time |
| − | * | + | * Date |
| − | * | + | * Timezone |
| − | * | + | They need to be correct to connect to eduroam. |
| − | === | + | ===No certificate available=== |
| − | + | Install the network certificate twice as mentioned above. | |
<br> <br> | <br> <br> | ||
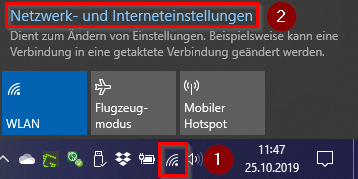
| − | + | If the eduroam profile ist already available, it was maybe saved with wrong settings. Delete the existing profile. | |
[[Datei:Eduroam-unter-windows10-3.png|links|mini|ohne|350px]] | [[Datei:Eduroam-unter-windows10-3.png|links|mini|ohne|350px]] | ||
<br> | <br> | ||
| − | * | + | * Click on the '''WLAN Symbol'''. |
| − | * | + | * Click on '''Network and Internet Settings'''. |
<br clear=all> | <br clear=all> | ||
[[Datei:Eduroam-unter-windows10-4.png|links|mini|ohne|350px]] | [[Datei:Eduroam-unter-windows10-4.png|links|mini|ohne|350px]] | ||
<br> | <br> | ||
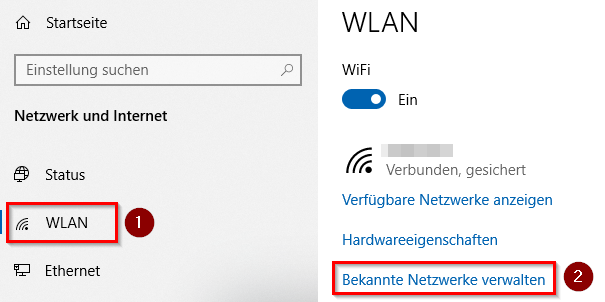
| − | * | + | * Click on '''WLAN'''. |
| − | * | + | * Click on '''Manage Prevered Networks'''. |
<br clear=all> | <br clear=all> | ||
[[Datei:Eduroam-unter-windows10-5.png|links|mini|ohne|350px]] | [[Datei:Eduroam-unter-windows10-5.png|links|mini|ohne|350px]] | ||
<br> | <br> | ||
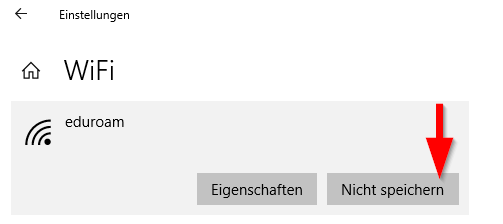
| − | * | + | * Select '''eduroam. |
| − | + | * Click on '''Forget'''. | |
| − | * | ||
<br clear=all> | <br clear=all> | ||
| − | + | Start this tutorial from the beginning to connect to eduroam. | |
| − | |||
| − | |||
| − | |||
| − | |||
| − | |||
| − | |||
| − | |||
| − | |||
| − | |||
| − | |||
| − | |||
| − | |||
| − | |||
| − | |||
| − | |||
| − | |||
| − | |||
| − | |||
| − | |||
Version vom 14. Oktober 2020, 11:57 Uhr
This tutorial describes how to set up the Wi-Fi eduroam on Windows 10.
Step-by-step description[Bearbeiten | Quelltext bearbeiten]
Create certificate[Bearbeiten | Quelltext bearbeiten]
Visit the ServicePortal and log in with your university account.
- Go to Benutzerverwaltung and click on Netzwerk Einstellungen.
- Click on Neues Zertifikat erstellen.
- Insert an identifier like "Laptop <Example>".
- Click on Neues Zertifikat zusenden.
- Copy the Import Passwort.
- Click on "Netzwerkzertifikat herunterladen".
Open the downloaded certificate. The import assistant start automatically.
- Klick on Next.
- Insert the Import Password.
- Use the defalt settings.
- Click on Next and Finish.
- Click on Yes if necessary.
Info: The box for "High security for private key" needs to be disabled. The Windows client doesn't support this option at the moment and no connection to eduroam will be established.
Install the certificate twice as shown in the previous step. Otherwise the connection to eduroam may not work. Windows has currently a problem with the certificate installation. |
Connect to eduroam[Bearbeiten | Quelltext bearbeiten]

- Open the Wi-Fi settings.
- Click on eduroam.
- Check the box for Connect automatically.
- Click on Connect
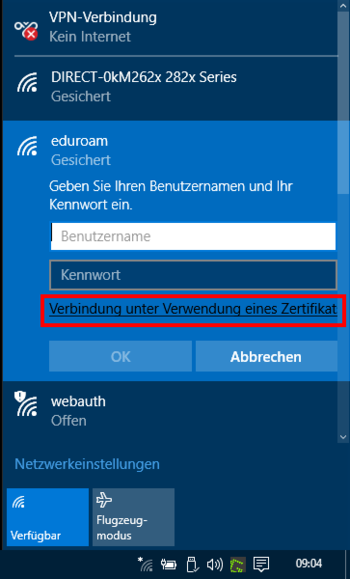
- Click on Connect by using a certificate.
- Important: Leave the field for username and password empty!
Your device should now connect to eduroam.
Troubleshooting[Bearbeiten | Quelltext bearbeiten]
No connection possible[Bearbeiten | Quelltext bearbeiten]
If you get the error message "No connection to this network possible" .
Go trough the following steps!
Reinstall certificate[Bearbeiten | Quelltext bearbeiten]
Deinstall and reinstall network certificate.
Check date and time[Bearbeiten | Quelltext bearbeiten]
Check the follwing settings:
- Time
- Date
- Timezone
They need to be correct to connect to eduroam.
No certificate available[Bearbeiten | Quelltext bearbeiten]
Install the network certificate twice as mentioned above.
If the eduroam profile ist already available, it was maybe saved with wrong settings. Delete the existing profile.

- Click on the WLAN Symbol.
- Click on Network and Internet Settings.

- Click on WLAN.
- Click on Manage Prevered Networks.

- Select eduroam.
- Click on Forget.
Start this tutorial from the beginning to connect to eduroam.
