The RADIUS server certificate was replaced on 17 December 2025 at 8:00 a.m. After that, your device may prompt you to verify the certificate before trusting it. You can find the current fingerprint for the certificate here:
You do not need to replace any network certificates on your device. Most devices should still be able to connect to eduroam without any problems. More details on how individual devices will behave can be found here:
For details click here
Depending on the device, you may have to reconnect to eduroam, select the certificate again or trust the certificate.
macOS
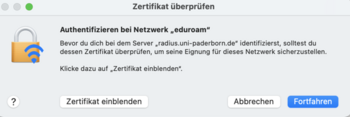
- Zertifikat einblenden to check certificate
- Continue to trust the certificate
- You may need to select your certificate again afterwards.
- Do not enter a username to log in to eduroam!


iPhone und iPad
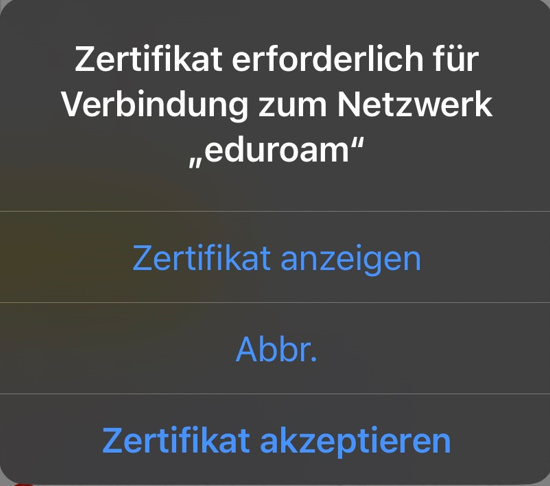
- Display certificate to check the certificate
- Accept certificate to trust the certificate

Windows

- Show certificate details to check the certificate
- Connect to trust the certificate
This tutorial describes how to set up the Wi-Fi Eduroam on macOS.
Video tutorial[Bearbeiten | Quelltext bearbeiten]
Step-by-step description[Bearbeiten | Quelltext bearbeiten]
What needs to be done?[Bearbeiten | Quelltext bearbeiten]
- Create a new network certificate in the service portal.
- Set up Eduroam with the new network certificate.
- If necessary, remove the Webauth network from the preferred networks of your device.
Step-by-step instructions[Bearbeiten | Quelltext bearbeiten]
Create network certificate[Bearbeiten | Quelltext bearbeiten]
To use Eduroam you need a network certificate at the University of Paderborn. In the first step we have to create and download this.
- The "Webauth" network can be used for this process. “Webauth” is only intended for this setup process and will log you out again after a short time.
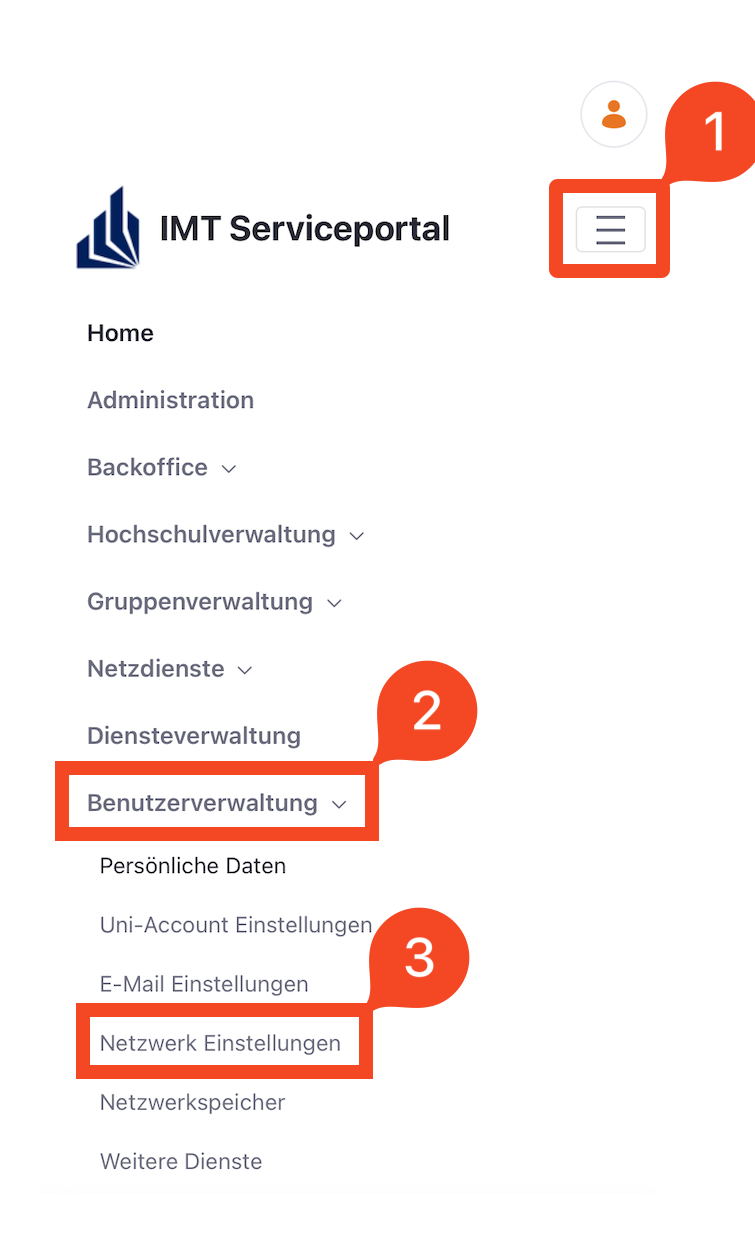
Go to the service portal and log in with your university account.

- Open the "Netzwerkeinstellungen" under "Benutzerverwaltung".
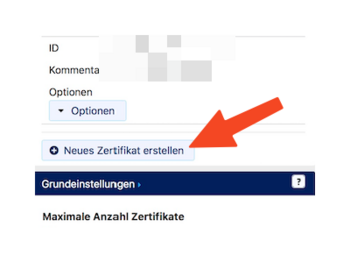
- Click "Neues Zertifikat erstellen".
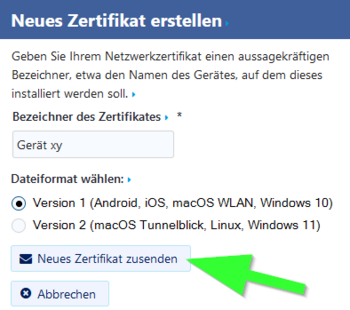
- Give the certificate a unique name (Ex: MacBook)
- Select "Version 1" as the file format.
- Then click on "Neues Zertifikat zusenden".
Version 1 or 2 - What's the difference?
The certificates are available for download in different container formats. The selected version is a recommendation that, in our experience, works well for this operating system.
- Version 1 is a TripleDES-SHA1 container
- Version 2 is an AES-256 container
AES-256 encryption is preferred for security reasons. Unfortunately, it is not yet supported by all operating systems.

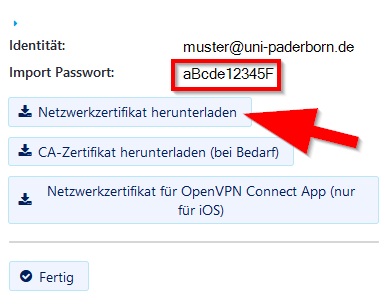
- A new network certificate has been created for you.
- First copy the Importpasswort to the clipboard.
- Now click on "Netzwerkzerifkat herunterladen".
Install network certificate[Bearbeiten | Quelltext bearbeiten]
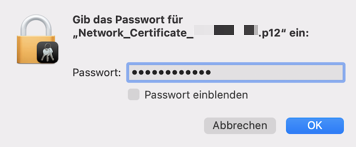
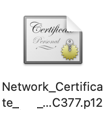 Open the certificate.
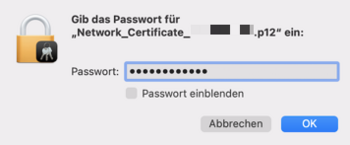
- Enter the import password for the certificate.
- We just copied it to the clipboard.
- Alternatively, we can type it from the service portal.
- We continue with "OK".
Set up Eduroam[Bearbeiten | Quelltext bearbeiten]
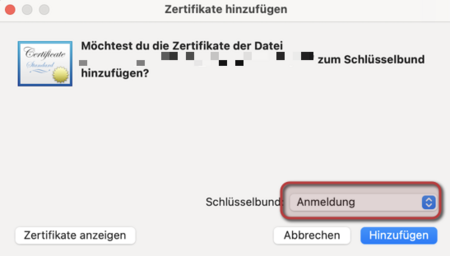
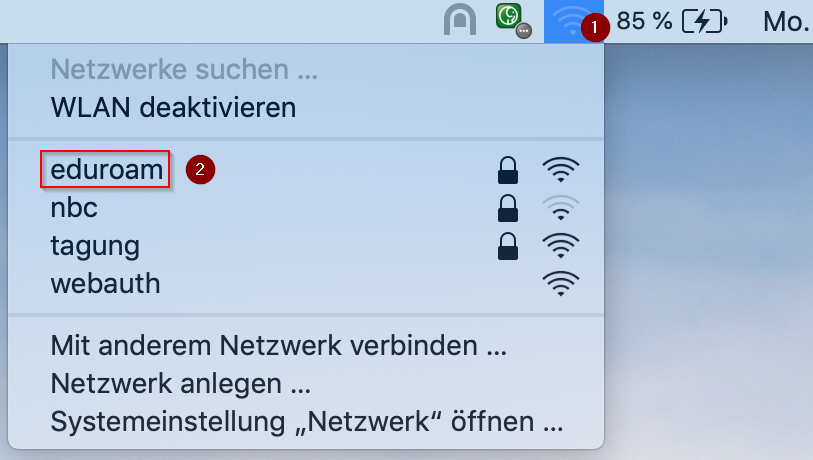
- The certificate is imported, now we can set up Eduroam.
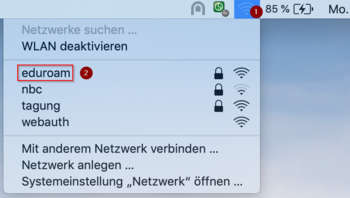
- To do this, click on the WLAN symbol in the bar at the top and then continue by clicking on Eduroam.

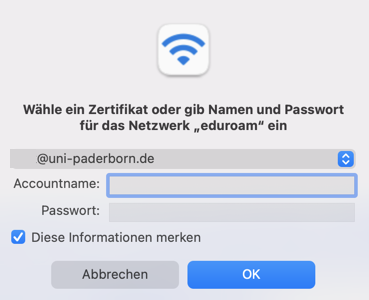
- Use the first button to select your certificate - It is <username>@uni-paderborn.de.
- Be sure to leave the field for user name and password blank!
- Then click "OK".

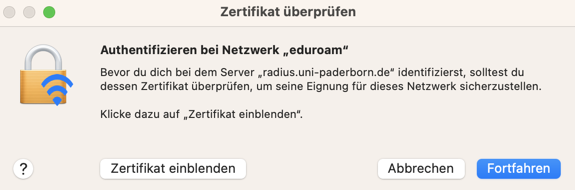
- Click on "Fortfahren".

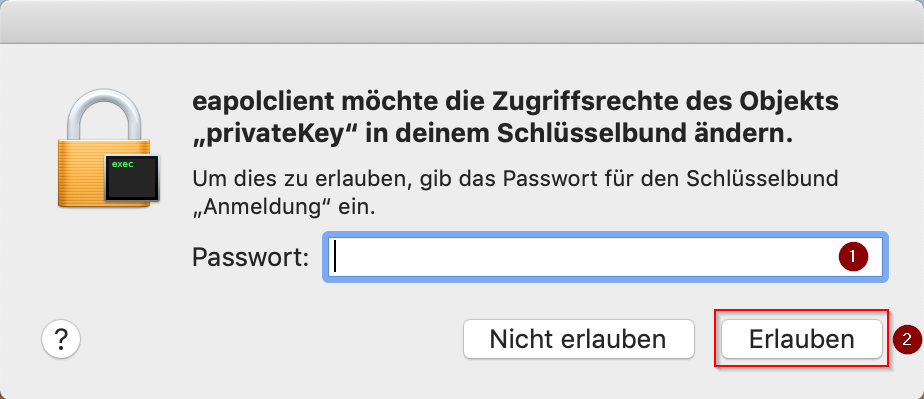
- MacOS now informs us that a change has been made to our computer.
- To confirm, enter the password for your Mac and then click Allow.
- This query can appear up to three times. Enter the password for your Mac every time.
Remove Wi-Fi Network Webauth[Bearbeiten | Quelltext bearbeiten]
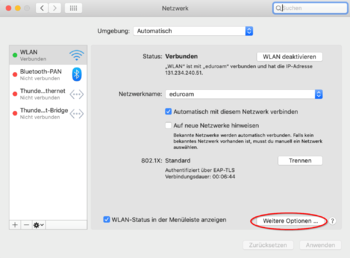
- Now we're basically done - Eduroam is set up and ready to use.
- However, if you were using the Wi-Fi network Webauth on your Mac, you should definitely remove it, as otherwise problems may occur.
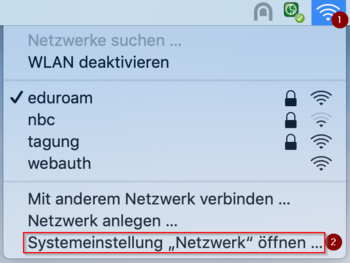
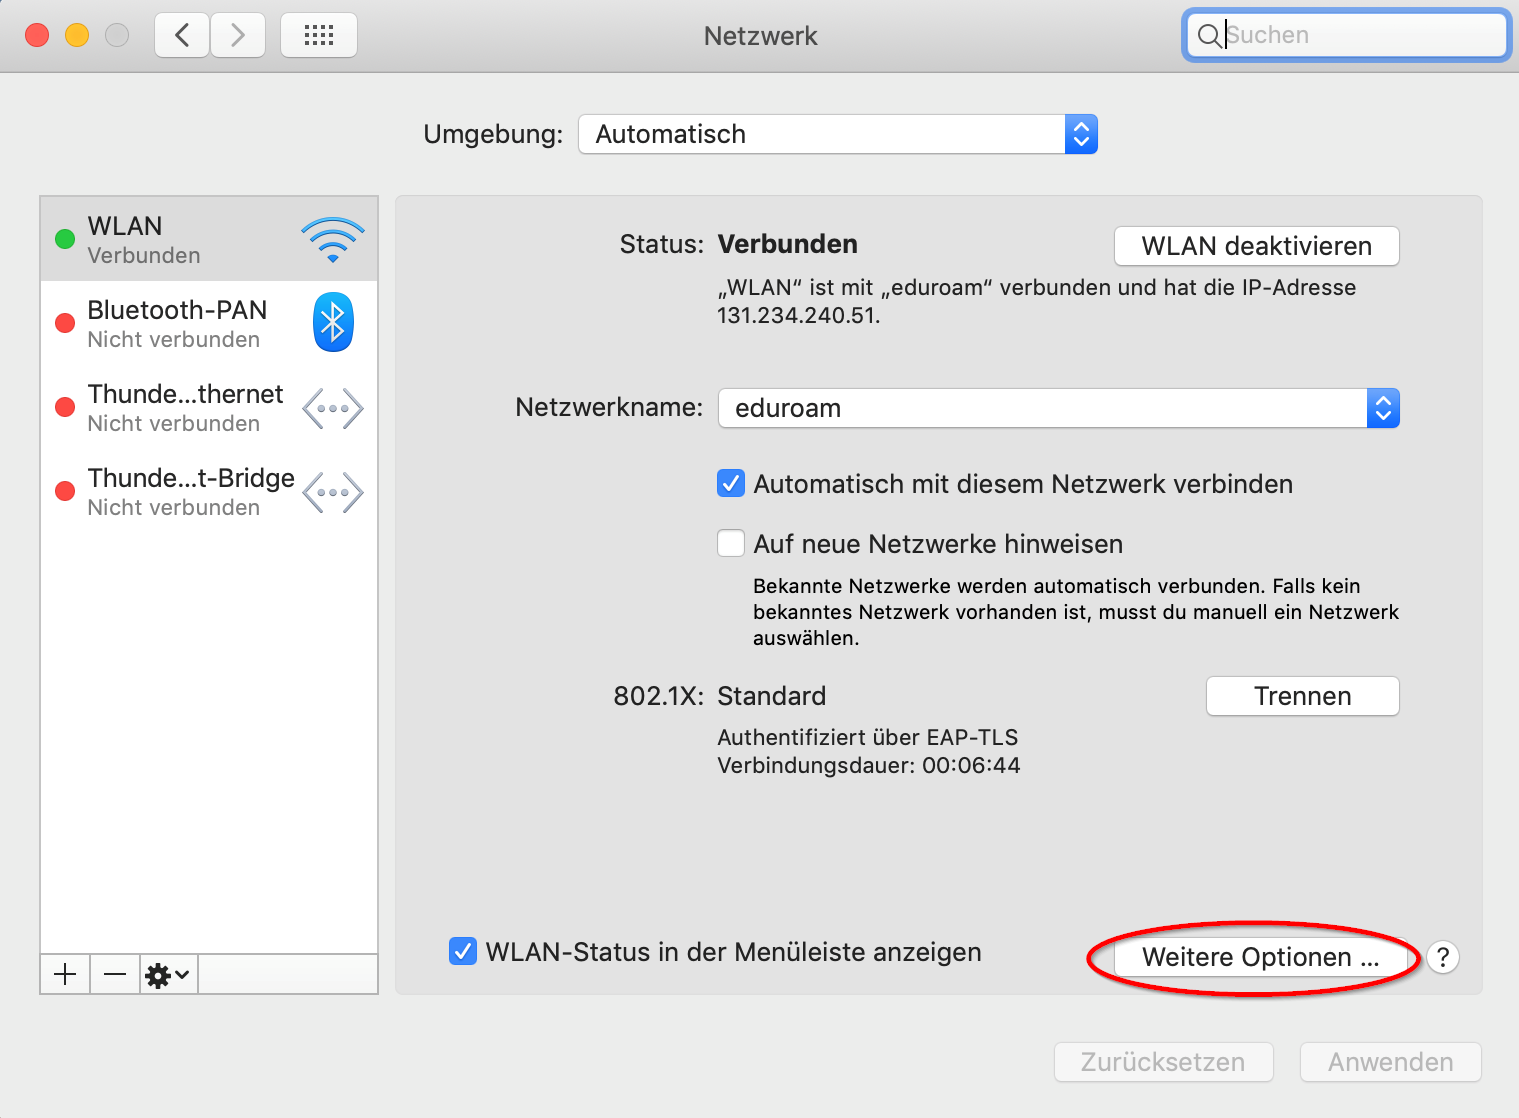
- To do this, click the Wi-Fi icon again at the top.
- Click on "System Preferences" > "Wi-Fi Settings..." to access the settings.
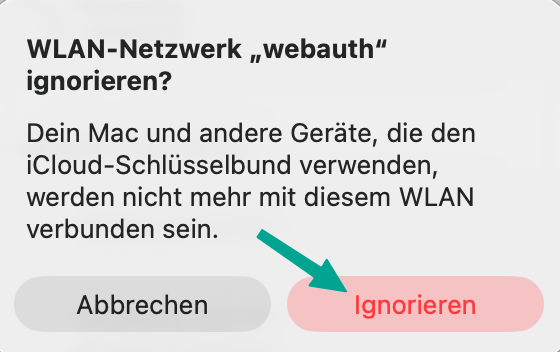
- Here, we select Webauth from the list, click on the three dots next to it, and then click "Ignore this network...".
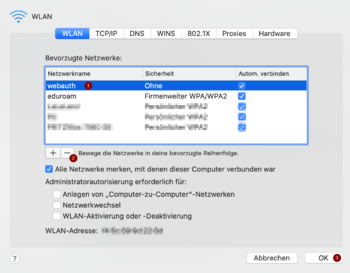
- Finally, we confirm once again that we want to ignore the Webauth network. This will prevent our device from connecting to Webauth instead of Eduroam.
Troubleshooting[Bearbeiten | Quelltext bearbeiten]
If you are unable to connect to Eduroam as described above, follow these steps.
Remove the WLAN profiles for Eduroam and Webauth as described above.
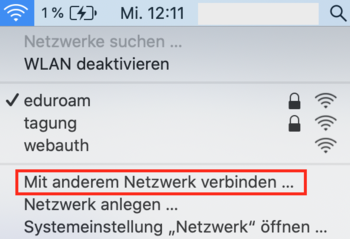
- Click on the WiFi icon in the bar at the top.
- Select "Connect to another network...".
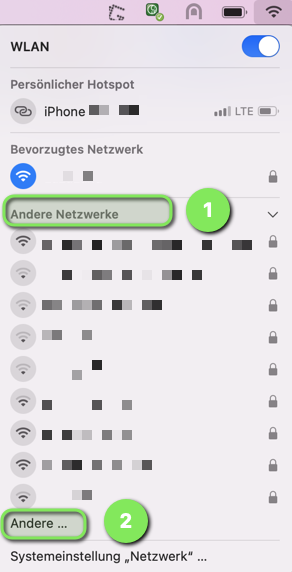
- From macOS 12 - Monterey this may look different.
- Click on the WiFi icon.
- Click "Other Networks".
- Click "Other...".
Set up the network with the following settings:
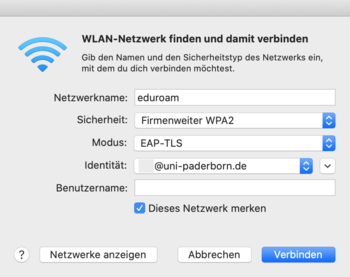
- Network name: eduroam
- Security: Company-wide WPA2
- Mode: EAP-TLS
- Identity: Select your installed network certificate. The name ends with “@uni-paderborn.de”.
- Username: Be sure to leave this field blank.
Now click on Verbinden.


