🛈
IPv6 subnets are currently not available in the halls of residence. It is therefore not possible to obtain an IPv6 address via the routers. We are currently working on a solution, but unfortunately it is not yet clear when we will be able to provide the necessary dual-stack connectivity.
Your room in the student residence has a network socket. If you want to connect your devices via Wi-Fi, you will need your own router, which you must set up as follows.
Prerequisites[Bearbeiten | Quelltext bearbeiten]
For this guide you need:
- Compatible router
- At least one network cable (CAT 5e or higher)
- Laptop or PC
You are in urgent need of an internet connection, but you do not have a router yet? Please take a look at this article for a temporary solution: PC direkt verbinden.
⚠
IMPORTANT: To connect to the internet, you must have a full-featured Wi-Fi router that sets up its own private IP network in your home. A simple Wi-Fi access point is not sufficient.
Examples: Compatible routers
The following routers can be set up using the following instructions:
- TP-Link AX10
- TP-Link AX53
- TP-Link AX73
- TP-Link Archer C6 AC1200
- TP-Link Archer C50 AC1200
- TP-Link Archer C20 AC750
- ASUS RT-AX58U
- ASUS RT-AC66U
- Fritz!Box 7590 (other FRITZ! products should work as well)
Other routers may also work. However, we cannot test every router and offer corresponding instructions.
Step-by-step instructions[Bearbeiten | Quelltext bearbeiten]
Connect router[Bearbeiten | Quelltext bearbeiten]
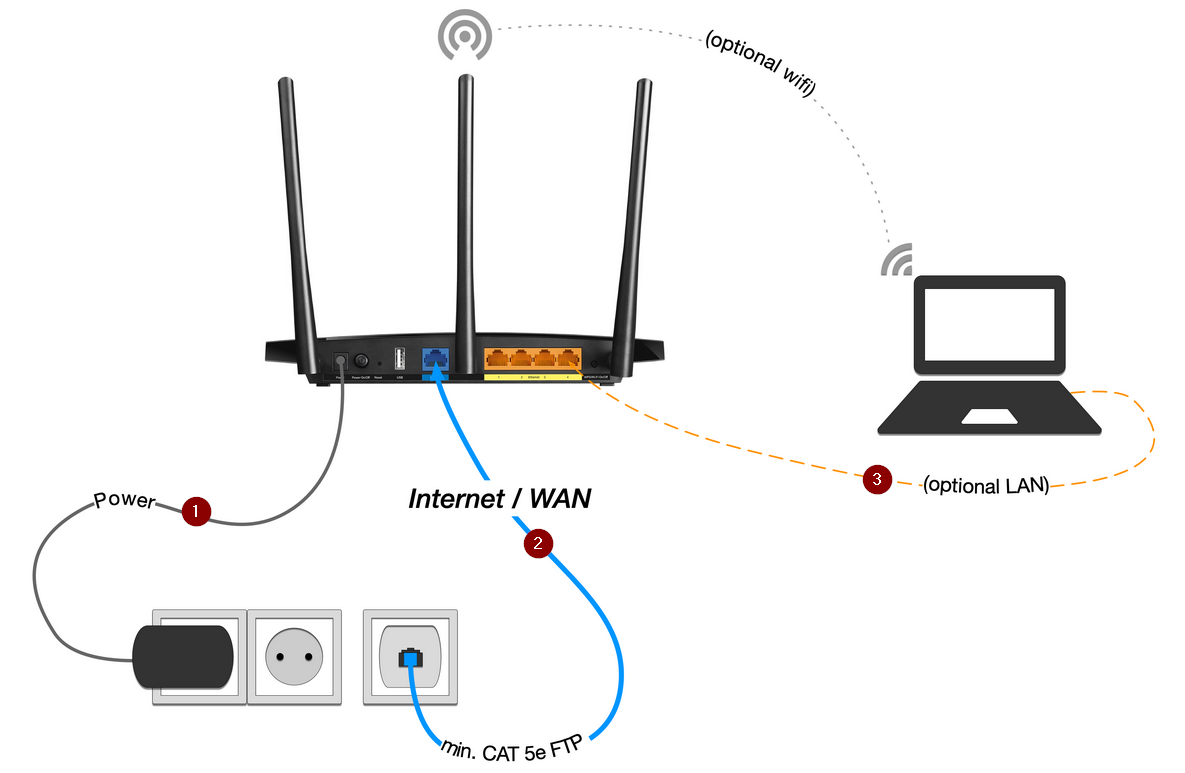
- 1.Power supply - Connect the power supply unit
- 2. Use the network cable to connect the network socket on the wall to the WAN port on the router.
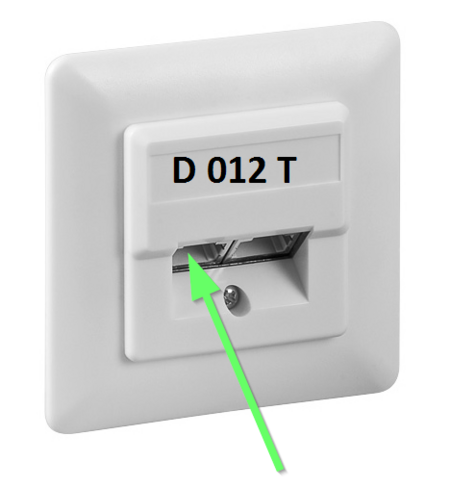
- 3. There is a double network socket in your home. Plug the network cable into the left-hand connection of the socket. It is marked with a D for data.
- 4. Plug the other end of the cable into the WAN port on your router. This is marked blue on some routers. It may also be labeled "Internet".
- 5. Use another network cable to connect your laptop to the LAN ports on the router. These are marked yellow on some routers. Alternatively, you can also establish a connection via Wi-Fi.

Setting up the router[Bearbeiten | Quelltext bearbeiten]
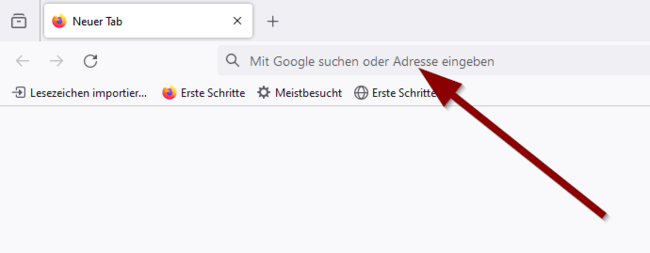
Open the configuration page of your router. The address and the access data can be found on the bottom of the router or in the manual.
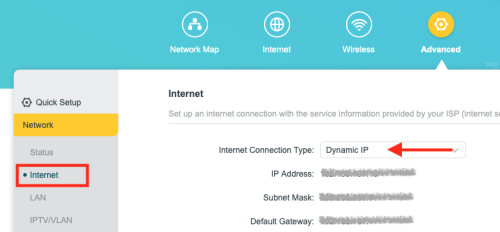
Set up tp-link router
Possible addresses for tp-link routers are:
Then log in with the access data. Details can be found on the bottom of your router or in the manual.

- Go to "Advanced"
- Select "Net/Network" from the menu
- Then select "Internet" - Alternatively, this item can also be called "WAN"
- The Internet Connection Type should be set to '"Dynamic IP".
If this is not the case:
- Change the setting "Internet Connection Type" to "Dynamic IP".
- Click on "Save" to apply the change.
- Wait at least 10 minutes.
- Disconnect the router from the power supply and wait at least 12 minutes before plugging it back in.
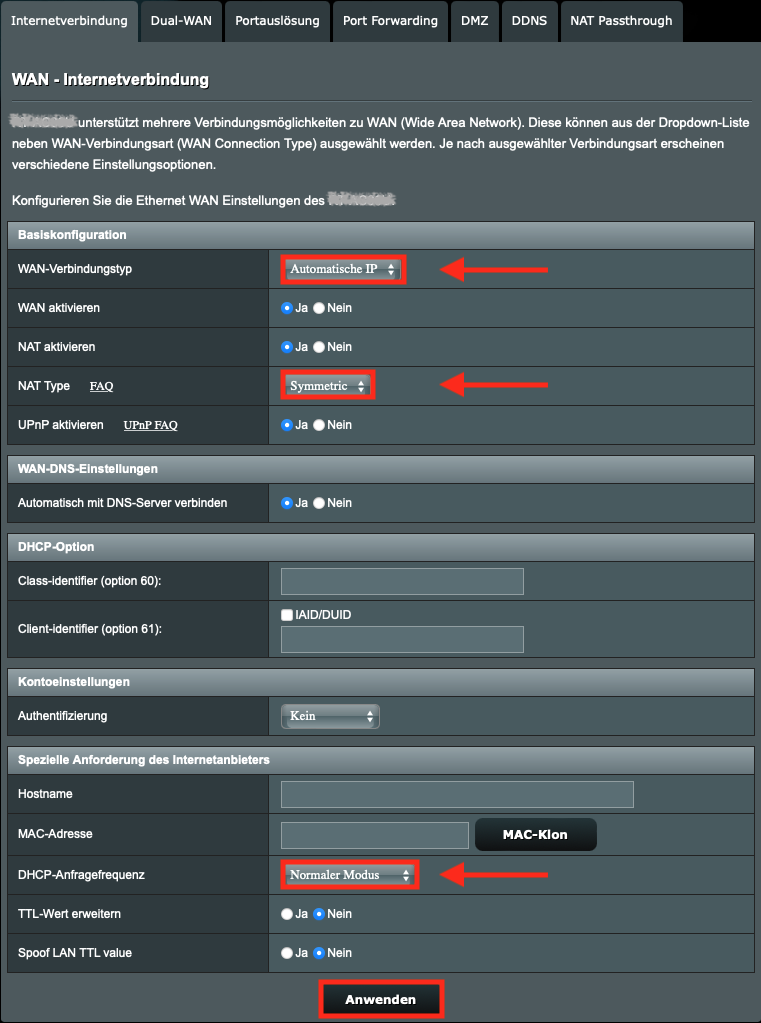
Setting up Asus router
Possible addresses for Asus routers are:
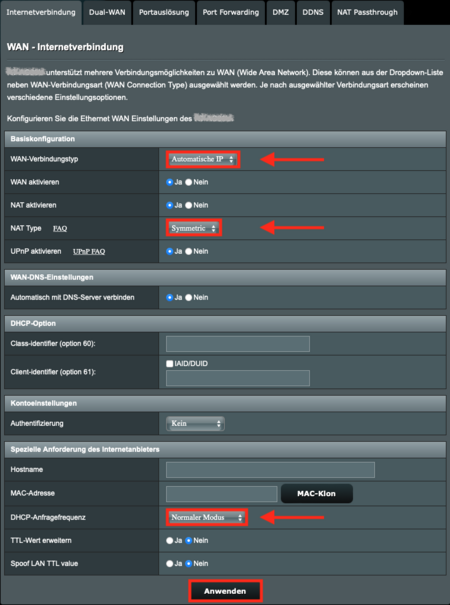
- Go to "Advanced settings" and "WAN".
- Choose the "Internet connection".
- Choose the following settings:
- WAN-Connection-Type: Automatic IP
- Activate WAN: Yes
- Activate NAT: Yes
- Type: Symmetric
- Automaticalle connect to DNS-Server: Yes
- DHCP request frequency: Normal mode
- Finally, save the changes with "Apply".
Setting up your Fritz!Box router
- Connect the network socket in your wall to the blue WAN port on the back of the device using a LAN cable.
- If your Fritz!Box doesn't have a WAN port, which is sometimes the case with older devices, the "LAN1" port should usually work. Here you can see which ports work for different router models.

- Connect your device, for example, your laptop, to the FRITZ!Box. A LAN connection is best. Alternatively, Wi-Fi is also possible.
- Next, open your browser and access the FRITZ!Box configuration interface via the address bar. If the FRITZ!Box is in its original state, the following addresses usually work:
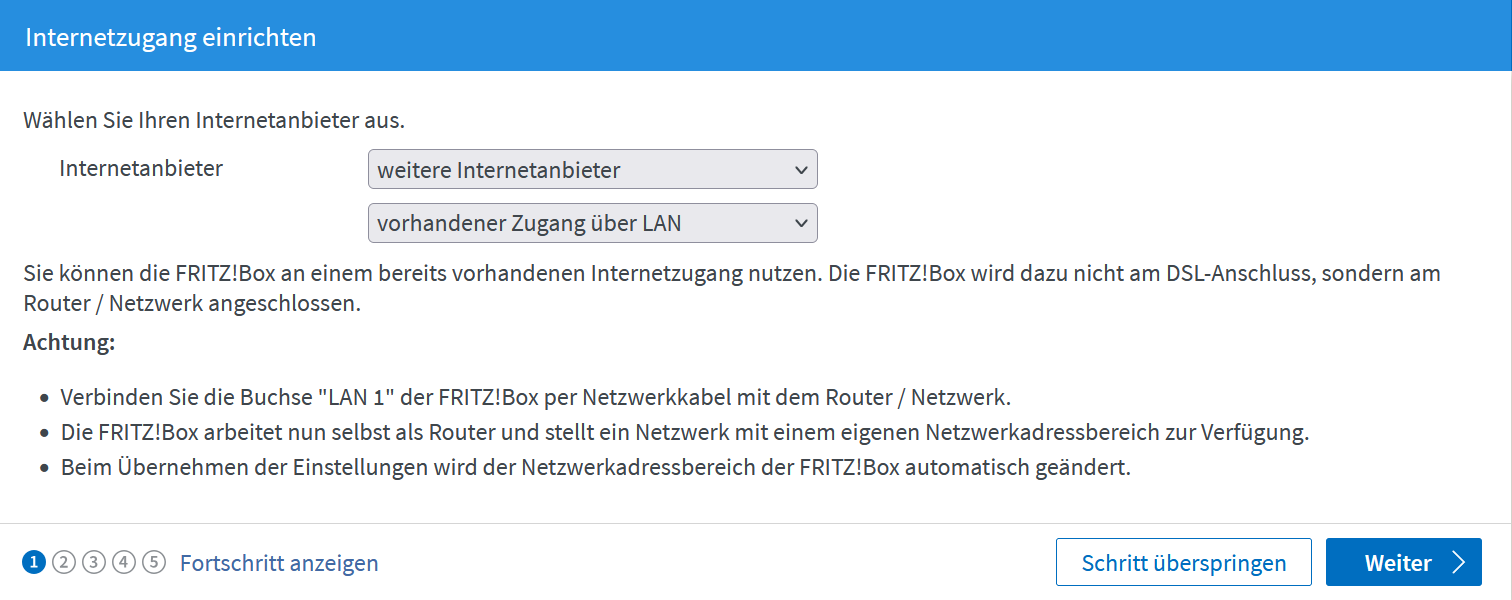
- If the FRITZ!Box has been reset to factory settings, you can follow the configuration wizard.
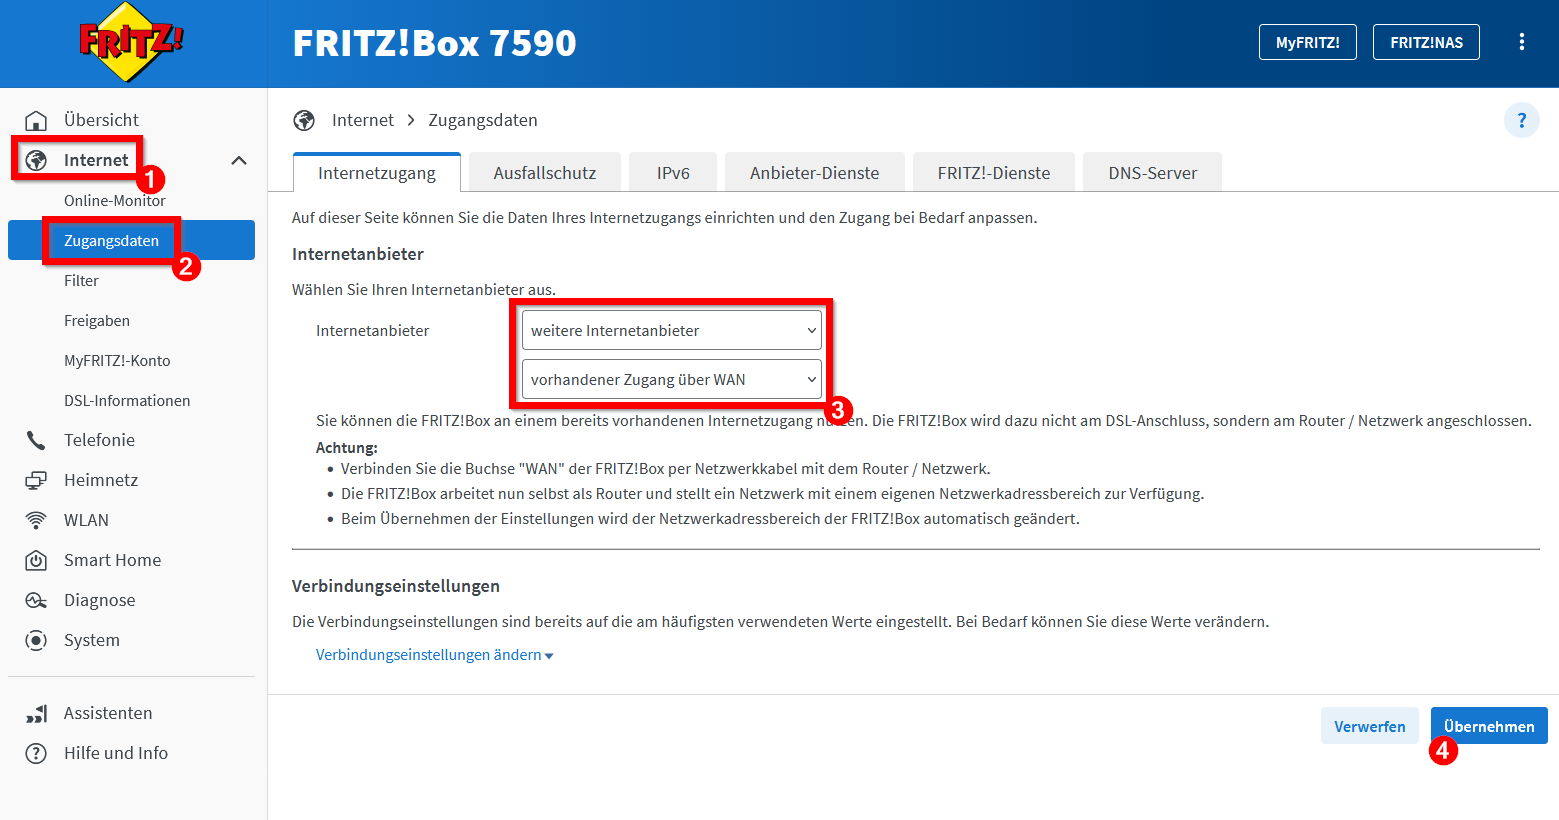
- If your FRITZ!Box is already configured, go to the following settings: Menu > Internet > Access Data, select "Other Internet providers".


WLAN[Bearbeiten | Quelltext bearbeiten]
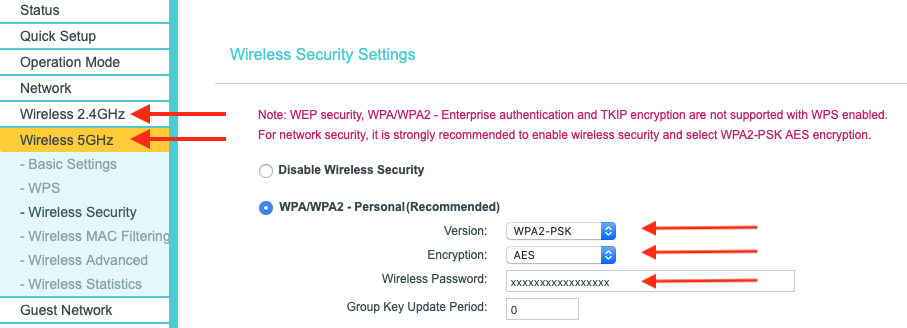
For security reasons, an encrypted WLAN should always be configured.
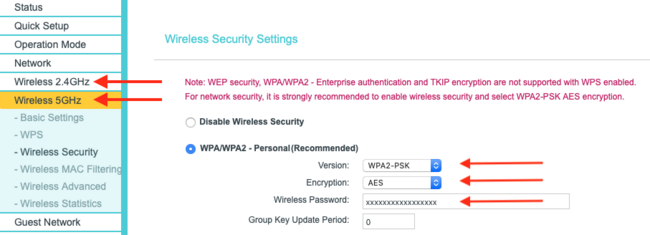
- Open the menu item "Wireless Security" or "Wireless Settings".
- Change the settings for the 2.4 GHz and 5 GHz network as follows:
- Select WPA/WPA2-Personal
- Version: WPA2-PSK
- Encryption: AES
- Set secure password
- Apply settings with "Save"
The password selected here is the Wi-Fi password for connecting other devices to the router via WLAN. |
To avoid problems with other wireless networks, the 5 GHz network should be used if the end devices support it. |


