| Zeile 35: | Zeile 35: | ||
[[Datei:Eduroam-unter-android-4.png|links|mini|ohne|350px]] | [[Datei:Eduroam-unter-android-4.png|links|mini|ohne|350px]] | ||
<br> | <br> | ||
| − | * Click on '''Neues Zertifikat erstellen'''. | + | * Click on '''"Neues Zertifikat erstellen"'''. |
<br clear=all> | <br clear=all> | ||
| Zeile 42: | Zeile 42: | ||
<br> | <br> | ||
* Give the certificate a unique name (e.g.: Mobile VPN) | * Give the certificate a unique name (e.g.: Mobile VPN) | ||
| − | * Select '''Version 1''' as the file format. | + | * Select '''"Version 1"''' as the file format. |
| − | * Then click on '''Neues Zertifikat zusenden'''. | + | * Then click on '''"Neues Zertifikat zusenden"'''. |
<br clear=all> | <br clear=all> | ||
| Zeile 50: | Zeile 50: | ||
* A new network certificate has been created for you. | * A new network certificate has been created for you. | ||
* First copy the '''Import Password''' to the clipboard. | * First copy the '''Import Password''' to the clipboard. | ||
| − | * Now click on '''Netzwerkzertifikat herunterladen'''. | + | * Now click on '''"Netzwerkzertifikat herunterladen"'''. |
<br clear=all> | <br clear=all> | ||
| Zeile 62: | Zeile 62: | ||
<br> | <br> | ||
* In order to be able to recognize the certificate afterwards, you will be asked to name the certificate here. | * In order to be able to recognize the certificate afterwards, you will be asked to name the certificate here. | ||
| − | * Name it '''UPB-VPN'''. | + | * Name it '''"UPB-VPN"'''. |
| − | * To use the login details, select '''VPN and Apps'''. | + | * To use the login details, select '''"VPN and Apps"'''. |
* Confirm with '''"OK"'''. | * Confirm with '''"OK"'''. | ||
<br clear=all> | <br clear=all> | ||
| Zeile 125: | Zeile 125: | ||
[[Datei:VPN Android-8.png|links|mini|ohne|350px]] | [[Datei:VPN Android-8.png|links|mini|ohne|350px]] | ||
<br> | <br> | ||
| − | * Click '''Select Certificate'''. | + | * Click '''"Select Certificate"'''. |
<br clear=all> | <br clear=all> | ||
| Zeile 131: | Zeile 131: | ||
<br> | <br> | ||
* Select the certificate we just installed. | * Select the certificate we just installed. | ||
| − | * Then click '''Select'''. | + | * Then click '''"Select"'''. |
<br clear=all> | <br clear=all> | ||
| Zeile 137: | Zeile 137: | ||
<br> | <br> | ||
* We have now successfully set up OpenVPN Connect. | * We have now successfully set up OpenVPN Connect. | ||
| − | * We can see that the VPN connection is active by the green '''"Connected''' symbol. | + | * We can see that the VPN connection is active by the green '''"Connected"''' symbol. |
<br clear=all> | <br clear=all> | ||
Version vom 1. Juli 2024, 14:12 Uhr
Some services are only available through the university network. These include, for example, access to network drives and the download of online resources from the homepage of the University Library. If you want to access these services when you are not at the university, you need a VPN connection. A Virtual Private Network guarantees secure access to the university network through other networks.
What needs to be done?[Bearbeiten | Quelltext bearbeiten]
- Install OpenVPN Connect from the PlayStore.
- Install a personal network certificate
- Download the configuration file:
- Use the .ovpn configuration file and your personal network certificate to configure OpenVPN Connect.
- Start a VPN connection.
Step-by-step instructions[Bearbeiten | Quelltext bearbeiten]
Install OpenVPN Connect[Bearbeiten | Quelltext bearbeiten]
Install the app OpenVPN Connect. Like other apps you can find it in the Google PlayStore

Install certificates[Bearbeiten | Quelltext bearbeiten]
For the VPN connection you need a network certificate. You cannot use the already installed certificate for Eduroam. Open the Serviceportal and log in with your university account.

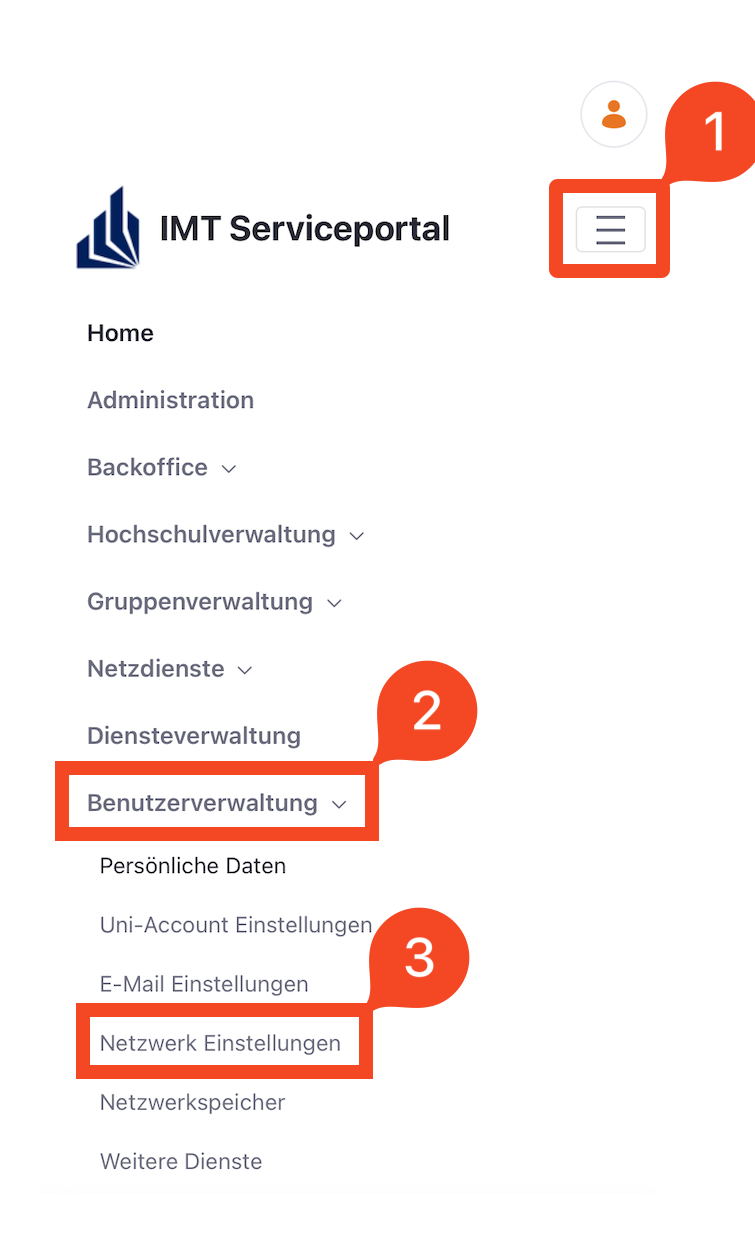
- Click on the 3 vertical bars on the upper right corner
- Click on User Management and then on Network Settings
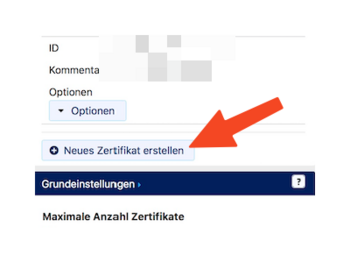
- Click on "Neues Zertifikat erstellen".
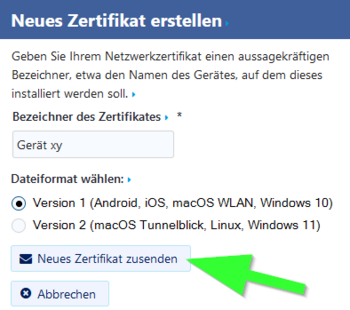
- Give the certificate a unique name (e.g.: Mobile VPN)
- Select "Version 1" as the file format.
- Then click on "Neues Zertifikat zusenden".

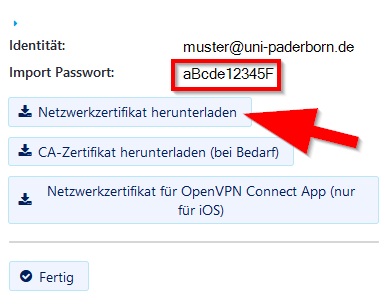
- A new network certificate has been created for you.
- First copy the Import Password to the clipboard.
- Now click on "Netzwerkzertifikat herunterladen".

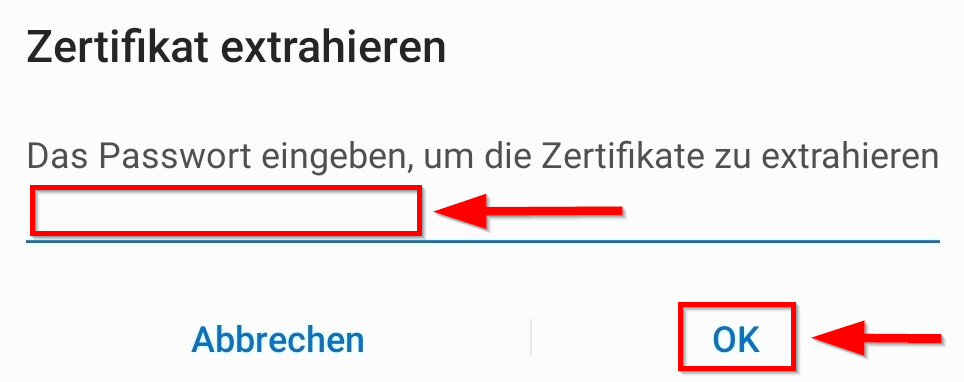
- To open the certificate you need your import password. We have already copied it to the clipboard and can now paste it here.
- Confirm with "OK".
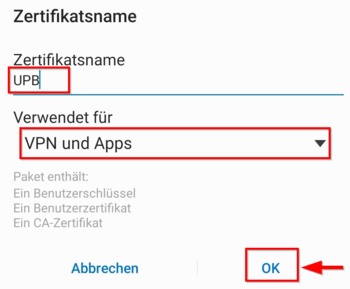
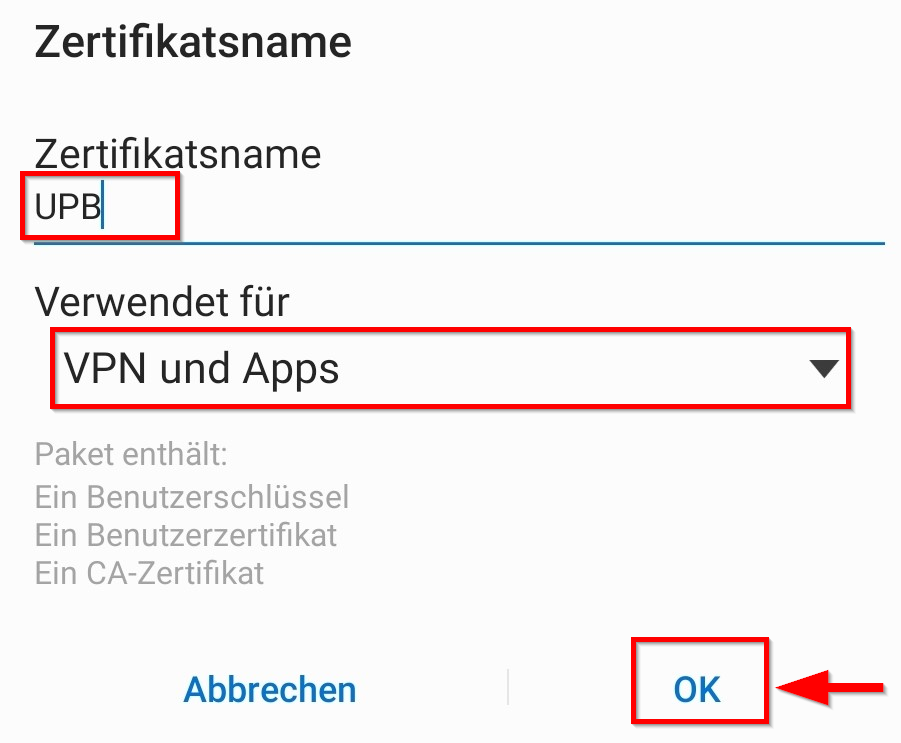
- In order to be able to recognize the certificate afterwards, you will be asked to name the certificate here.
- Name it "UPB-VPN".
- To use the login details, select "VPN and Apps".
- Confirm with "OK".
Download configuration file[Bearbeiten | Quelltext bearbeiten]
Download the configuration file, select the VPN you want to connect to and click Download. Normally "Uni-VPN (Standard)" should be the right choice, but if you have problems with the connection, try "Uni-VPN-TCP" again.
Note: You can click "Download" here and download your configuration file. This is not a screenshot ;-)
Direct all internet traffic through the tunnel?
- Accessing online resources may require that you route all network traffic through the tunnel.
- You do not need this option for pure access to network drives.
Set up OpenVPN Connect[Bearbeiten | Quelltext bearbeiten]
- Open the OpenVPN Connect app.
- We downloaded this in the first step.
Accept the data protection declaration by clicking on "Agree".
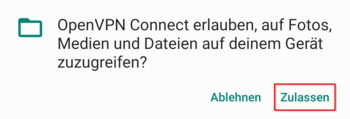
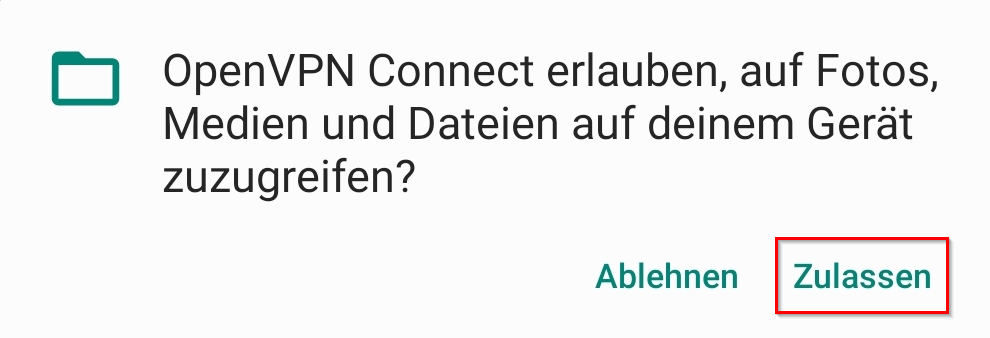
- OpenVPN Connect must be able to access your device.
- Click Allow.
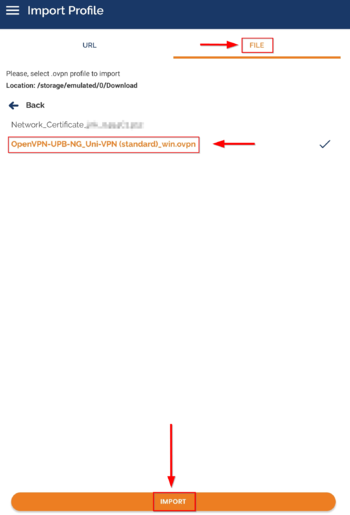
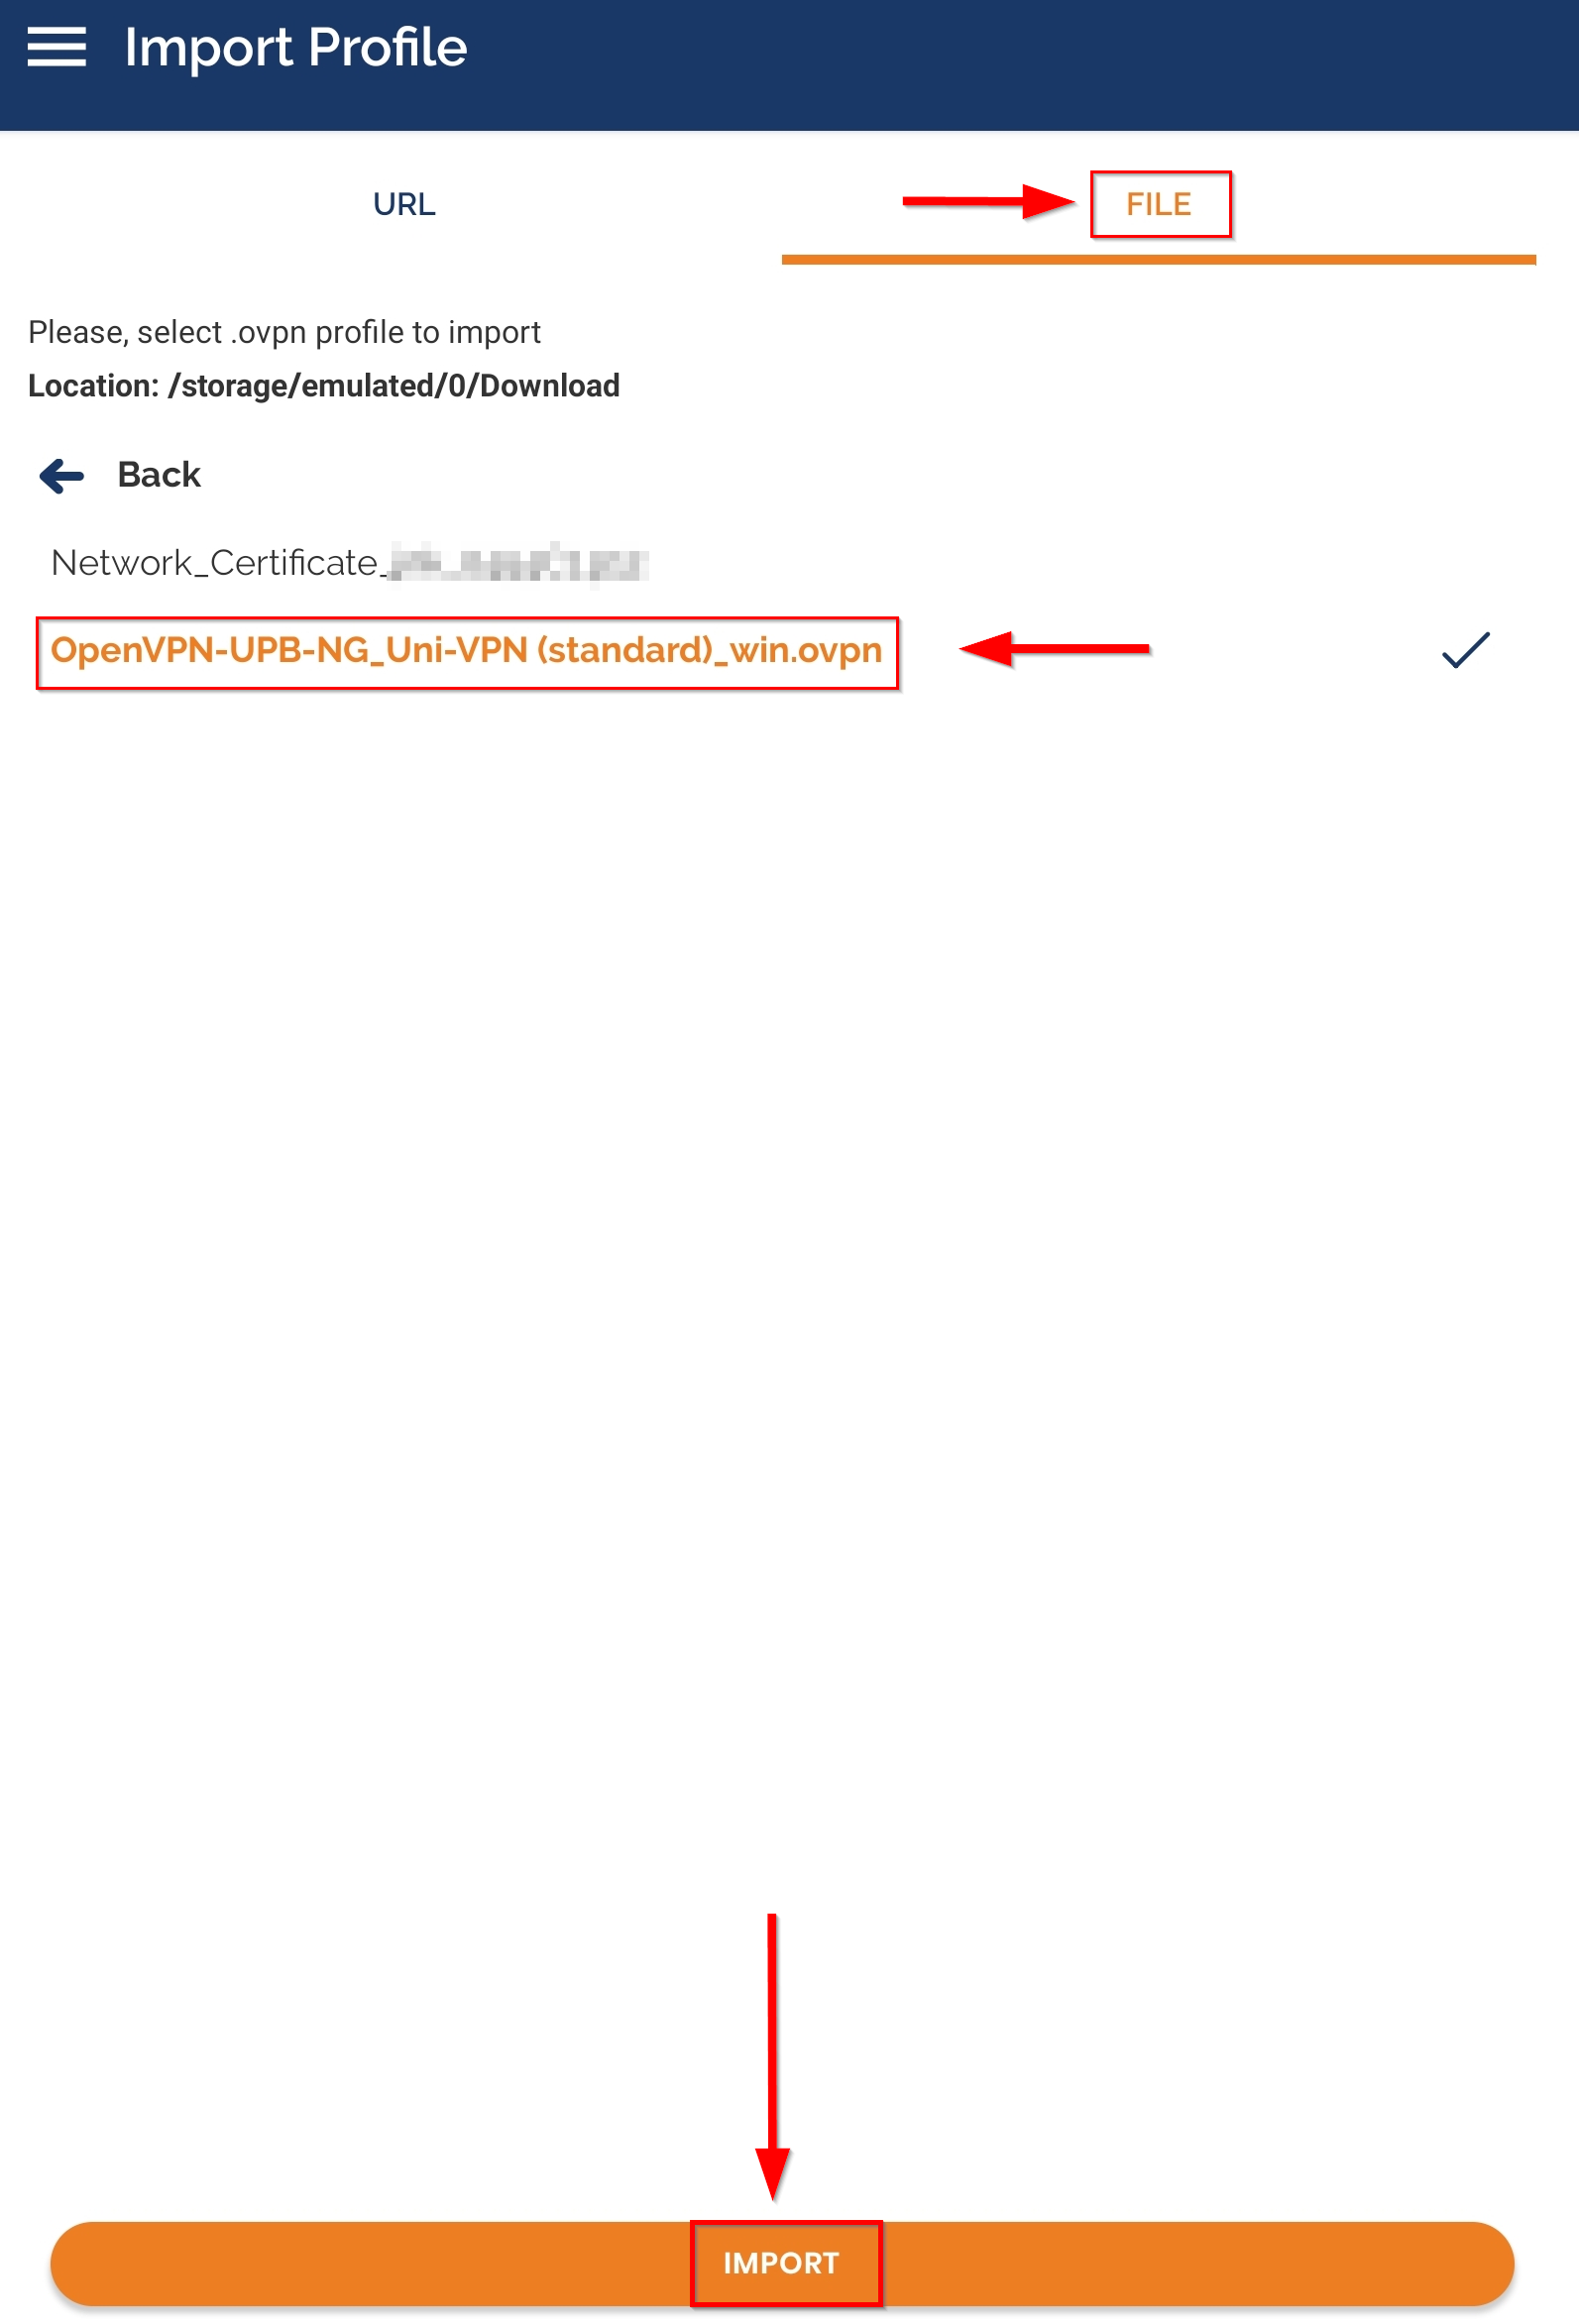
- Go to the "File" page.
- Go to the "Downloads" folder.
- Select the configuration file that we just downloaded.
- Click "Import" at the bottom.
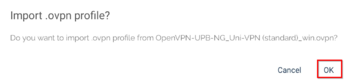
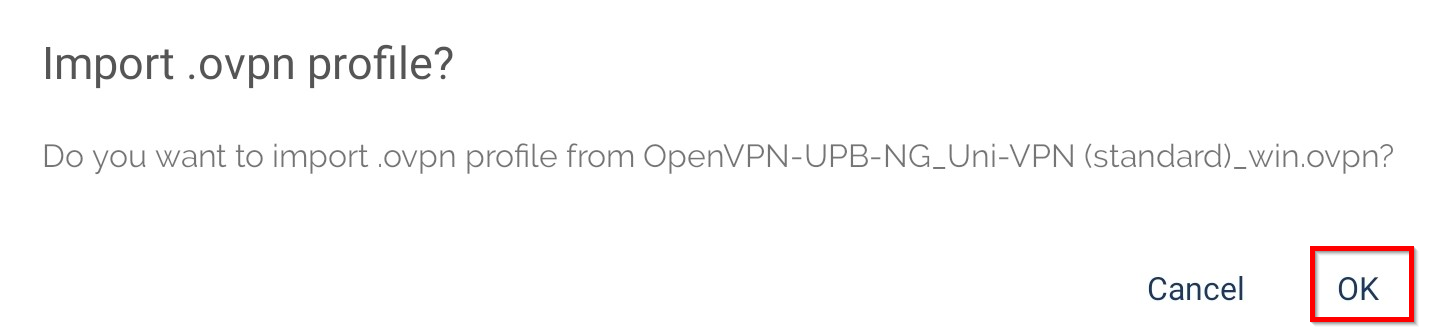
- Confirm the question with "OK".
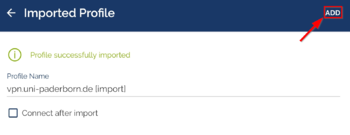
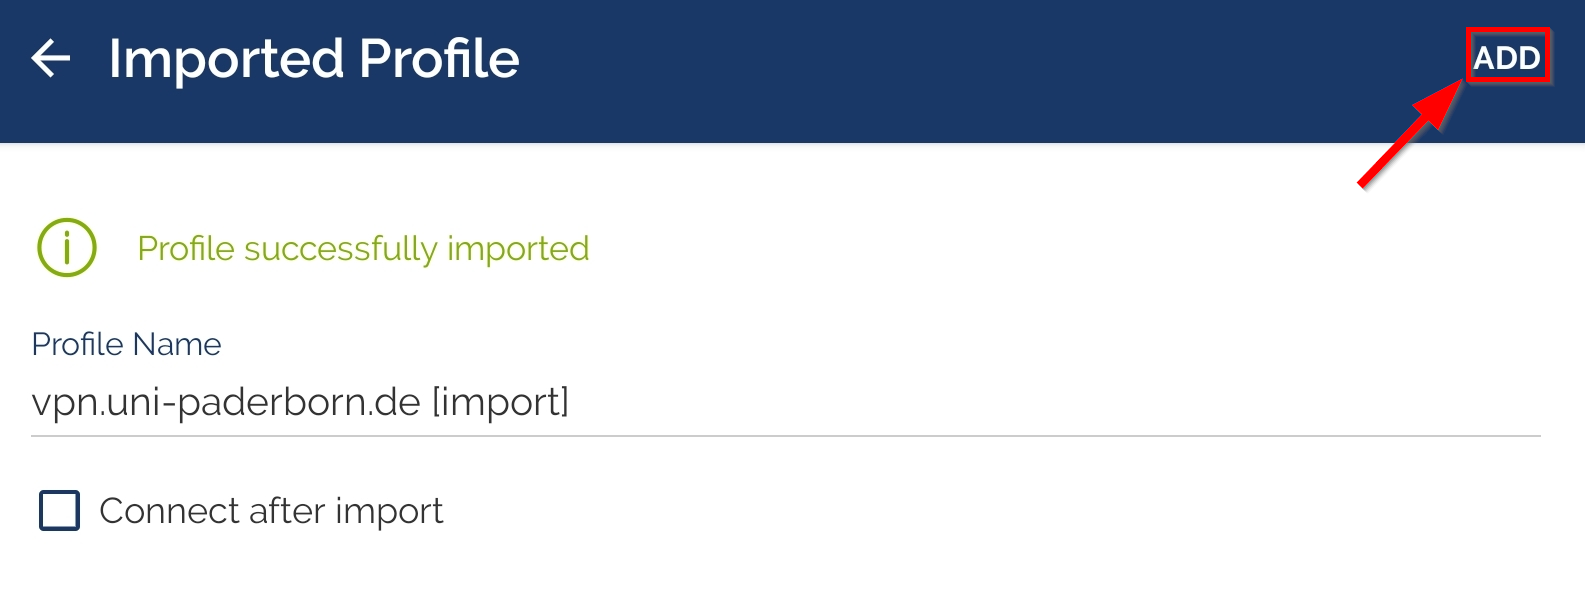
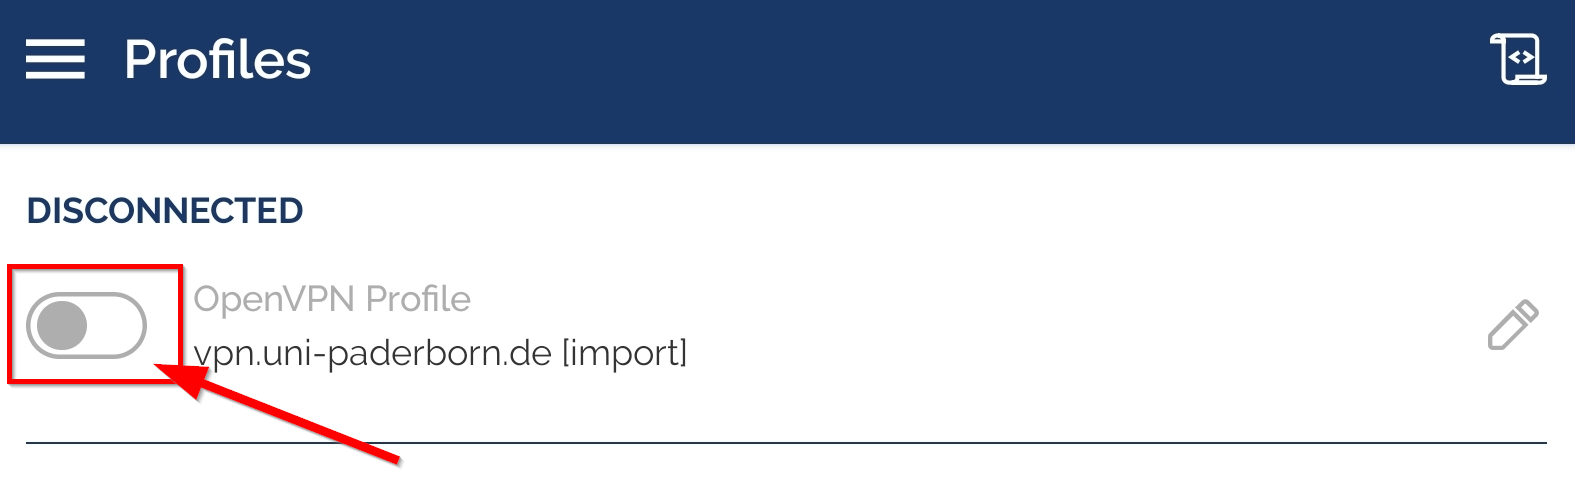
- Click "ADD" in the top right corner.
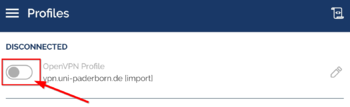
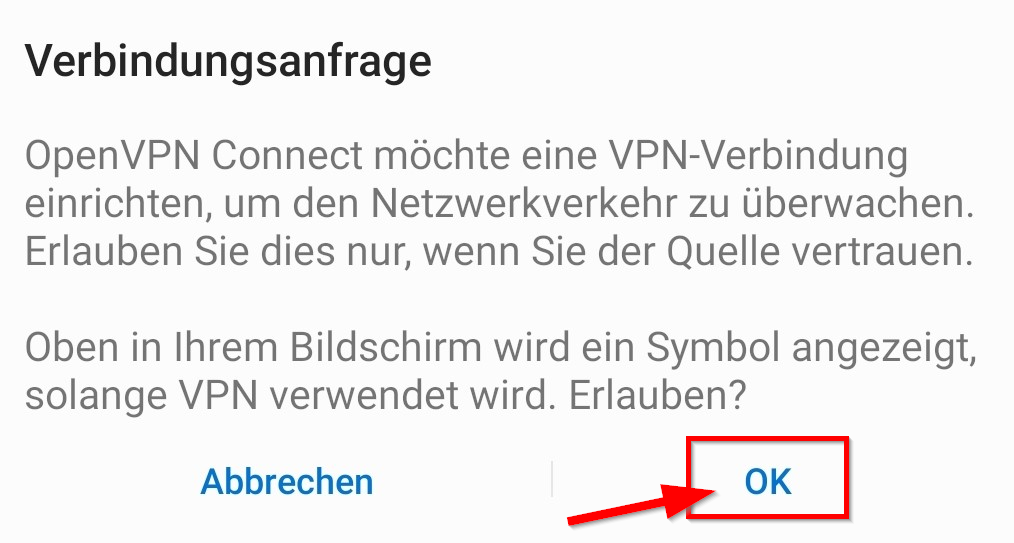
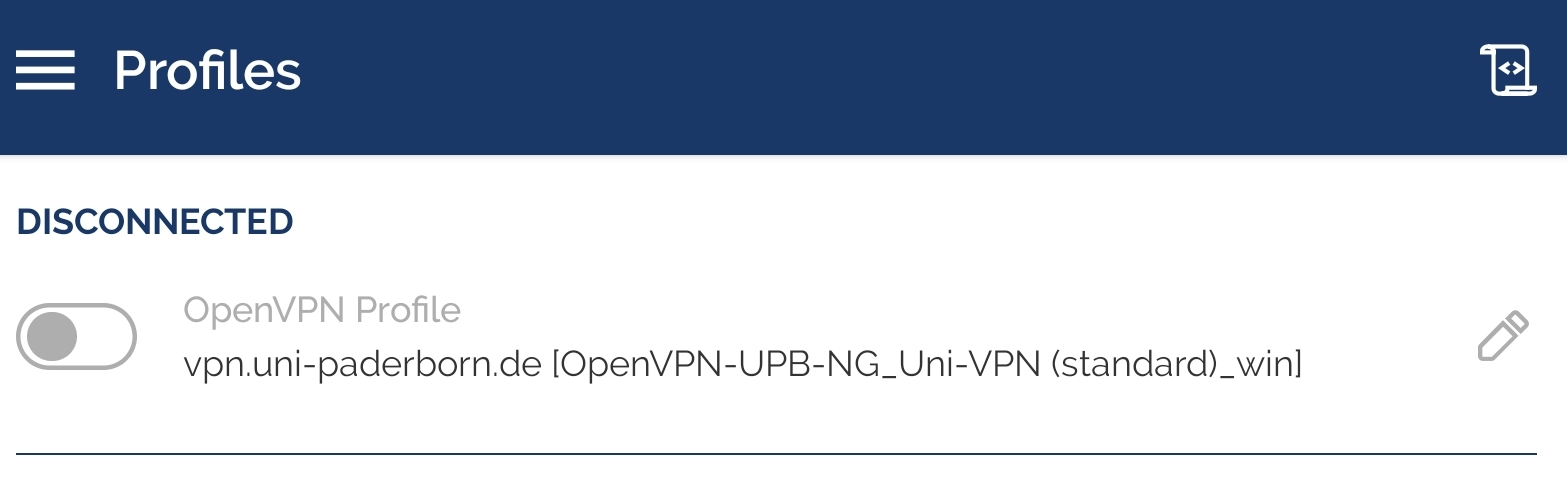
- Click on the "switch symbol" to activate the VPN connection.
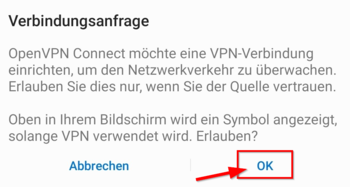
- Allow connection with "OK".
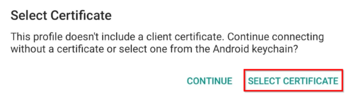
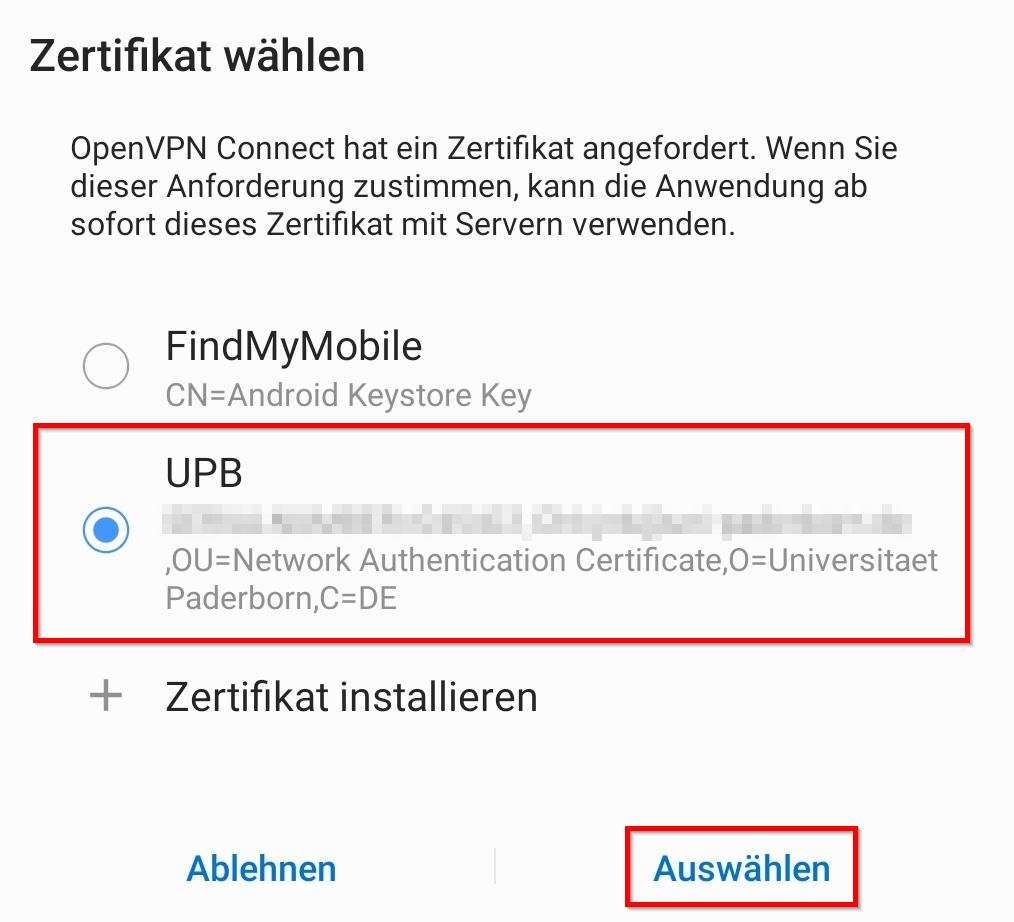
- Click "Select Certificate".
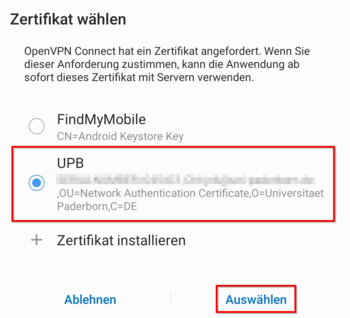
- Select the certificate we just installed.
- Then click "Select".
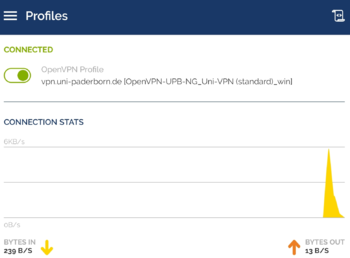
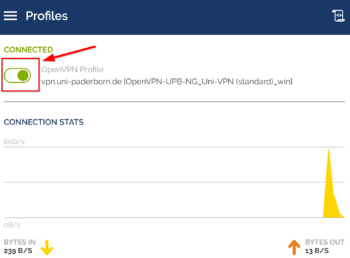
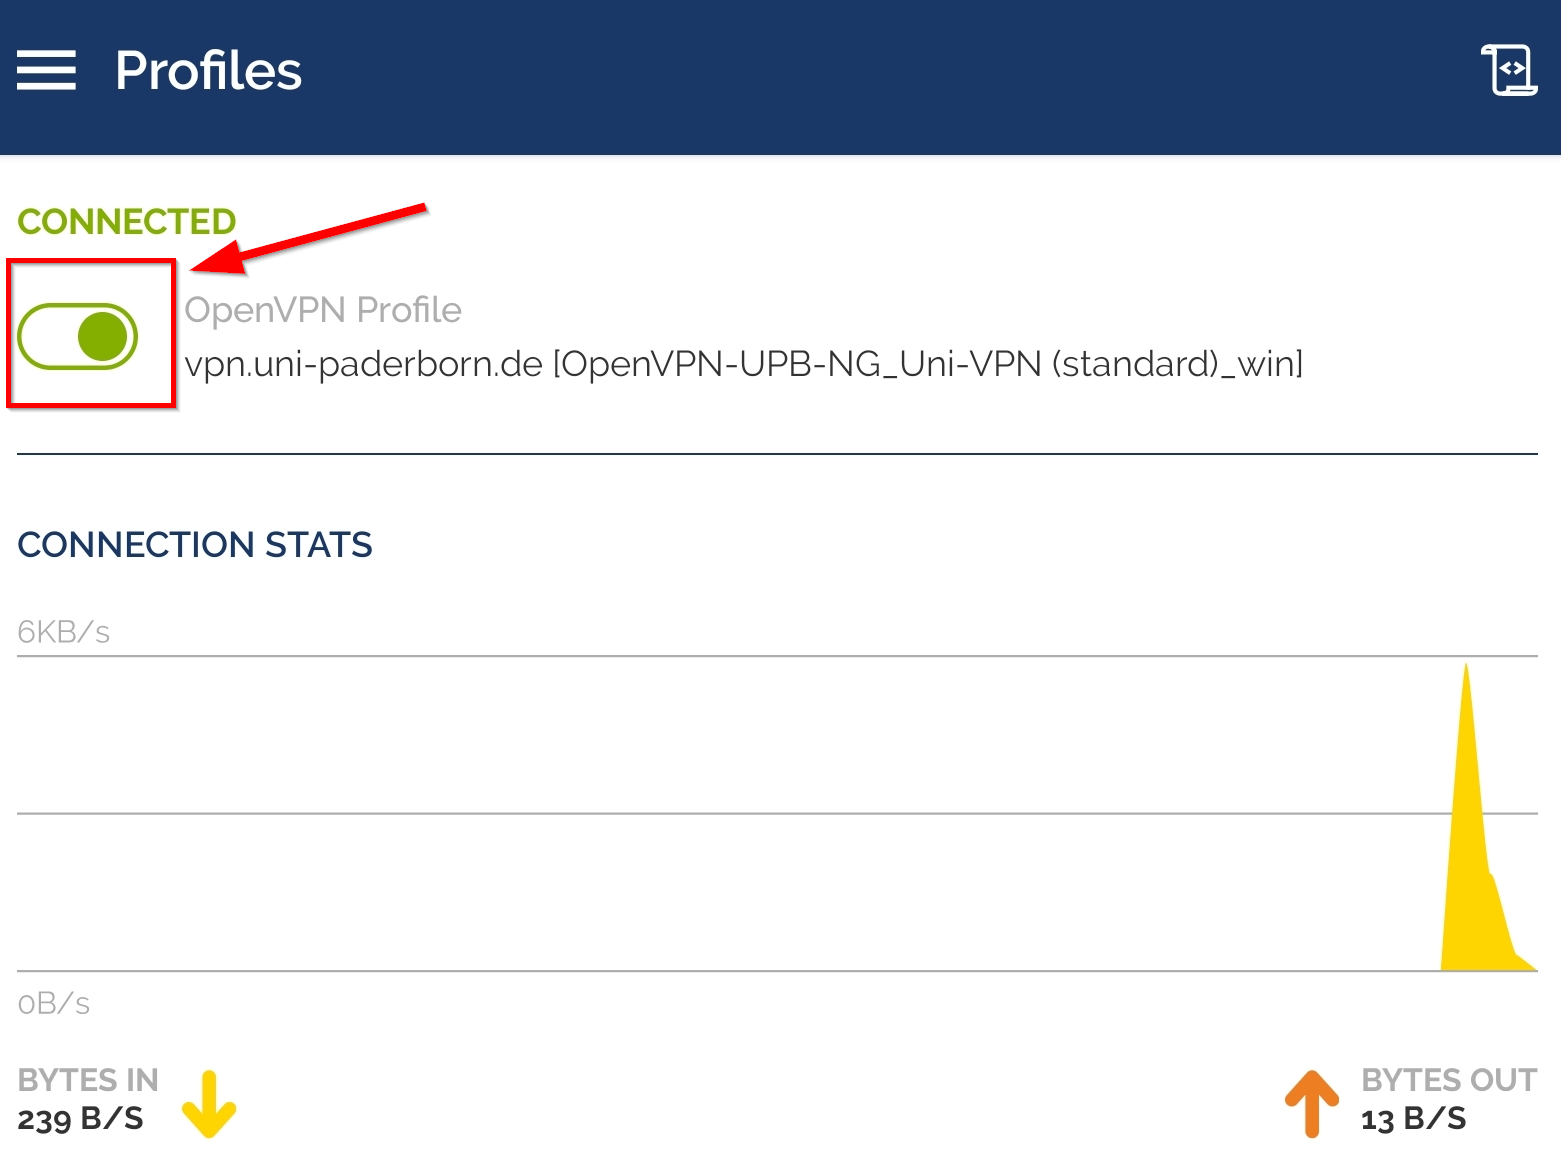
- We have now successfully set up OpenVPN Connect.
- We can see that the VPN connection is active by the green "Connected" symbol.
Note: If the VPN connection is active, all your Internet activities will be redirected via the University of Paderborn servers, so please deactivate the VPN connection if you don't need it.
Deactivate VPN connection[Bearbeiten | Quelltext bearbeiten]
- Click on the switch icon.
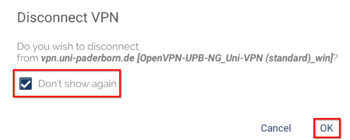
- Tick "Don't show again".
- Click "OK".
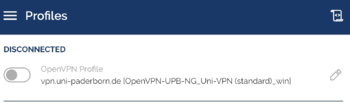
- The VPN connection is now deactivated.
- You can reactivate it by clicking on the gray switch.
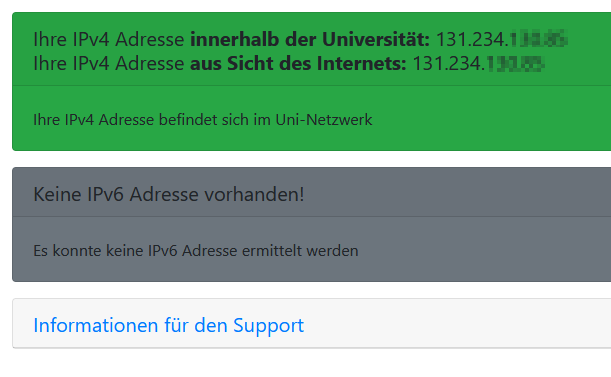
Check VPN[Bearbeiten | Quelltext bearbeiten]
You can check the functionality of the VPN by visiting:
Your IP will be displayed there and it will show whether you are on the university network.


