Jnk (Diskussion | Beiträge) |
|||
| (25 dazwischenliegende Versionen von 2 Benutzern werden nicht angezeigt) | |||
| Zeile 4: | Zeile 4: | ||
|translated title=eduroam on Android | |translated title=eduroam on Android | ||
}} | }} | ||
| + | |||
| + | {{Fingerprint_Radiuszertifikat-en}} | ||
| + | |||
This tutorial describes how to set up the Wi-Fi eduroam on android. | This tutorial describes how to set up the Wi-Fi eduroam on android. | ||
<br><br> | <br><br> | ||
| − | Android is used by many different manufactureres and therefore can look very different. We can't offer | + | Android is used by many different manufactureres and therefore can look very different. We can't offer instructions for every device. |
| + | |||
| + | ==Video tutorial== | ||
| + | {{#ev:upb|391464f9199086b9b68283a0b236b307}} | ||
== Step-by-step description == | == Step-by-step description == | ||
| Zeile 14: | Zeile 20: | ||
Visit the [https://serviceportal.uni-paderborn.de/ Serviceportal] and log in with your Uni-Account.<br> | Visit the [https://serviceportal.uni-paderborn.de/ Serviceportal] and log in with your Uni-Account.<br> | ||
| − | [[Datei:Eduroam-android-1.png|80px]] We recomend using the '''"Google-Chrome-Browser"'''. Other | + | [[Datei:Eduroam-android-1.png|80px]] We recomend using the '''"Google-Chrome-Browser"'''. Other browsers may also work. |
[[Datei:Eduroam-unter-android-3.png|links|mini|ohne|350px]] | [[Datei:Eduroam-unter-android-3.png|links|mini|ohne|350px]] | ||
<br> | <br> | ||
* Click on the displayed icon. | * Click on the displayed icon. | ||
| − | * Click on ''' | + | * Click on '''"User Selfcare"''' |
* Click on '''"Network Settings"'''. | * Click on '''"Network Settings"'''. | ||
<br clear=all> | <br clear=all> | ||
| Zeile 28: | Zeile 34: | ||
<br clear=all> | <br clear=all> | ||
| − | [[Datei: | + | [[Datei:Netzwerkzertifikat-container-v1.png|links|mini|ohne|350px]] |
<br> | <br> | ||
* Name your certificate. | * Name your certificate. | ||
| + | * Choose '''"Version 1"''' as the data format. | ||
* Click on '''"Send Certificate"'''. | * Click on '''"Send Certificate"'''. | ||
<br clear=all> | <br clear=all> | ||
| Zeile 36: | Zeile 43: | ||
===Install user certificate=== | ===Install user certificate=== | ||
| − | [[Datei: | + | [[Datei:Netzwerkzertifikat-download.png|links|mini|ohne|350px]] |
<br> | <br> | ||
* A new certificate was created. | * A new certificate was created. | ||
| − | * Copy the '''Import Passwort'''. | + | * Copy the '''"Import Passwort"'''. |
* Click on '''"Download certificate"'''. | * Click on '''"Download certificate"'''. | ||
<br clear=all> | <br clear=all> | ||
| Zeile 45: | Zeile 52: | ||
[[Datei:Eduroam-unter-android-7.png|links|mini|ohne|350px]] | [[Datei:Eduroam-unter-android-7.png|links|mini|ohne|350px]] | ||
<br> | <br> | ||
| − | * Use your '''Import Passwort''' to open the certificate. | + | * Use your '''"Import Passwort"''' to open the certificate. |
| − | * Click on '''Ok'''. | + | * Click on '''"Ok"'''. |
<br clear=all> | <br clear=all> | ||
<bootstrap_accordion> | <bootstrap_accordion> | ||
| − | + | <bootstrap_panel heading="The dialogue is not displayed?"> | |
| − | + | Normally, the certificate import assistant opens now. If this isn't the case: | |
Swipe down from the top. Your certificate should appear as a download in the infocenter. Open it with a click. | Swipe down from the top. Your certificate should appear as a download in the infocenter. Open it with a click. | ||
| − | </bootstrap_panel> | + | </bootstrap_panel> |
</bootstrap_accordion> | </bootstrap_accordion> | ||
| Zeile 59: | Zeile 66: | ||
[[Datei:Eduroam-unter-android-8.png|links|mini|ohne|350px]] | [[Datei:Eduroam-unter-android-8.png|links|mini|ohne|350px]] | ||
<br> | <br> | ||
| − | * Name your certificate - e.g. Eduroam'''. | + | * Name your certificate in order to find it again - e.g. Eduroam'''. |
| − | * Choose '''WLAN''' or '''Wi-Fi'''. | + | * Choose '''"WLAN"''' or '''"Wi-Fi"'''. |
| − | * Click on '''Ok'''. | + | * Click on '''"Ok"'''. |
<br clear=all> | <br clear=all> | ||
| − | [[Datei: | + | [[Datei:Netzwerkzertifikat-identity.png|links|mini|ohne|350px]] |
<br> | <br> | ||
* Copy the identifier named '''"Identität"'''. | * Copy the identifier named '''"Identität"'''. | ||
* We will need it in the next step. | * We will need it in the next step. | ||
<br clear=all> | <br clear=all> | ||
| − | |||
| − | |||
| − | |||
| − | |||
| − | |||
| − | |||
| − | |||
<br clear=all> | <br clear=all> | ||
| Zeile 96: | Zeile 96: | ||
<span style="color:green">Info: If you can't find these setting - Click on '''Additional settings''' at first.</span> | <span style="color:green">Info: If you can't find these setting - Click on '''Additional settings''' at first.</span> | ||
| + | |||
| + | If the procedure described above doesn't work, you'll find two additional installation options here. | ||
<bootstrap_accordion> | <bootstrap_accordion> | ||
| − | <bootstrap_panel heading=" | + | <bootstrap_panel heading="Variant 1" color="info"> |
| − | + | On older Android devices, the required HARICA CA certificate is not present. You can install it manually as follows: | |
| − | + | ||
| − | * | + | [[Datei:Netzwerkzertifikat-download.png|links|mini|ohne|350px]] |
| + | |||
| + | <br> | ||
| + | * Install the network certificate as described above. | ||
| + | |||
| + | * Additionally, click here on '''"Download CA certificate"'''</span> | ||
| + | |||
| + | <br clear=all> | ||
| + | |||
| + | [[Datei:Eduroam-android-ca-certificate-01.png|links|mini|ohne|350px]] | ||
| + | |||
| + | <br> | ||
| + | * Now open the Android settings to install the CA certificate manually. | ||
| + | |||
| + | * The menu is located in different places depending on the Android version and manufacturer. | ||
| + | |||
| + | * The easiest way to do this is to search for "Certificate" in the '''Settings''' | ||
| + | |||
| + | * Then select the menu item "Install CA Certificate from Store"''' - this may also be named differently depending on the version. | ||
| + | |||
| + | <br clear=all> | ||
| + | |||
| + | [[Datei:Eduroam-android-ca-certificate-02.png|links|mini|ohne|350px]] | ||
| + | |||
<br> | <br> | ||
| − | + | * Now click on CA Certificate | |
| + | |||
| + | <br clear=all> | ||
| + | |||
| + | [[Datei:Eduroam-android-04.png|links|mini|ohne|350px]] | ||
| − | |||
<br> | <br> | ||
| − | * | + | * Now select the certificate "HARICA-TLS-Root-2021-RSA.crt"''' that you just downloaded. |
| − | * | + | |
| − | * | + | |
| + | ``` <br clear=all> | ||
| + | |||
| + | Now configure eduroam with the following settings: | ||
| + | |||
| + | [[Datei:Eduroam-Android-Systemcert.jpg|links|mini|ohne|350px]] | ||
| + | |||
| + | <br> | ||
| + | * '''EAP Method:''' TLS | ||
| + | * '''Identity:''' We already copied this in a previous step - paste from clipboard. Alternatively, enter ''username@uni-paderborn.de''. Replace '''username''' with your personal username for your university account. | ||
| + | |||
| + | * '''CA Certificate:''' Use system certificates | ||
| + | * '''Domain:''' radius.uni-paderborn.de | ||
| + | * '''User Certificate:''' You named this yourself. If you followed the recommendation, this is called "eduroam". | ||
| + | |||
<br clear=all> | <br clear=all> | ||
| + | </bootstrap_panel> | ||
| + | |||
| + | <bootstrap_panel heading="Variant 2" color="info"> | ||
| + | If the menu item "Use CA certificate system certificates"''' is not present in your Wi-Fi settings, or if the connection via this option does not work, you can install the CA certificate as a Wi-Fi certificate and select it manually. To do this, proceed as follows: | ||
| + | |||
| + | [[Datei:Netzwerkzertifikat-download.png|links|mini|ohne|350px]] | ||
| − | |||
<br> | <br> | ||
| + | * Install the network certificate as described above. | ||
| + | |||
| + | * Additionally, click here on "Download CA certificate"'''</span> | ||
| + | |||
| + | <br clear=all> | ||
| + | |||
| + | [[File:Eduroam-android-ca-certificate-01.png|links|mini|ohne|350px]] | ||
| + | |||
| + | <br> | ||
| + | * Now open the Android settings to install the CA certificate manually. | ||
| + | |||
| + | * The menu is located in different places depending on the Android version and manufacturer. | ||
| + | |||
| + | * The easiest way to find it is to search for "Certificate" in the '''Settings''' | ||
| + | |||
| + | * Then select the menu item "Install CA certificate from storage" - this may also be named differently depending on the version. | ||
| − | |||
| − | |||
| − | |||
<br clear=all> | <br clear=all> | ||
| − | + | [[Datei:Eduroam-android-ca-certificate-03.png|links|mini|ohne|350px]] | |
| − | [[Datei:Eduroam- | + | |
<br> | <br> | ||
| − | * ''' | + | * Now click on Wi-Fi certificate |
| − | * ''' | + | |
| − | * '''CA | + | <br clear=all> |
| − | * ''' | + | |
| − | * ''' | + | [[Datei:Eduroam-android-04.png|links|mini|ohne|350px]] |
| + | |||
| + | * Now select the certificate "HARICA-TLS-Root-2021-RSA.crt"''' that you just downloaded. | ||
| + | |||
| + | |||
| + | ``` | ||
| + | |||
| + | [[Datei:Eduroam-android-03.png|links|mini|ohne|350px]] | ||
| + | |||
| + | * Name the certificate '''"HARICA"'''. | ||
| + | |||
| + | |||
| + | |||
| + | Next, open the Wi-Fi settings and select eduroam. Configure the network with the following settings: | ||
| + | |||
| + | [[Datei:Eduroam-android-ca-cert-manuell.png|links|mini|ohne|350px]] | ||
| + | |||
| + | * '''EAP Method:''' TLS | ||
| + | |||
| + | * '''Identity:''' We already copied this in a previous step - paste from clipboard. Alternatively, enter username@uni-paderborn.de. Replace '''username''' with your personal username for the university account. | ||
| + | |||
| + | * '''CA Certificate:''' You named this yourself. If you followed the recommendation, this will be called "harica" | ||
| + | |||
| + | * '''Domain:''' radius.uni-paderborn.de | ||
| + | * '''User certificate:''' You named this yourself. If you followed the recommendation, this will be called "eduroam". | ||
| + | |||
| + | <br clear=all> | ||
| + | |||
</bootstrap_panel> | </bootstrap_panel> | ||
| + | |||
</bootstrap_accordion> | </bootstrap_accordion> | ||
| Zeile 137: | Zeile 225: | ||
==Alternatives== | ==Alternatives== | ||
| − | On Android 9 the CA certificate may not be needed. You can choose '''Use network certificates''' instead. | + | On Android 9 the CA certificate may not be needed. You can choose '''"Use network certificates"''' instead. |
==Troubleshooting== | ==Troubleshooting== | ||
| − | = | + | <bootstrap_accordion> |
| + | <bootstrap_panel heading="No connection to eduroam" color="info"> | ||
Try the following steps: | Try the following steps: | ||
* Deactivate and activate '''Wi-Fi''' | * Deactivate and activate '''Wi-Fi''' | ||
* Deactivate and activate '''Airplane Mode''' | * Deactivate and activate '''Airplane Mode''' | ||
* Perform a '''restart'''. | * Perform a '''restart'''. | ||
| + | </bootstrap_panel> | ||
| − | = | + | <bootstrap_panel heading="Certificate can't be installed" color="info"> |
Do you get the error message "Certificate can't be read"? Try to install the certificate manually. Download the certificate. Ignore the error message. | Do you get the error message "Certificate can't be read"? Try to install the certificate manually. Download the certificate. Ignore the error message. | ||
<br> Open the '''settings'''. The path can differ but open | <br> Open the '''settings'''. The path can differ but open | ||
| Zeile 153: | Zeile 243: | ||
<br> | <br> | ||
Click on '''Install certificates from SD-Card''' and install the downloaded certificates. | Click on '''Install certificates from SD-Card''' and install the downloaded certificates. | ||
| − | |||
<br clear=all> | <br clear=all> | ||
<span style="color:green">Info: Can't find the option in the menu? Search for it.</span> | <span style="color:green">Info: Can't find the option in the menu? Search for it.</span> | ||
| + | </bootstrap_panel> | ||
| − | = | + | <bootstrap_panel heading="Certificate: Password wrong" color="info"> |
Do you get the error message "Password wrong". Don't use the clipboard but type in the password manually. | Do you get the error message "Password wrong". Don't use the clipboard but type in the password manually. | ||
<br> | <br> | ||
That does't help either? There is no fix for this problem yet. | That does't help either? There is no fix for this problem yet. | ||
| + | </bootstrap_panel> | ||
| + | |||
| + | </bootstrap_accordion> | ||
Aktuelle Version vom 29. Dezember 2025, 18:11 Uhr
The RADIUS server certificate was replaced on 17 December 2025 at 8:00 a.m. After that, your device may prompt you to verify the certificate before trusting it. You can find the current fingerprint for the certificate here:
You do not need to replace any network certificates on your device. Most devices should still be able to connect to eduroam without any problems. More details on how individual devices will behave can be found here:
For details click here
Depending on the device, you may have to reconnect to eduroam, select the certificate again or trust the certificate.
macOS
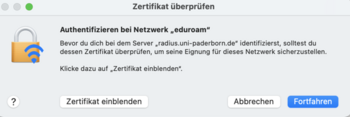
- Zertifikat einblenden to check certificate
- Continue to trust the certificate
- You may need to select your certificate again afterwards.
- Do not enter a username to log in to eduroam!


iPhone und iPad
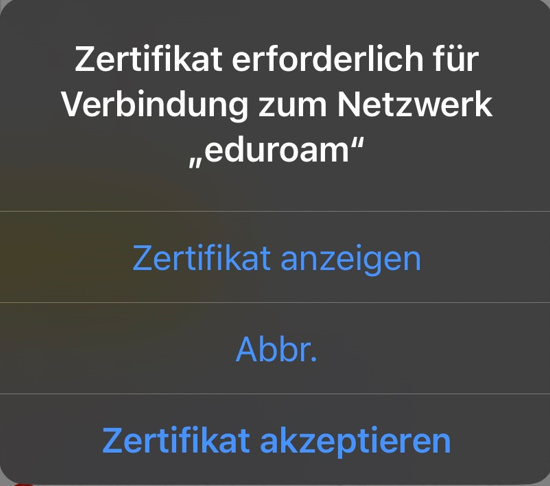
- Display certificate to check the certificate
- Accept certificate to trust the certificate

Windows

- Show certificate details to check the certificate
- Connect to trust the certificate
This tutorial describes how to set up the Wi-Fi eduroam on android.
Android is used by many different manufactureres and therefore can look very different. We can't offer instructions for every device.
Video tutorial[Bearbeiten | Quelltext bearbeiten]
Step-by-step description[Bearbeiten | Quelltext bearbeiten]
Create certificate[Bearbeiten | Quelltext bearbeiten]
Bevore setting up eduroam, we must create and install a certificate. You can use mobile data for this. Otherwise use webauth.
Visit the Serviceportal and log in with your Uni-Account.
 We recomend using the "Google-Chrome-Browser". Other browsers may also work.

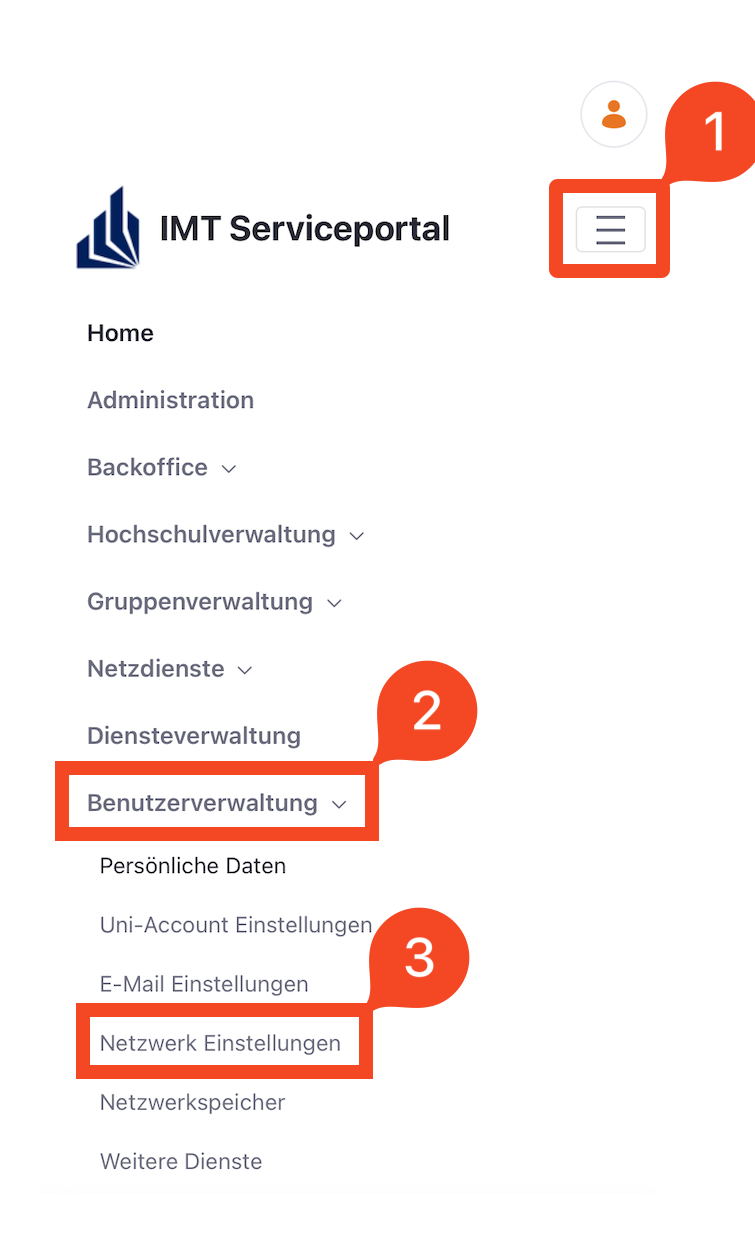
- Click on the displayed icon.
- Click on "User Selfcare"
- Click on "Network Settings".
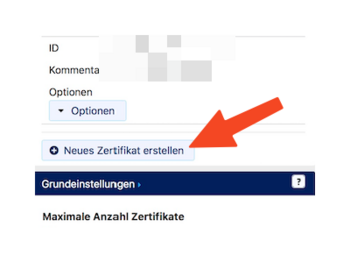
- Click on "Create network certificate".
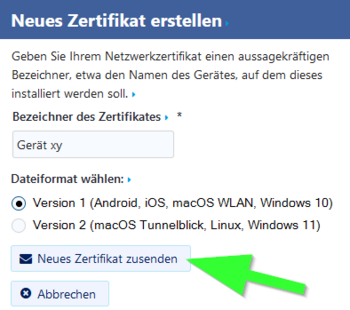
- Name your certificate.
- Choose "Version 1" as the data format.
- Click on "Send Certificate".
Hinweis: Create a certificate for every device. A device isn't used anymore? A device got lost or stolen? Retract your certificate!
Install user certificate[Bearbeiten | Quelltext bearbeiten]

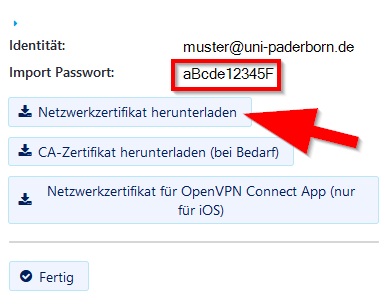
- A new certificate was created.
- Copy the "Import Passwort".
- Click on "Download certificate".
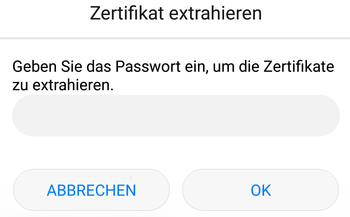
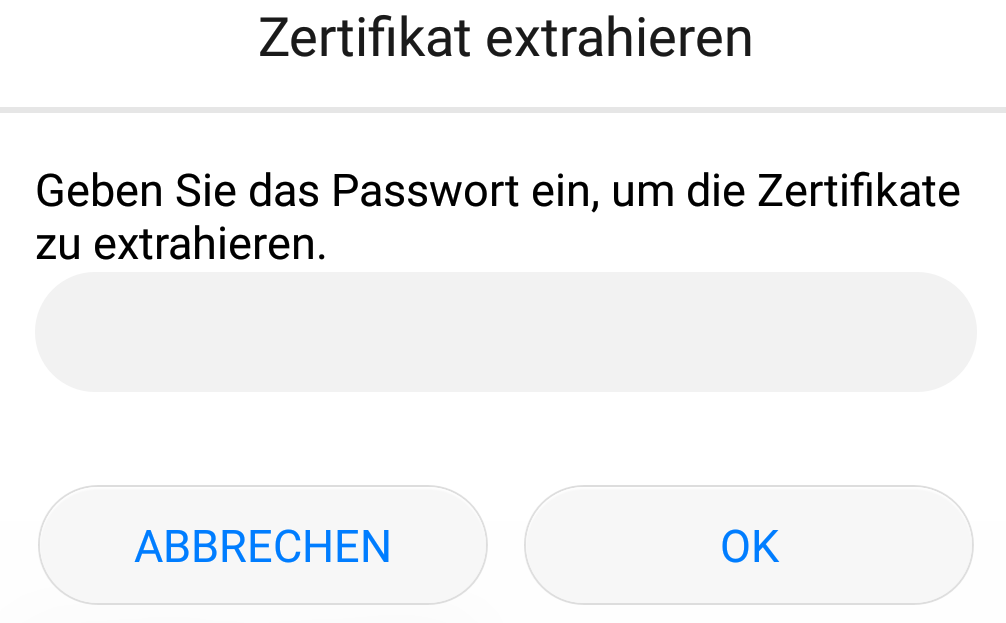
- Use your "Import Passwort" to open the certificate.
- Click on "Ok".
The dialogue is not displayed?
Normally, the certificate import assistant opens now. If this isn't the case: Swipe down from the top. Your certificate should appear as a download in the infocenter. Open it with a click.
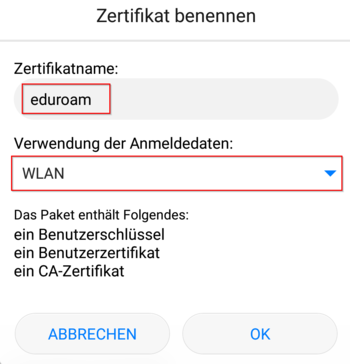
- Name your certificate in order to find it again - e.g. Eduroam.
- Choose "WLAN" or "Wi-Fi".
- Click on "Ok".
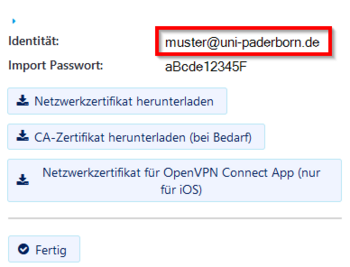
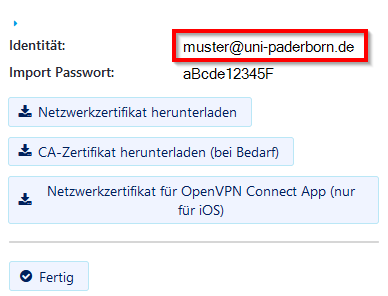
- Copy the identifier named "Identität".
- We will need it in the next step.
Set up eduroam[Bearbeiten | Quelltext bearbeiten]
After installing the certificate, you can set up eduroam.
- Open the Wi-Fi settings
- Select "eduroam".
Choose the following settings:
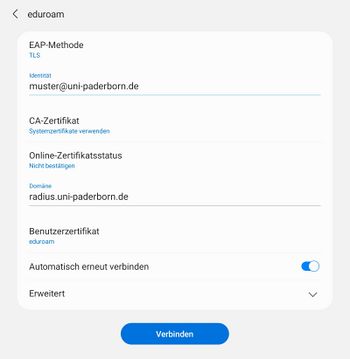
- EAP-Methode: TLS
- Identitiät: Insert from clipboard. We copied it in the step before. Alterternatively, you can enter benutzername@uni-paderborn.de. Replace benutzername with your personal username for the Uni-Account.
- CA-Zertifikat: Systemzertifikate verwenden
- Domäne: radius.uni-paderborn.de
- Benutzerzertifikat: eduroam
Info: If you can't find these setting - Click on Additional settings at first.
If the procedure described above doesn't work, you'll find two additional installation options here.
Variant 1
On older Android devices, the required HARICA CA certificate is not present. You can install it manually as follows:
- Install the network certificate as described above.
- Additionally, click here on "Download CA certificate"

- Now open the Android settings to install the CA certificate manually.
- The menu is located in different places depending on the Android version and manufacturer.
- The easiest way to do this is to search for "Certificate" in the Settings
- Then select the menu item "Install CA Certificate from Store" - this may also be named differently depending on the version.

- Now click on CA Certificate

- Now select the certificate "HARICA-TLS-Root-2021-RSA.crt" that you just downloaded.
```
Now configure eduroam with the following settings:
- EAP Method: TLS
- Identity: We already copied this in a previous step - paste from clipboard. Alternatively, enter username@uni-paderborn.de. Replace username with your personal username for your university account.
- CA Certificate: Use system certificates
- Domain: radius.uni-paderborn.de
- User Certificate: You named this yourself. If you followed the recommendation, this is called "eduroam".
Variant 2
If the menu item "Use CA certificate system certificates" is not present in your Wi-Fi settings, or if the connection via this option does not work, you can install the CA certificate as a Wi-Fi certificate and select it manually. To do this, proceed as follows:
- Install the network certificate as described above.
- Additionally, click here on "Download CA certificate"
- Now open the Android settings to install the CA certificate manually.
- The menu is located in different places depending on the Android version and manufacturer.
- The easiest way to find it is to search for "Certificate" in the Settings
- Then select the menu item "Install CA certificate from storage" - this may also be named differently depending on the version.

- Now click on Wi-Fi certificate
- Now select the certificate "HARICA-TLS-Root-2021-RSA.crt" that you just downloaded.
```

- Name the certificate "HARICA".
Next, open the Wi-Fi settings and select eduroam. Configure the network with the following settings:

- EAP Method: TLS
- Identity: We already copied this in a previous step - paste from clipboard. Alternatively, enter username@uni-paderborn.de. Replace username with your personal username for the university account.
- CA Certificate: You named this yourself. If you followed the recommendation, this will be called "harica"
- Domain: radius.uni-paderborn.de
- User certificate: You named this yourself. If you followed the recommendation, this will be called "eduroam".
Delete webauth[Bearbeiten | Quelltext bearbeiten]
- If you used webauth - Delete it afterwards.
- Log press on webauth and click on Delete.
- This can also be labled as Forget.
Alternatives[Bearbeiten | Quelltext bearbeiten]
On Android 9 the CA certificate may not be needed. You can choose "Use network certificates" instead.
Troubleshooting[Bearbeiten | Quelltext bearbeiten]
No connection to eduroam
Try the following steps:
- Deactivate and activate Wi-Fi
- Deactivate and activate Airplane Mode
- Perform a restart.
Certificate can't be installed
Do you get the error message "Certificate can't be read"? Try to install the certificate manually. Download the certificate. Ignore the error message.
Open the settings. The path can differ but open
Settings /Additional Settings / Security
Click on Install certificates from SD-Card and install the downloaded certificates.
Info: Can't find the option in the menu? Search for it.
Certificate: Password wrong
Do you get the error message "Password wrong". Don't use the clipboard but type in the password manually.
That does't help either? There is no fix for this problem yet.


