Mail einrichten unter iOS und iPadOS/en
Jnk (Diskussion | Beiträge) (Info zu E-Mail-Alias durch Vorlage ersetzt) |
|||
| (13 dazwischenliegende Versionen von 2 Benutzern werden nicht angezeigt) | |||
| Zeile 8: | Zeile 8: | ||
Do you have an exchange account? Please go to [[Exchange_einrichten | Setup Exchange]] | Do you have an exchange account? Please go to [[Exchange_einrichten | Setup Exchange]] | ||
| − | == Step-by-step | + | == What needs to be done? == |
| + | |||
| + | * Open the "Mail, Contacts, Calendars" settings. | ||
| + | |||
| + | * Set up a new account using your university login credentials. | ||
| + | |||
| + | * Send and receive emails using the "Apple Mail" app. | ||
| + | |||
| + | == Step-by-step instructions == | ||
| + | |||
=== Open Settings === | === Open Settings === | ||
| − | + | ||
| − | [[Datei: | + | [[Datei:Eduroam-ios-8.png|80px]] |
| − | < | + | Open the Settings app. |
| − | < | + | |
| + | <br clear=all> | ||
| + | |||
| + | <br> | ||
| + | |||
| + | [[Datei:Exchange-ios-06.png|links|mini|ohne|450px|Add Account]] | ||
| + | |||
| + | <br> | ||
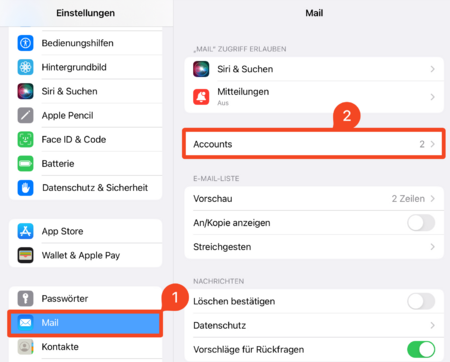
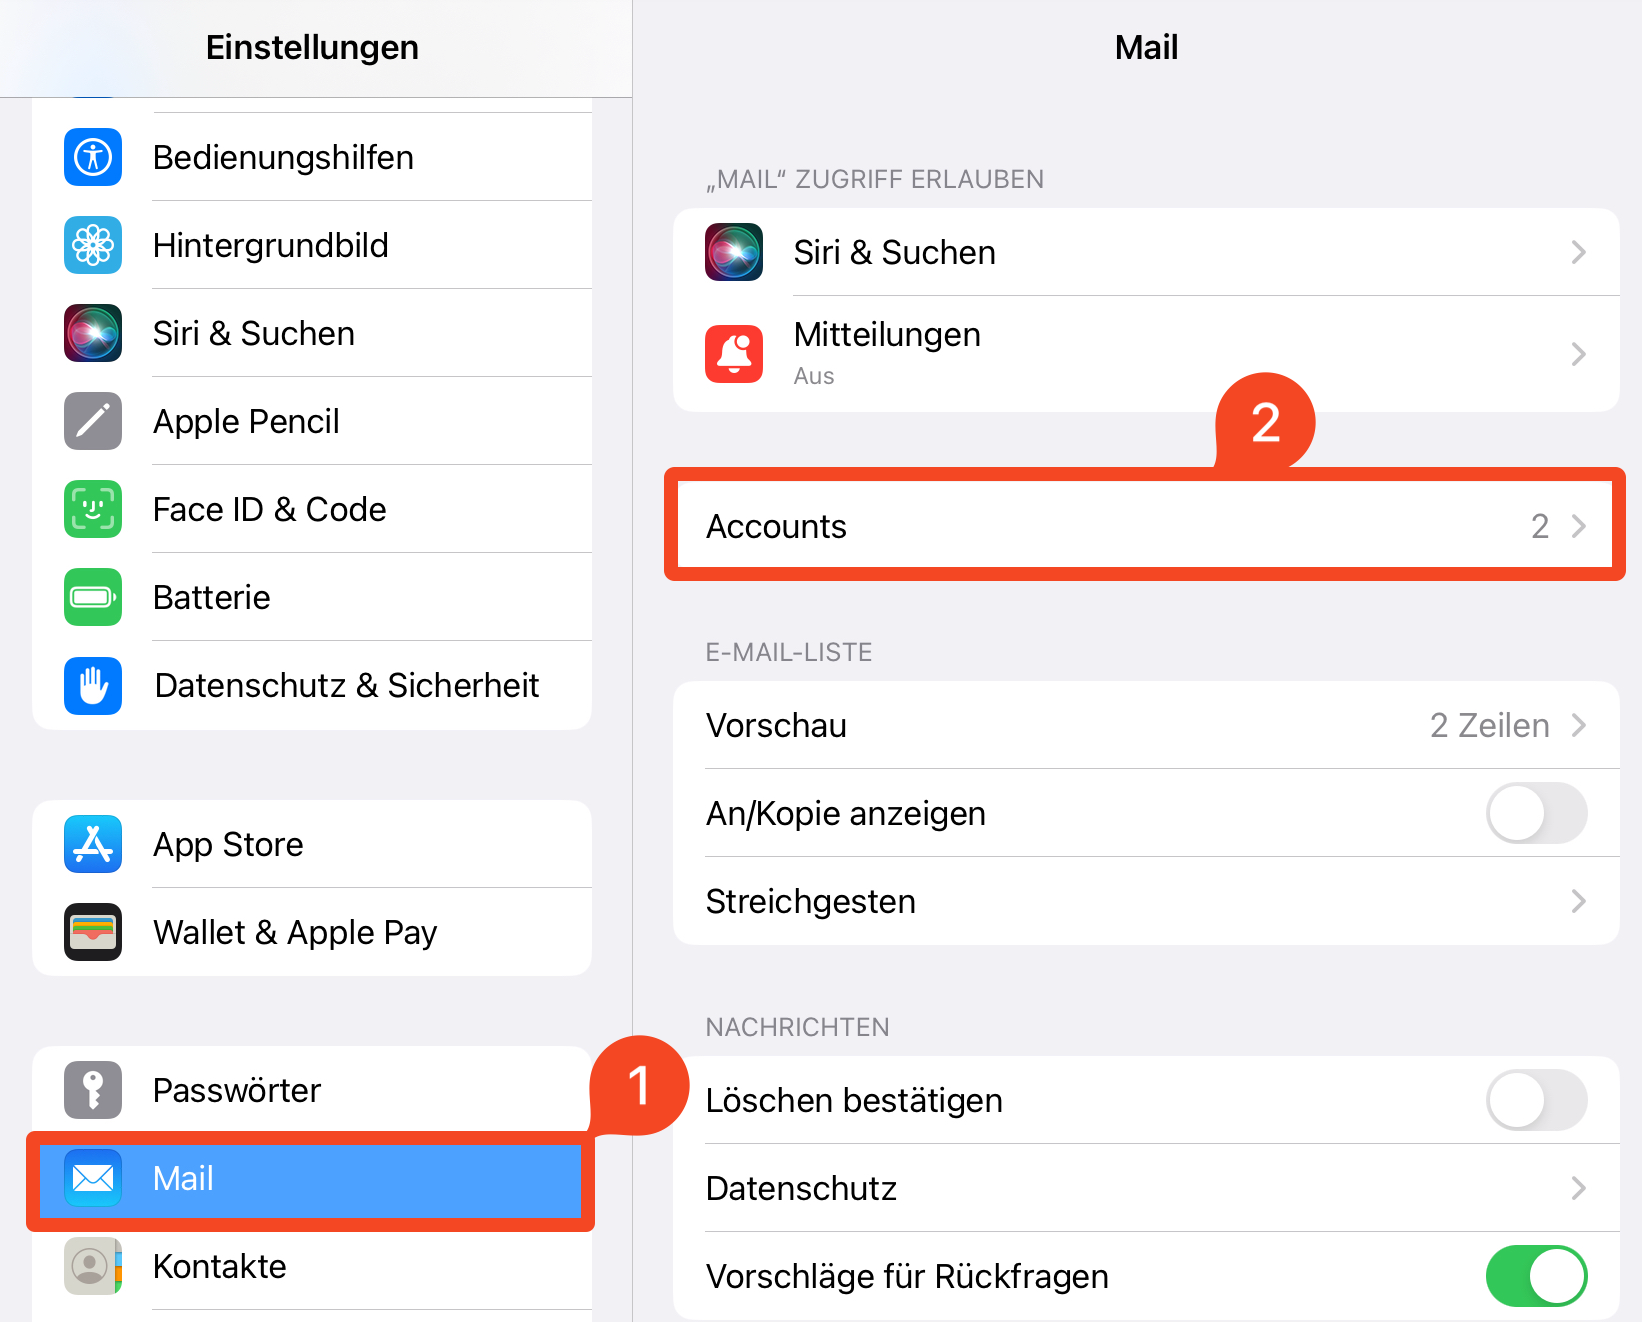
| + | * In your iPhone/iPad settings, select Apps. | ||
| + | |||
| + | * Tap '''Mail'''. | ||
| + | |||
| + | <br clear=all>> | ||
| + | |||
| + | [[Datei:Exchange_einrichten_in_iOS_01.png|links|mini|ohne|450px|Add Account]] | ||
| + | |||
| + | <br> | ||
| + | |||
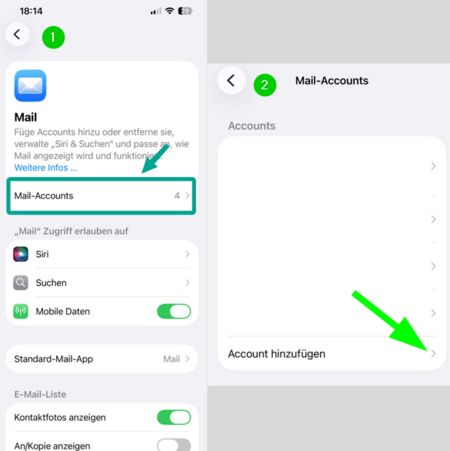
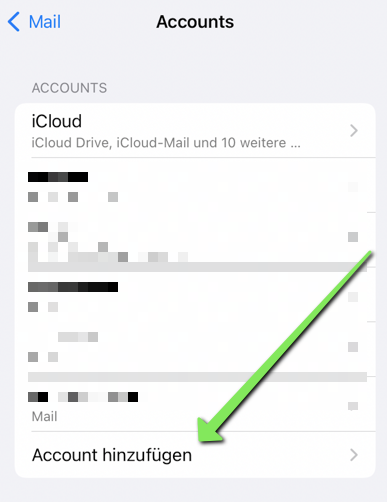
| + | * Click on '''"Mail Accounts"''' and then on '''"Add Account"'''. | ||
| + | |||
<br clear=all> | <br clear=all> | ||
| − | [[Datei:Mail_einrichten_unter_iOS_04.png| | + | |
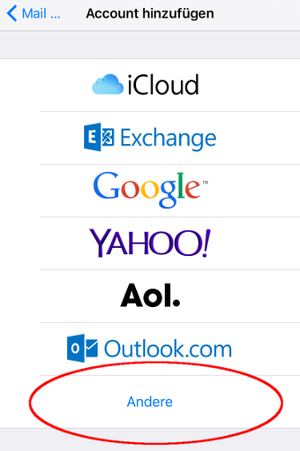
| − | <div class="tleft" style="clear:none">[[ | + | [[Datei:Mail_einrichten_unter_iOS_04.png|left|mini|none|300px|Select Other]] |
| + | |||
| + | <div class="tleft" style="clear:none">[[File:Mail_einrichten_unter_iOS_05.png|left|mini|none|300px|Add Mail Account]]</div> | ||
| + | |||
<br clear=all> | <br clear=all> | ||
| − | === | + | ===Setting up Mailbox=== |
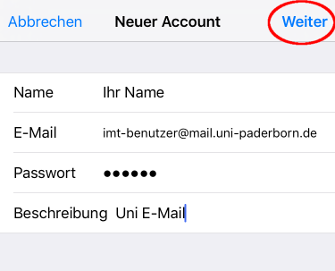
| − | + | Set up the account with the following settings: | |
| − | [[ | + | |
| + | [[File:Mail_einrichten_unter_iOS_06.png|left|mini|none|350px]] | ||
| + | |||
<br> | <br> | ||
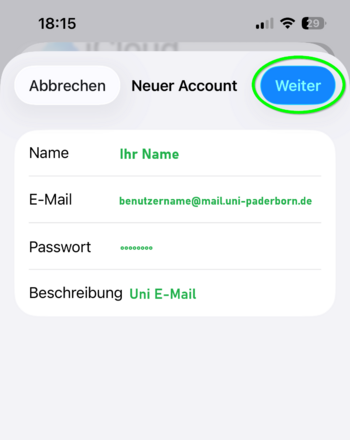
| − | * '''Name:''' | + | * '''Name:''' Your name - This will be displayed as the sender when you send emails. |
| − | * ''' | + | |
| − | * '''Password:''' | + | * '''Email Address:''' Your email address |
| − | * '''Description:''' | + | * '''Password:''' Password for your university account |
| − | * | + | * '''Description:''' Short account description that will be displayed in the mail overview. |
| + | |||
| + | * Then click '''"Next"'''. | ||
| + | |||
<br clear=all> | <br clear=all> | ||
| Zeile 33: | Zeile 69: | ||
Check the following settings: | Check the following settings: | ||
| − | [[ | + | |
| + | [[File:Mail_einrichten_unter_iOS_07.png|left|mini|none|350px]] | ||
| + | |||
<br> | <br> | ||
* '''IMAP''' | * '''IMAP''' | ||
| − | * '''Name:''' | + | * '''Name:''' Your name - This will be displayed as the sender when you send emails. |
| − | * '''Description:''' | + | |
| + | * '''Description:''' Short account description that will be displayed in the mail overview. | ||
| + | |||
<br> | <br> | ||
| − | Incoming | + | Incoming Emails |
* '''Hostname:''' mail.uni-paderborn.de | * '''Hostname:''' mail.uni-paderborn.de | ||
| − | * '''Username:''' | + | * '''Username:''' Username of your university account |
| − | * '''Password:''' | + | * '''Password:''' Password for your university account |
| − | + | ||
| − | Outgoing | + | Outgoing Emails |
* '''Hostname:''' mail.uni-paderborn.de | * '''Hostname:''' mail.uni-paderborn.de | ||
| − | + | * '''Username:''' Username of your university account | |
| − | * | + | * '''Password:''' Password for your university account |
| + | * Note: Enter your username and password for outgoing emails as well! | ||
| + | |||
| + | *Tap '''"Next"'''. | ||
| + | |||
| + | |||
<br clear=all> | <br clear=all> | ||
<bootstrap_accordion> | <bootstrap_accordion> | ||
| − | + | ||
| − | * | + | <bootstrap_panel heading="IMAP or POP?" > |
| − | + | ||
| − | * | + | * With '''IMAP''', all changes you make on your device are synchronized with the server. If you delete an email on your iPhone, it will also be deleted on all other devices where you use this account. |
| − | + | ||
| − | * We recommend using IMAP. | + | |
| − | </bootstrap_panel> | + | * With Changes will not be synchronized with '''POP3'''. If you delete an email here, it will remain on your other devices. |
| + | |||
| + | * We recommend using IMAP. Support for POP3 may be discontinued in the future. | ||
| + | |||
| + | </bootstrap_panel> | ||
</bootstrap_accordion> | </bootstrap_accordion> | ||
| + | [[File:Mail_einrichten unter iOS 08.png|left|mini|none|350px]] | ||
| − | + | * You can optionally link the '''Notes app''' to your email account. | |
| − | + | ||
| − | * | + | * Click '''"Save"'''. |
| − | * Click | ||
<br clear=all> | <br clear=all> | ||
| − | === | + | === Sending & Receiving Emails === |
| − | [[ | + | |
| − | + | [[File:Mail_einrichten unter iOS 10.png|left|mini|none|350px]] | |
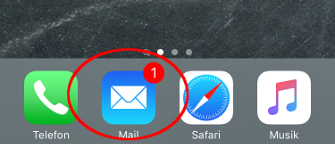
| − | * Open the '''"Mail | + | |
| − | * You can send and receive | + | * Open the '''"Mail app"''''. |
| + | |||
| + | * Here you can send and receive emails. | ||
| + | |||
| + | |||
| + | * You can send and receive emails. | ||
<br clear=all> | <br clear=all> | ||
==See also == | ==See also == | ||
* [[Mail einrichten wenn mein System nicht aufgefuehrt ist]] | * [[Mail einrichten wenn mein System nicht aufgefuehrt ist]] | ||
Aktuelle Version vom 1. Januar 2026, 23:12 Uhr
Die deutsche Version finden Sie auf der Seite Mail einrichten unter iOS und iPadOS
This tutorial describes how to set up the university E-Mail-Address on iPhones and iPads.
Do you have an exchange account? Please go to Setup Exchange
What needs to be done?[Bearbeiten | Quelltext bearbeiten]
- Open the "Mail, Contacts, Calendars" settings.
- Set up a new account using your university login credentials.
- Send and receive emails using the "Apple Mail" app.
Step-by-step instructions[Bearbeiten | Quelltext bearbeiten]
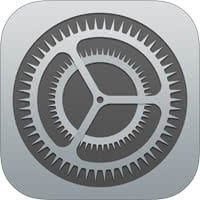
Open Settings[Bearbeiten | Quelltext bearbeiten]
 Open the Settings app.
- In your iPhone/iPad settings, select Apps.
- Tap Mail.
>
- Click on "Mail Accounts" and then on "Add Account".

Setting up Mailbox[Bearbeiten | Quelltext bearbeiten]
Set up the account with the following settings:
- Name: Your name - This will be displayed as the sender when you send emails.
- Email Address: Your email address
- Password: Password for your university account
- Description: Short account description that will be displayed in the mail overview.
- Then click "Next".
Further info: Which mail address do you have?
As student or employe you have the following e-mail adresses:
- username@mail.uni-paderborn.de
- username@campus.uni-paderborn.de
- username@mail.upb.de
- username@campus.upb.de
Employes have additionally the following E-Mail-Adress:
- name.surname@uni-paderborn.de
- name.surname@upb.de
- Contact the ZIM for additional E-Mail-Aliases.
All aliases are available in the same mailbox. Choose one as you like for sending an receiving mails.
Check the following settings:
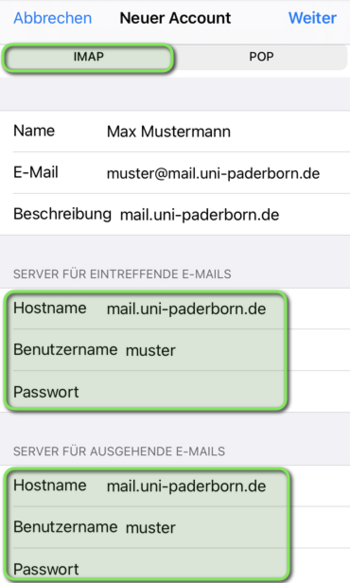
- IMAP
- Name: Your name - This will be displayed as the sender when you send emails.
- Description: Short account description that will be displayed in the mail overview.
Incoming Emails
- Hostname: mail.uni-paderborn.de
- Username: Username of your university account
- Password: Password for your university account
Outgoing Emails
- Hostname: mail.uni-paderborn.de
- Username: Username of your university account
- Password: Password for your university account
- Note: Enter your username and password for outgoing emails as well!
- Tap "Next".
IMAP or POP?
- With IMAP, all changes you make on your device are synchronized with the server. If you delete an email on your iPhone, it will also be deleted on all other devices where you use this account.
- With Changes will not be synchronized with POP3. If you delete an email here, it will remain on your other devices.
- We recommend using IMAP. Support for POP3 may be discontinued in the future.
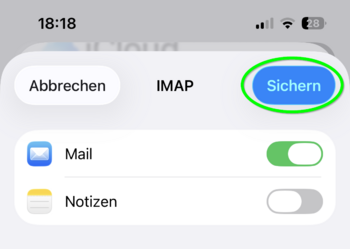
- You can optionally link the Notes app to your email account.
- Click "Save".
Sending & Receiving Emails[Bearbeiten | Quelltext bearbeiten]
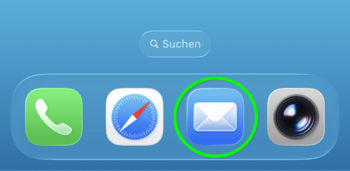
- Open the "Mail app"'.
- Here you can send and receive emails.
- You can send and receive emails.


