Jnk (Diskussion | Beiträge) (Die Seite wurde neu angelegt: „{{translated page |origin=Mail einrichten in Outlook 2019 (Windows 10) |lang=en |translated title=mail setup in Outlook 2019 (Windows 10) }} Outlook is an E-Ma…“) |
Jnk (Diskussion | Beiträge) |
||
| Zeile 9: | Zeile 9: | ||
== Summarized Steps == | == Summarized Steps == | ||
| − | * | + | * Prepare Outlook. |
* Add new IMAP Account. | * Add new IMAP Account. | ||
== Step-by-step description == | == Step-by-step description == | ||
===Outlook vorbereiten=== | ===Outlook vorbereiten=== | ||
| − | + | Since Outlook 2016, Microsoft has shortened the setup for E-Mail-Accounts. In order to setup Outlook without problems, we change the account setup back to the old one via registry edit. | |
<br> | <br> | ||
| − | + | ||
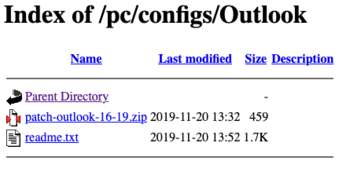
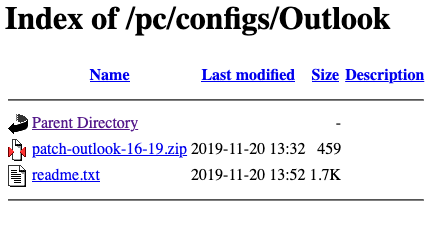
| + | Open the [http://download.uni-paderborn.de/pc/configs/Outlook/ Downloadportal]. | ||
[[Datei:Outlook19-unter-Win-10-01.png|links|mini|ohne|350px]] | [[Datei:Outlook19-unter-Win-10-01.png|links|mini|ohne|350px]] | ||
<br> | <br> | ||
| − | * | + | * Download '''patch-outlook-16-19.zip'''. |
<br clear=all> | <br clear=all> | ||
| + | Unzip the container file. | ||
| + | |||
| + | <bootstrap_accordion> | ||
| + | <bootstrap_panel heading="Need help to unzip file? Click here"> | ||
[[Datei:Outlook19-unter-Win-10-02.png|links|mini|ohne|350px]] | [[Datei:Outlook19-unter-Win-10-02.png|links|mini|ohne|350px]] | ||
<br> | <br> | ||
| − | * | + | * Unzip the file. |
| − | * | + | * You can do that via right click. |
| − | * | + | * Click on '''Unzip all...''' |
<br clear=all> | <br clear=all> | ||
[[Datei:Outlook19-unter-Win-10-03.png|links|mini|ohne|350px]] | [[Datei:Outlook19-unter-Win-10-03.png|links|mini|ohne|350px]] | ||
<br> | <br> | ||
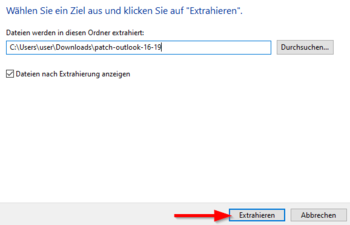
| − | * | + | * Click on '''Extract''' |
<br clear=all> | <br clear=all> | ||
| + | |||
| + | </bootstrap_panel> | ||
| + | </bootstrap_accordion> | ||
[[Datei:Outlook19-unter-Win-10-04.png|links|mini|ohne|350px]] | [[Datei:Outlook19-unter-Win-10-04.png|links|mini|ohne|350px]] | ||
<br> | <br> | ||
| − | * | + | * Open the file '''Outlook-16-19'''. |
<br clear=all> | <br clear=all> | ||
[[Datei:Mail-unter-outlook19-05.png|links|mini|ohne|350px]] | [[Datei:Mail-unter-outlook19-05.png|links|mini|ohne|350px]] | ||
<br> | <br> | ||
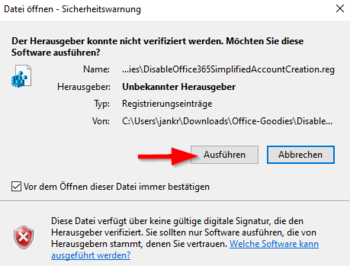
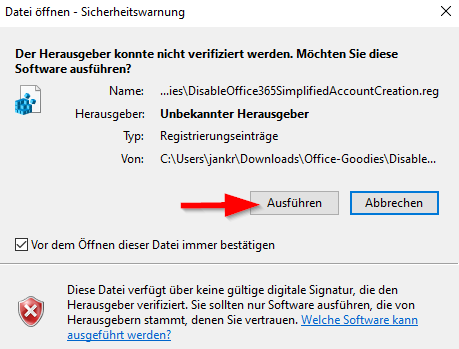
| − | * | + | * Click on '''Run'''. |
| − | * | + | * Confirm the security message with '''Yes'''. |
<br clear=all> | <br clear=all> | ||
[[Datei:Mail-unter-outlook19-06.png|links|mini|ohne|350px]] | [[Datei:Mail-unter-outlook19-06.png|links|mini|ohne|350px]] | ||
<br> | <br> | ||
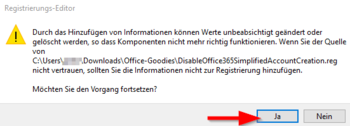
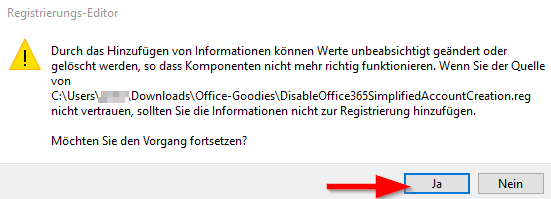
| − | * | + | * Confirm the registry change with '''Yes'''. |
<br clear=all> | <br clear=all> | ||
[[Datei:Mail-unter-outlook19-07.png|links|mini|ohne|350px]] | [[Datei:Mail-unter-outlook19-07.png|links|mini|ohne|350px]] | ||
<br> | <br> | ||
| − | * | + | * The task was successful. |
| − | * | + | * Click on '''OK'''. |
<br clear=all> | <br clear=all> | ||
| − | + | The Outlook preferences have been changed. | |
===Outlook einrichten=== | ===Outlook einrichten=== | ||
[[Datei:Screenshot Outlook19 RibbonDatei.png|links|mini|ohne|350px]] | [[Datei:Screenshot Outlook19 RibbonDatei.png|links|mini|ohne|350px]] | ||
<br> | <br> | ||
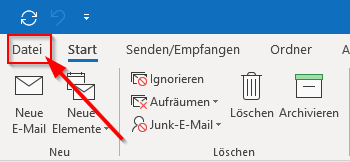
| − | * | + | * Open Outlook 2019. |
| − | * | + | * Click on '''File''' in the top left hand corner. |
<br clear=all> | <br clear=all> | ||
| + | |||
[[Datei:Exchange einrichten in Microsoft Outlook 2019 (Windows 10) 01.png|links|mini|ohne|350px]] | [[Datei:Exchange einrichten in Microsoft Outlook 2019 (Windows 10) 01.png|links|mini|ohne|350px]] | ||
<br> | <br> | ||
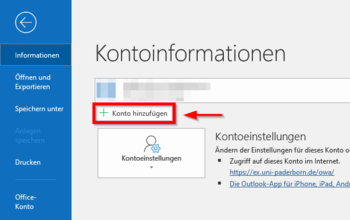
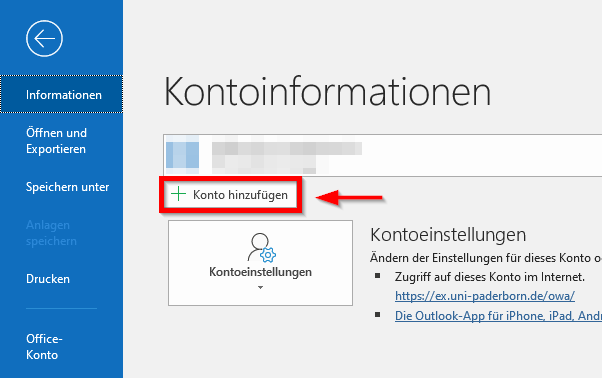
| − | * | + | * Click on '''"Add Account"''' |
<br clear=all> | <br clear=all> | ||
[[Datei:Mail-unter-outlook19-08.png|links|mini|ohne|350px]] | [[Datei:Mail-unter-outlook19-08.png|links|mini|ohne|350px]] | ||
<br> | <br> | ||
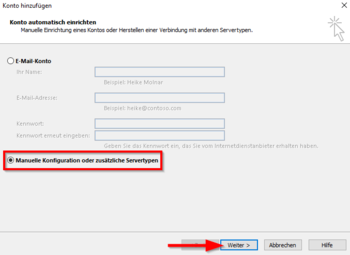
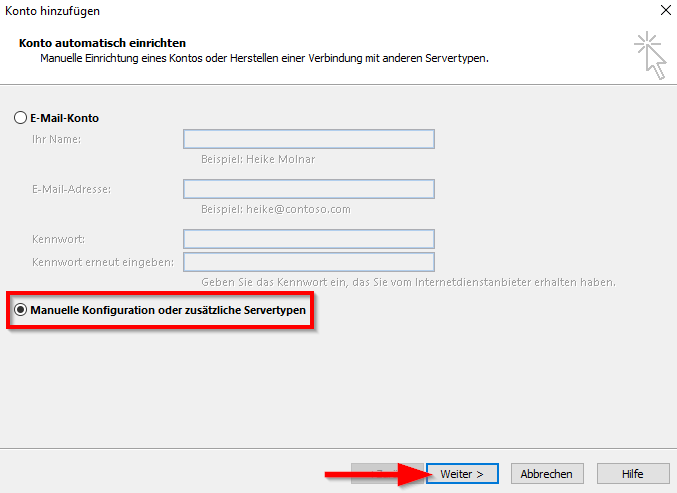
| − | * | + | * Click on '''Manual Setup''' |
| − | * | + | * Click on '''Next''' |
<br clear=all> | <br clear=all> | ||
[[Datei:Mail-unter-outlook19-09.png|links|mini|ohne|350px]] | [[Datei:Mail-unter-outlook19-09.png|links|mini|ohne|350px]] | ||
<br> | <br> | ||
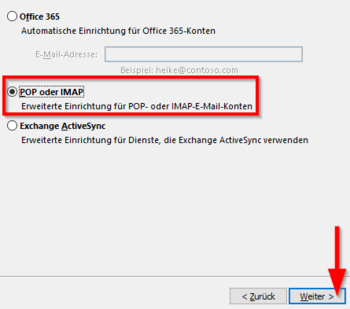
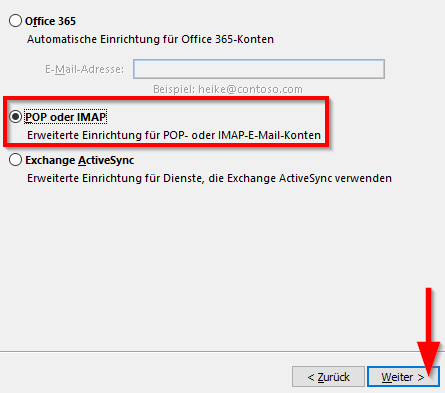
| − | * | + | * Choose '''POP or IMAP''' |
| − | * | + | * Click on '''Next''' |
<br clear=all> | <br clear=all> | ||
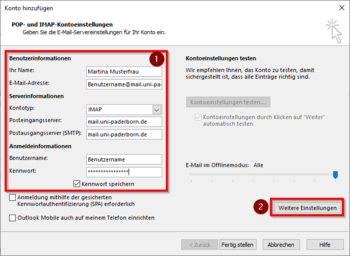
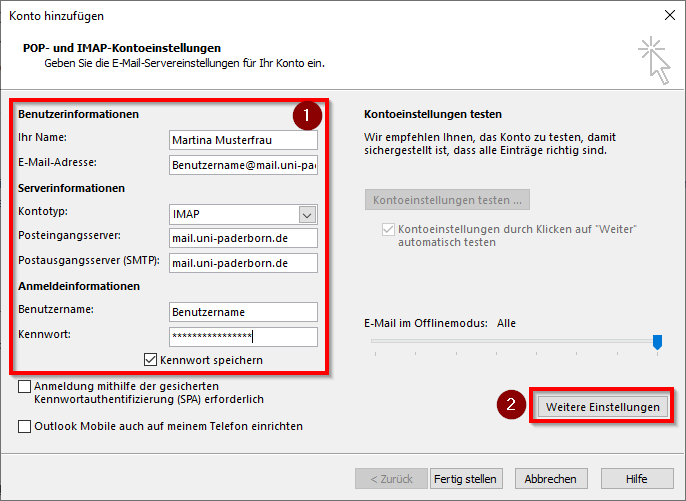
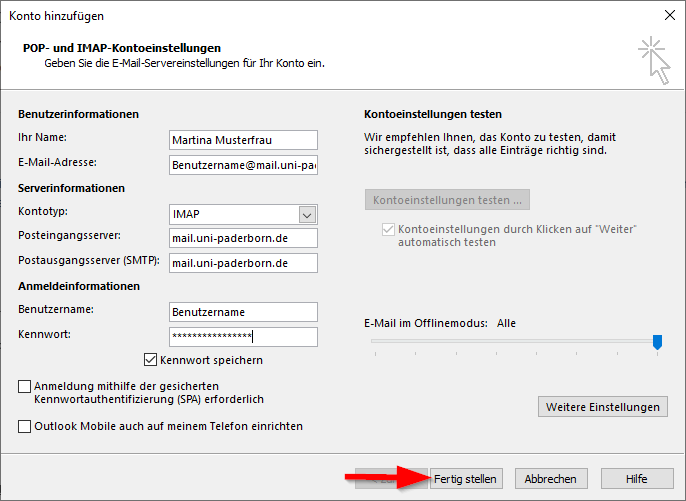
| − | + | Choose the following settings: | |
[[Datei:Mail-unter-outlook19-10.png|links|mini|ohne|350px]] | [[Datei:Mail-unter-outlook19-10.png|links|mini|ohne|350px]] | ||
<br> | <br> | ||
| − | * ''' | + | * '''Your name:''' Enter your Name - This will be displayed if you send mails. |
| − | * '''E-Mail- | + | * '''E-Mail-Address:''' Your E-Mail-Address. |
| − | * ''' | + | * '''Ingoing Mailserver:''' mail.uni-paderborn.de |
| − | * ''' | + | * '''Outgoing Mailserver:''' mail.uni-paderborn.de |
| − | * ''' | + | * '''Username:''' Username for the university account. |
| − | * ''' | + | * '''Password:''' Password for the university account. |
| − | * | + | * Click on '''Additional Settings''' |
<br clear=all> | <br clear=all> | ||
<bootstrap_accordion> | <bootstrap_accordion> | ||
| − | <bootstrap_panel heading=" | + | <bootstrap_panel heading="Which E-Mail-Adress do I have? Click here for infos." > |
| − | + | As student or employe you have the follwing e-mail adresses: | |
| − | * < | + | * <username>@mail.uni-paderborn.de |
| − | * < | + | * <username>@campus.uni-paderborn.de |
<br> | <br> | ||
| − | + | Employes have additionally the following E-Mail-Adress: | |
| − | * | + | * name.surname@uni-paderborn.de |
| − | * | + | * If necessary you can request additional E-Mail-Aliases at the IMT. |
| − | |||
| − | |||
</bootstrap_panel> | </bootstrap_panel> | ||
</bootstrap_accordion> | </bootstrap_accordion> | ||
| Zeile 109: | Zeile 116: | ||
[[Datei:Mail-unter-outlook19-11.png|links|mini|ohne|350px]] | [[Datei:Mail-unter-outlook19-11.png|links|mini|ohne|350px]] | ||
<br> | <br> | ||
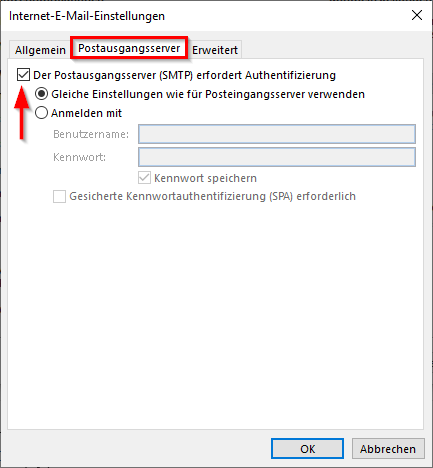
| − | * | + | * Switch to '''Outgoing Mailserver''' |
| − | * | + | * Check the Box for '''The Outgoing Mailserver (SMTP) needs authentification''' |
<br clear=all> | <br clear=all> | ||
[[Datei:Mail-unter-outlook19-12.png|links|mini|ohne|350px]] | [[Datei:Mail-unter-outlook19-12.png|links|mini|ohne|350px]] | ||
<br> | <br> | ||
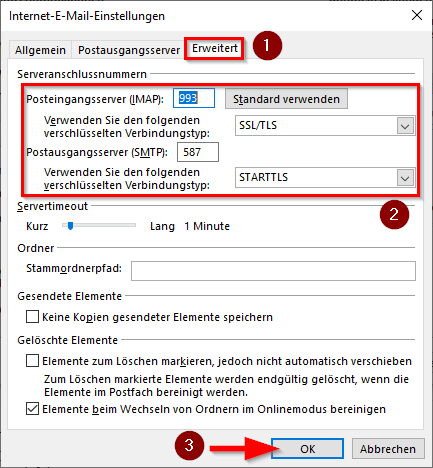
| − | * | + | * Switch to '''Additional Settings'''. |
| − | * | + | * Choose for the Outgoing Mailserver '''SSL/TLS'''. |
| − | * | + | * Choose for the Ingoing Mailserver '''STARTTLS'''. |
| − | * | + | * Click on '''OK'''. |
<br clear=all> | <br clear=all> | ||
[[Datei:Mail-unter-outlook19-13.png|links|mini|ohne|350px]] | [[Datei:Mail-unter-outlook19-13.png|links|mini|ohne|350px]] | ||
<br> | <br> | ||
| − | * | + | * Click on '''Finish'''. |
| − | * | + | * The setup is noch complete. |
<br clear=all> | <br clear=all> | ||
| − | == | + | == See also == |
[https://hilfe.uni-paderborn.de/Mail Weitere Anleitungen zum Thema Mail] | [https://hilfe.uni-paderborn.de/Mail Weitere Anleitungen zum Thema Mail] | ||
| − | |||
| − | |||
| − | |||
| − | |||
| − | |||
| − | |||
| − | |||
| − | |||
| − | |||
| − | |||
| − | |||
| − | |||
Version vom 15. Oktober 2020, 08:47 Uhr
Outlook is an E-Mail-Programm and part of the Microsoft Office package. This tutorial describes how to set up the university E-Mail-Address in Outlook 2019.
Do you have an exchange account? Please go to [| Setup Exchange]
Falls Sie ein Exchange Konto haben, benutzen Sie stattdessen die Anleitung für Exchange.
Summarized Steps[Bearbeiten | Quelltext bearbeiten]
- Prepare Outlook.
- Add new IMAP Account.
Step-by-step description[Bearbeiten | Quelltext bearbeiten]
Outlook vorbereiten[Bearbeiten | Quelltext bearbeiten]
Since Outlook 2016, Microsoft has shortened the setup for E-Mail-Accounts. In order to setup Outlook without problems, we change the account setup back to the old one via registry edit.
Open the Downloadportal.
- Download patch-outlook-16-19.zip.
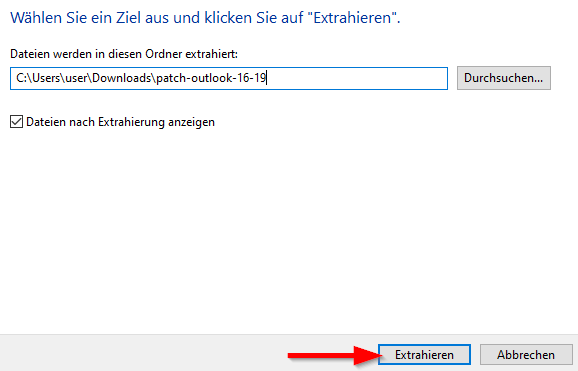
Unzip the container file.
- Open the file Outlook-16-19.
- Click on Run.
- Confirm the security message with Yes.
- Confirm the registry change with Yes.
- The task was successful.
- Click on OK.
The Outlook preferences have been changed.
Outlook einrichten[Bearbeiten | Quelltext bearbeiten]
- Open Outlook 2019.
- Click on File in the top left hand corner.
- Click on "Add Account"
- Click on Manual Setup
- Click on Next
- Choose POP or IMAP
- Click on Next
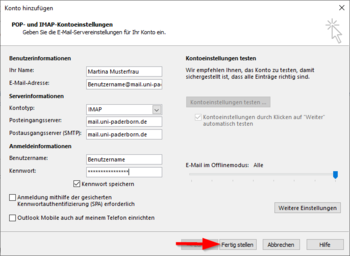
Choose the following settings:
- Your name: Enter your Name - This will be displayed if you send mails.
- E-Mail-Address: Your E-Mail-Address.
- Ingoing Mailserver: mail.uni-paderborn.de
- Outgoing Mailserver: mail.uni-paderborn.de
- Username: Username for the university account.
- Password: Password for the university account.
- Click on Additional Settings
Which E-Mail-Adress do I have? Click here for infos.
As student or employe you have the follwing e-mail adresses:
- <username>@mail.uni-paderborn.de
- <username>@campus.uni-paderborn.de
Employes have additionally the following E-Mail-Adress:
- name.surname@uni-paderborn.de
- If necessary you can request additional E-Mail-Aliases at the IMT.
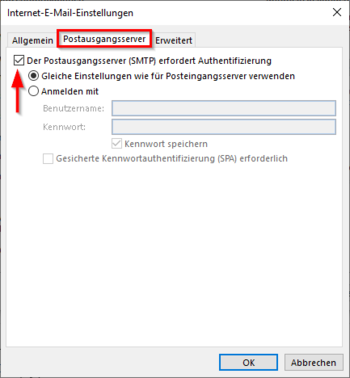
- Switch to Outgoing Mailserver
- Check the Box for The Outgoing Mailserver (SMTP) needs authentification
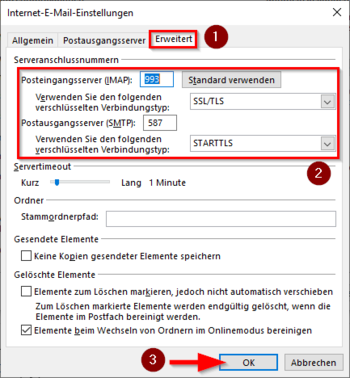
- Switch to Additional Settings.
- Choose for the Outgoing Mailserver SSL/TLS.
- Choose for the Ingoing Mailserver STARTTLS.
- Click on OK.
- Click on Finish.
- The setup is noch complete.
