Some services are only available through the university network. These include, for example, access to network drives and the download of online resources from the homepage of the University Library. If you want to access these services when you are not at the university, you need a VPN connection. A Virtual Private Network guarantees secure access to the university network through other networks.
Simultaneous connections[Bearbeiten | Quelltext bearbeiten]
🛈
Do you want to connect your laptop and your mobile phone to the VPN in addition to your PC? You can set up VPN connections on multiple devices. However, each person can only establish one connection per VPN at the same time.
What does that mean?
Uni-VPN
- If you use the Uni-VPN, you can only establish one connection at a time.
- You cannot establish a connection to the Uni-VPN on another device at the same time.
- You must disconnect the existing connection first.
Group VPN
- If you use a group VPN, you cannot establish a second VPN connection to this group VPN on another device at the same time.
- You must disconnect the existing connection first.
- However, you can establish a parallel connection to the Uni VPN or another group VPN on another device.
What needs to be done?[Bearbeiten | Quelltext bearbeiten]
- Install OpenVPN Connect from the PlayStore.
- Install a personal network certificate
- Download the configuration file:
- Use the .ovpn configuration file and your personal network certificate to configure OpenVPN Connect.
- Start a VPN connection.
Step-by-step instructions[Bearbeiten | Quelltext bearbeiten]
Install OpenVPN Connect[Bearbeiten | Quelltext bearbeiten]
Install the app OpenVPN Connect. Like other apps you can find it in the Google PlayStore.

Install certificates[Bearbeiten | Quelltext bearbeiten]
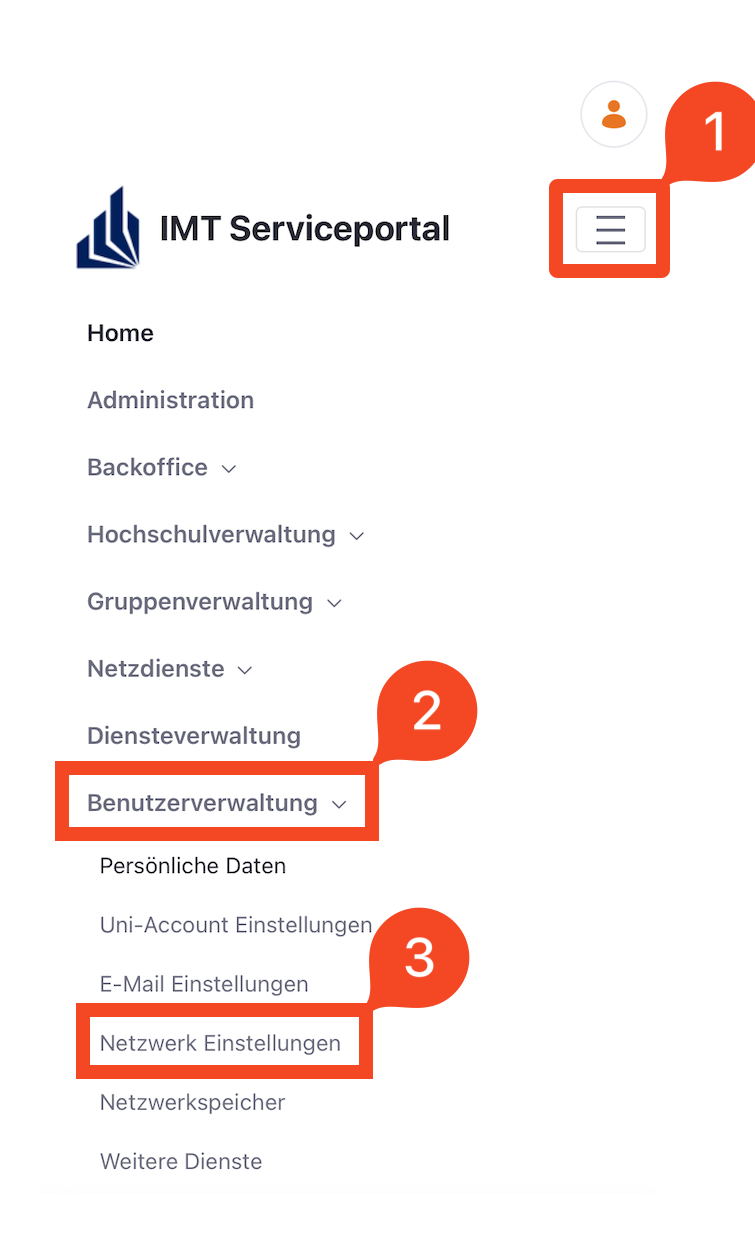
For the VPN connection you need a network certificate. You cannot use the already installed certificate for Eduroam. Open the Serviceportal and log in with your university account.

- Click on the 3 vertical bars on the upper right corner.
- Click on "Benutzerverwaltung" and then on "Netzwerkeinstellungen".
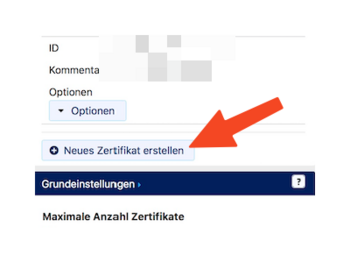
- Click on "Neues Zertifikat erstellen".
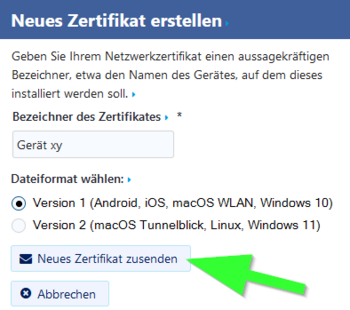
- Give the certificate a unique name (e.g.: Mobile VPN)
- Select "Version 1" as the file format.
- Then click on "Neues Zertifikat zusenden".

- A new network certificate has been created for you.
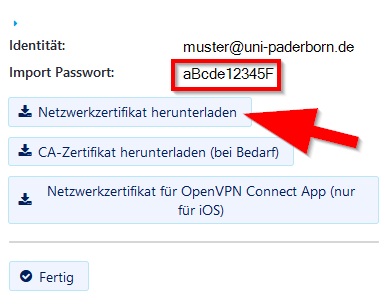
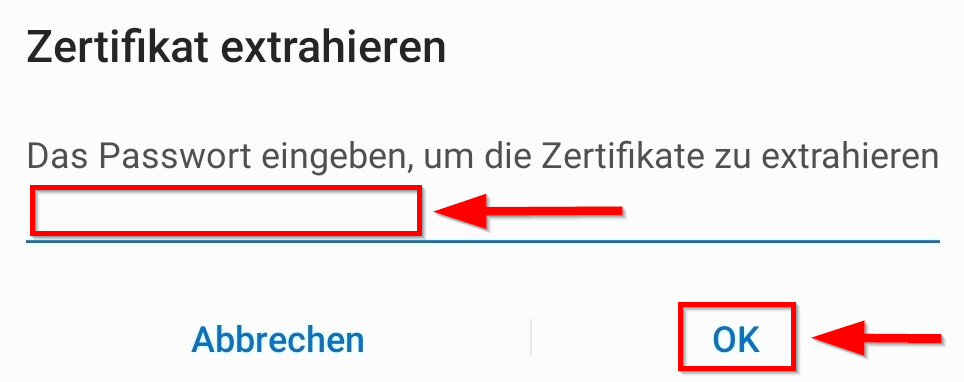
- First copy the Import Password to the clipboard.
- Now click on "Netzwerkzertifikat herunterladen".

- To open the certificate you need your import password. We have already copied it to the clipboard and can now paste it here.
- Confirm with "OK".
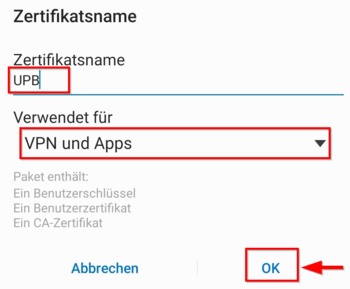
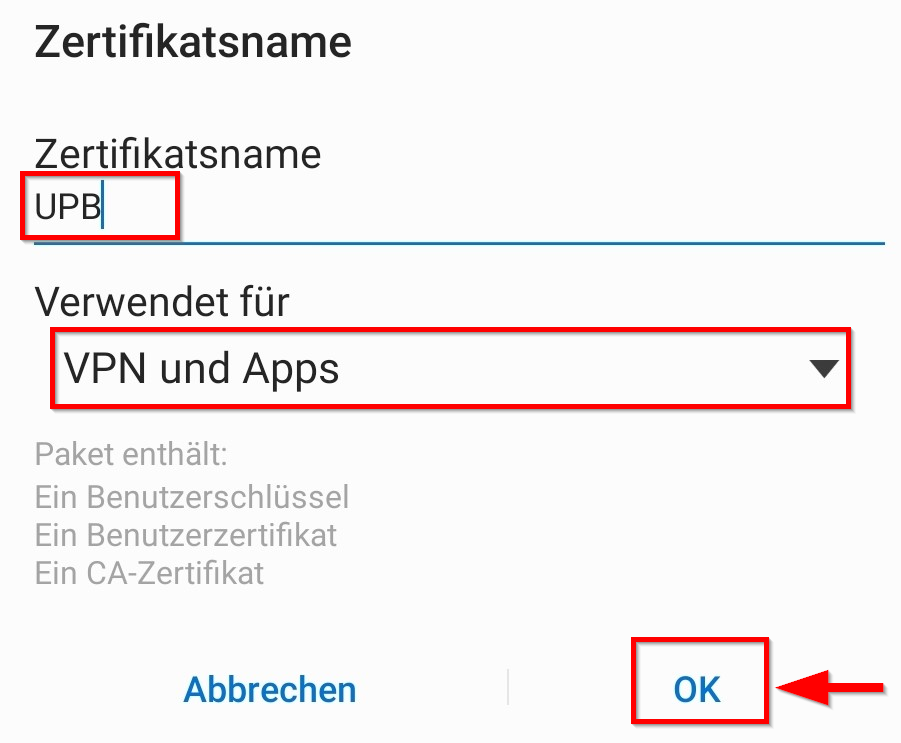
- In order to be able to recognize the certificate afterwards, you will be asked to name the certificate here.
- Name it "UPB-VPN".
- To use the login details, select "VPN and Apps".
- Confirm with "OK".
Download configuration file[Bearbeiten | Quelltext bearbeiten]
Download the configuration file, select the VPN you want to connect to and click Download.
Normally "Uni-VPN (Standard)" should be the right choice, but if you have problems with the connection, try "Uni-VPN-TCP" again.
Note: You can click "Download" here and download your configuration file. This is not a screenshot ;-)
Protocol
The VPN connection can be established using two different protocols.
Use UDP whenever possible. This protocol offers the best overall combination of high speed, low latency, and stability.
Use TCP only in exceptional cases if you are unable to establish a connection via UDP. Speed and latency may be significantly worse with TCP.
Route all anternet traffic through the tunnel?
The VPN tunnel can be configured in two different ways.
Full Tunnel
All internet traffic is routed through the VPN in encrypted form. You establish a connection to the Paderborn University network and access the internet from this network. From the perspective of the services you use online, you have a Paderborn University IP address. You benefit from the firewall and security measures in the University network.
Use this option if you want to access external resources provided by Paderborn University Library, such as eBooks.

Split Tunnel
With the split tunnel option, only connections to destinations within the Paderborn University network are routed through the VPN tunnel. From the perspective of the services you use online, you do not have a Paderborn University IP address.
Depending on network load, speed and latency may be slightly better in this mode.
Before downloading, deactivate the checkmark to create a split-tunnel configuration file.

Setting up OpenVPN Connect[Bearbeiten | Quelltext bearbeiten]
- Open the app OpenVPN Connect.
- We downloaded this in the first step.
Accept the privacy policy by clicking on "Agree".
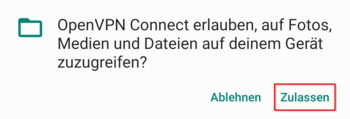
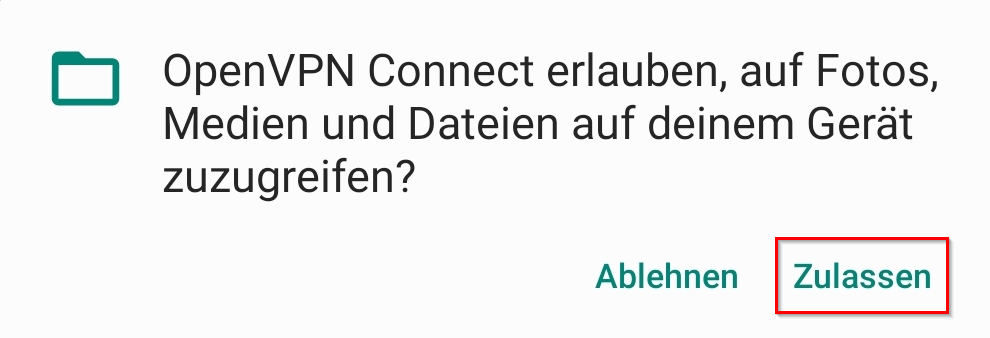
- OpenVPN Connect must be able to access your device.
- Click on "Allow".

- Go to your browser's download folder.
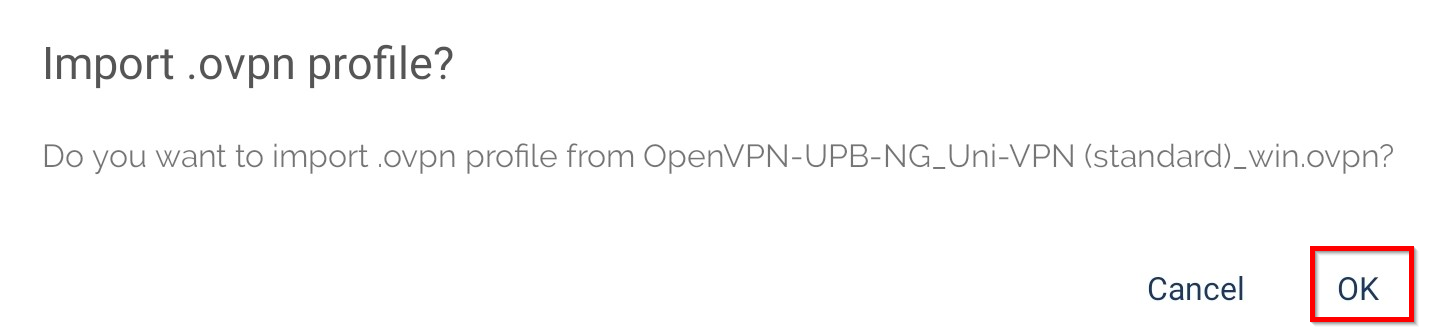
- Select the configuration file (usually the newest file in your downloads).
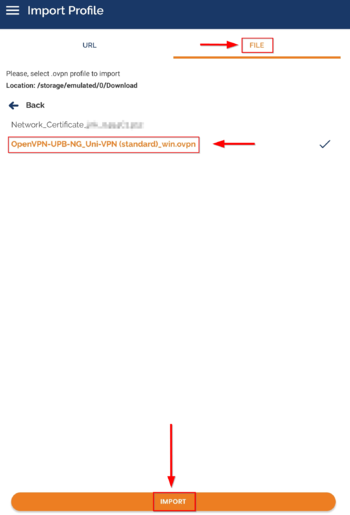
- Select OpenVPN from the list and click either This time only or Always, depending on whether you want to always open VPN certificates with OpenVPN.
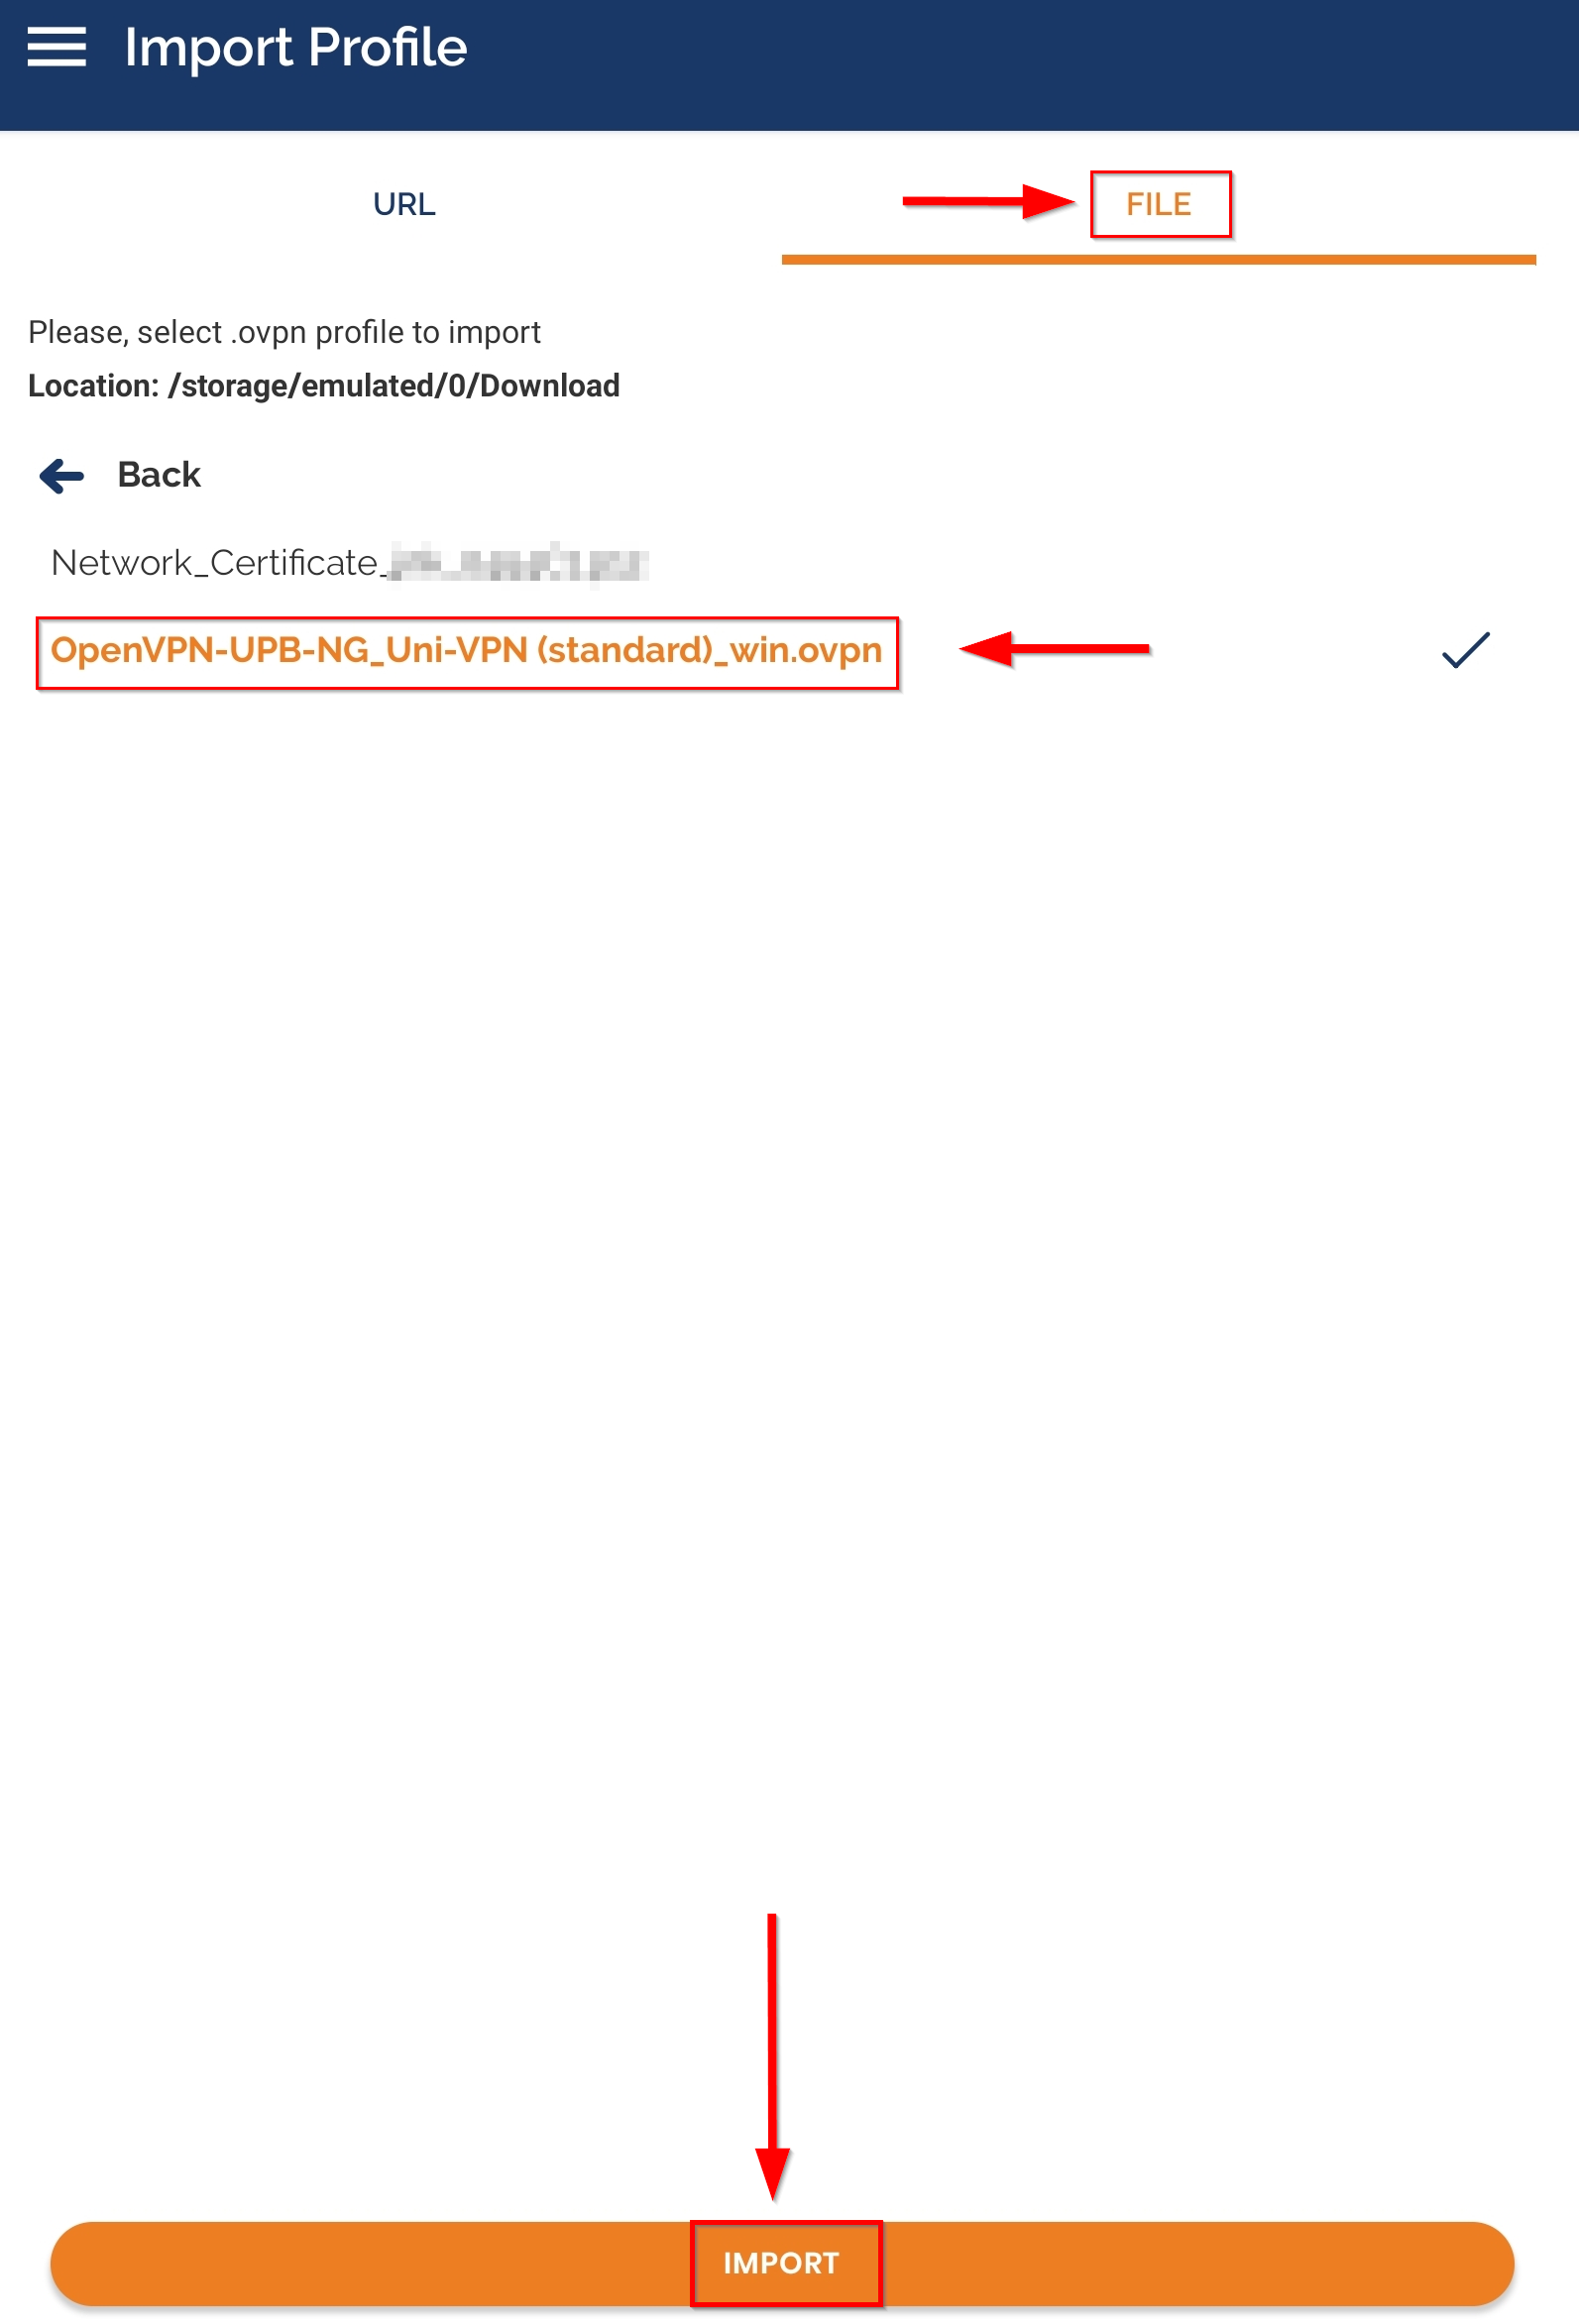
- If the file cannot be imported this way, you can also import it via the OpenVPN app. To do this, go to the Import File page in the OpenVPN app, click Browse, and browse your Downloads folder for the configuration file.
- Is your configuration file not displayed? In very rare cases, the file may have been saved with a different file extension, such as .txt. If this is the case, click the button below. If your file can be imported normally, you can ignore this and continue reading below at the next image :-)
Can't import the configuration file and/or it looks different? Click here.
- During the download, it can happen that the .ovpn file becomes a .txt file. However, we can change the file extension back relatively easily.
- Go to your phone's files, the application for this is usually simply called Files or My Documents.
- Go to the Downloads folder. There you should now find a file with OpenVPN and UPB in the name among the latest downloads.
- Hold down the file with your finger and then press the three dots with "more" (usually found at the bottom right).
- Click on "rename" and change the file extension (after the dot at the end of the file name) to .ovpn.
- If you now get a warning that the file may become unusable, continue anyway.
- The file should now be changed to the correct format.
- Go back to the OpenVPN app and try importing the file again.
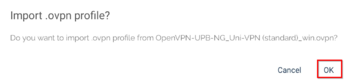
- Confirm the question with "OK".
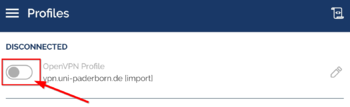
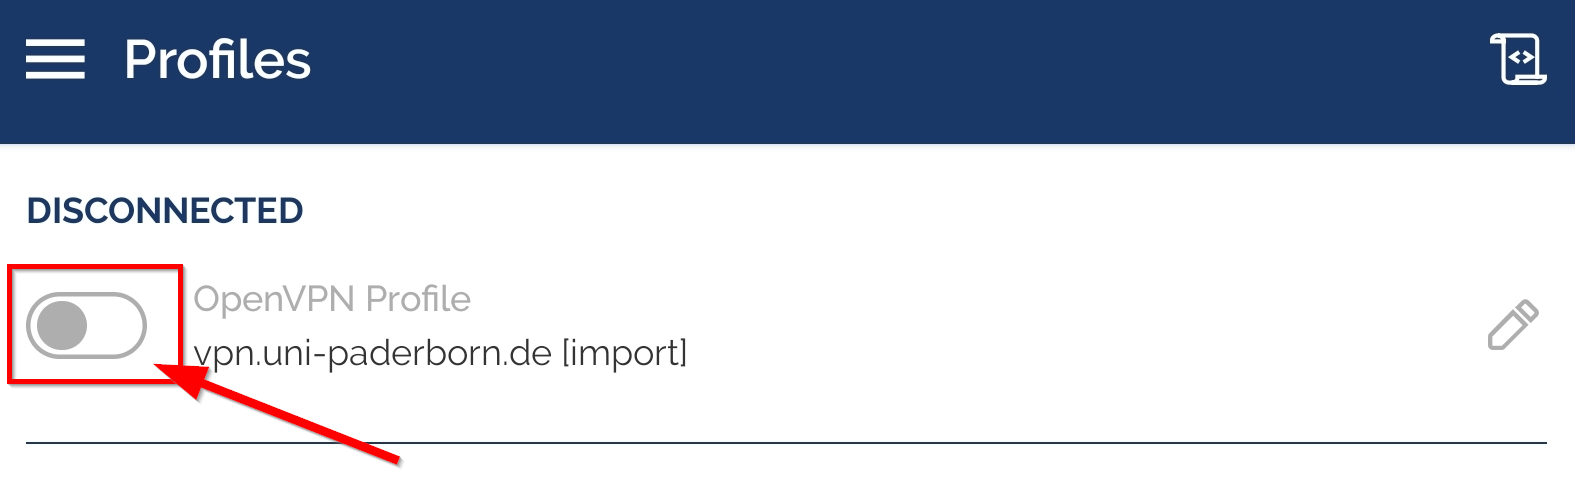
- Click on "Connect" to activate the VPN connection.
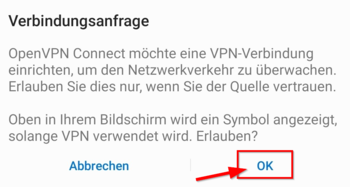
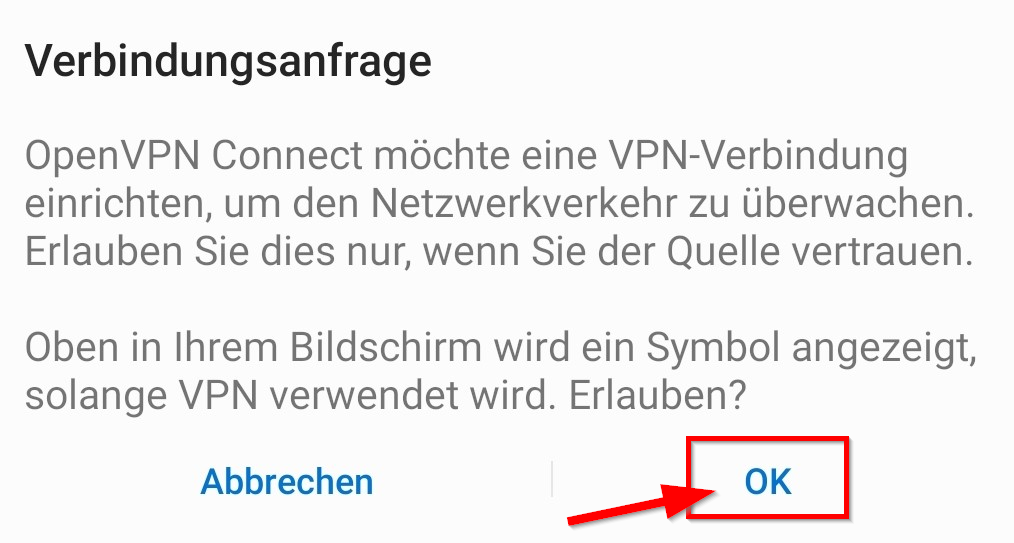
- Allow the connection with "OK".

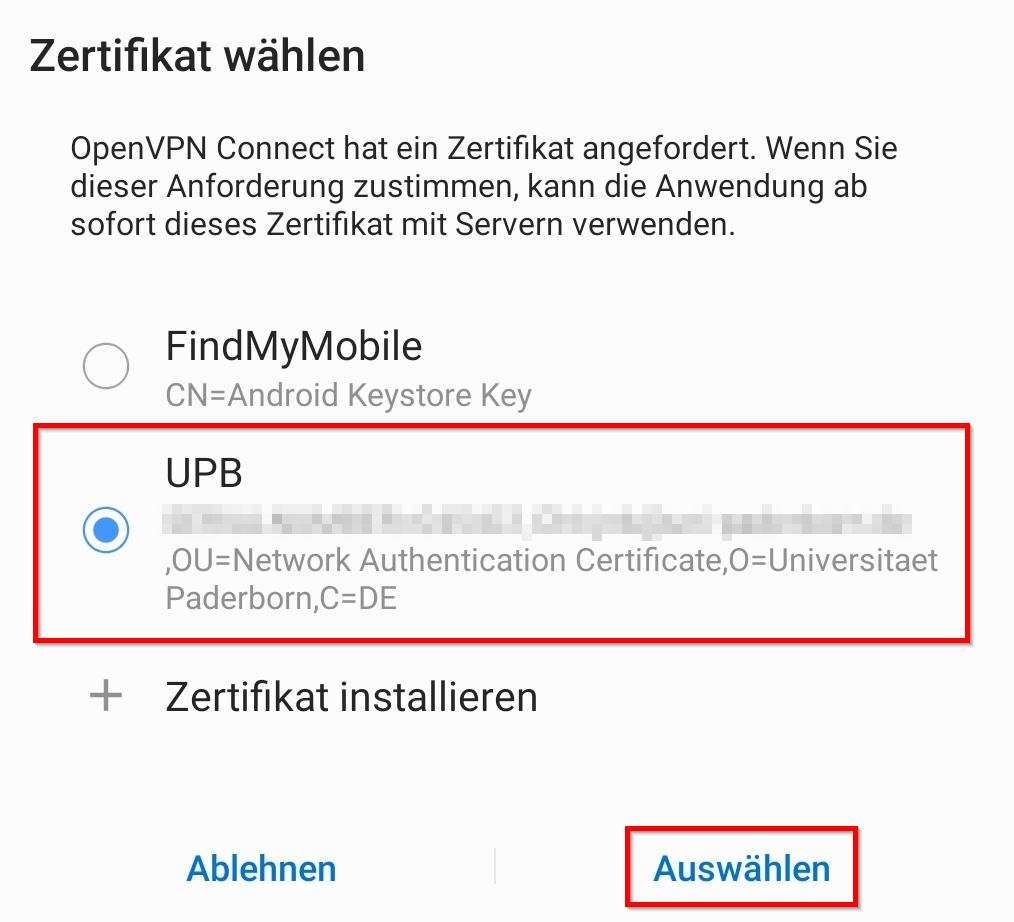
- Click on "Select Certificate".
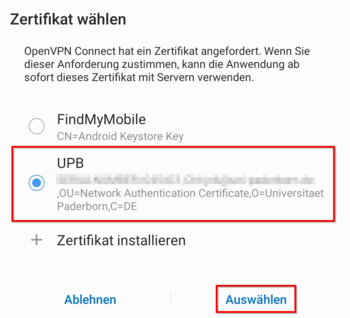
- Select the certificate that we have just installed.
- Then click on "Select".
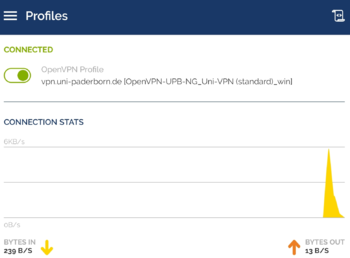
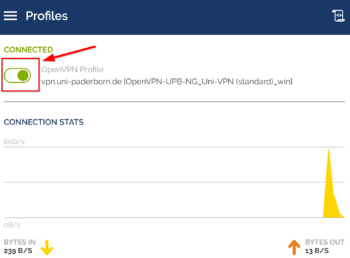
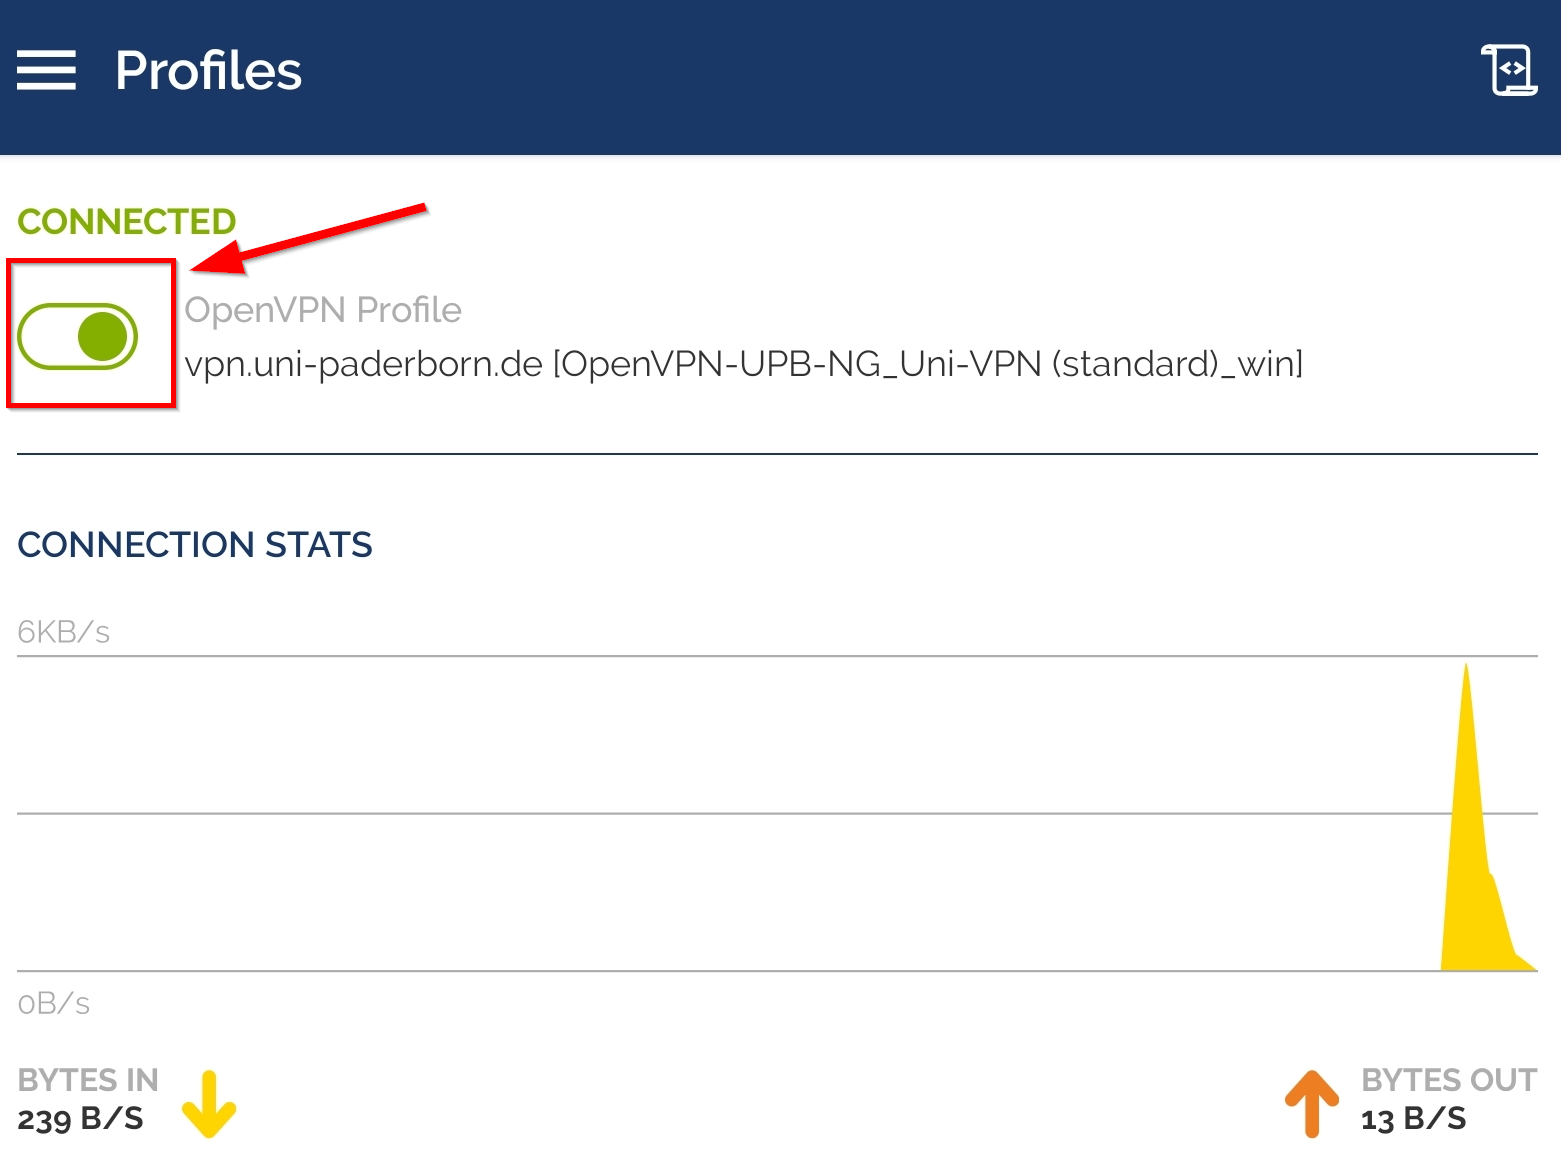
- We have now successfully set up OpenVPN Connect.
- The green "Connected" symbol tells us that the VPN connection is active.
Note: When the VPN connection is active, all your activities on the Internet are redirected via the servers of Paderborn University. So deactivate the VPN connection if you do not need it.
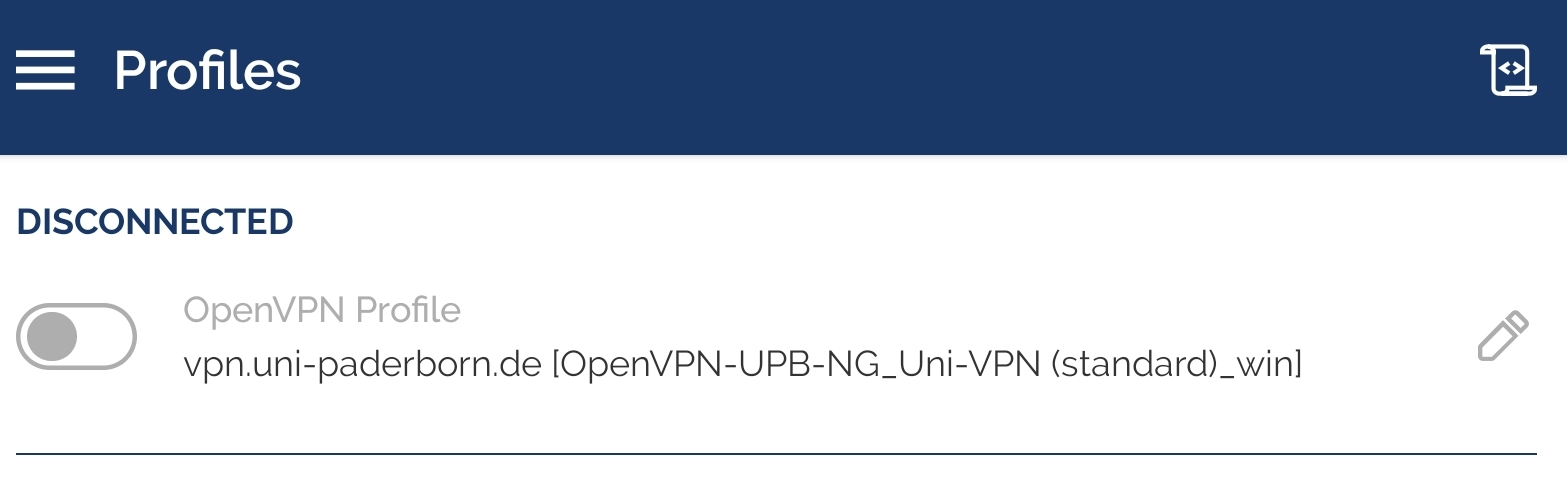
Deactivate VPN Connection[Bearbeiten | Quelltext bearbeiten]
- Click the green "switch icon".
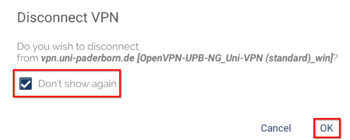
- Check the box next to "Don't show again".
- Click "OK".
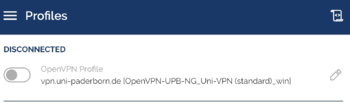
- The VPN connection is now disabled.
- You can re-enable it by clicking the gray switch.
- On newer Android versions, it's also possible to change the VPN connection directly through your device settings.
- To do this, search for VPN in your device settings, select OpenVPN, and tap Disconnect to disconnect.
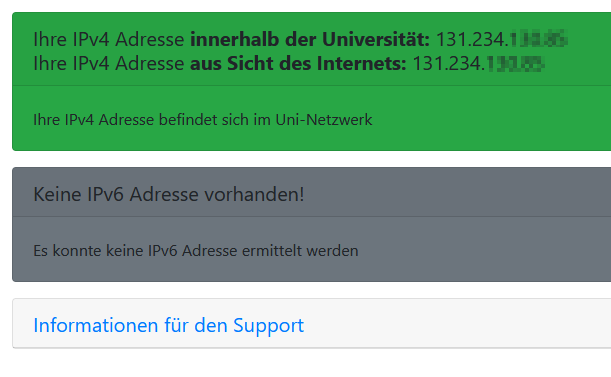
Check VPN[Bearbeiten | Quelltext bearbeiten]
You can check the functionality of the VPN by visiting:
Your IP will be displayed there and it will show whether you are on the university network.


