Eduroam unter Chrome OS/en
Jnk (Diskussion | Beiträge) |
Jnk (Diskussion | Beiträge) |
||
| (6 dazwischenliegende Versionen von 2 Benutzern werden nicht angezeigt) | |||
| Zeile 10: | Zeile 10: | ||
== What needs to be done? == | == What needs to be done? == | ||
| − | * Import the [[Netzwerkzertifikate| Network Certifikate]] from the university | + | * Import the [[Netzwerkzertifikate| Network Certifikate]] from the university |
| + | ** ''<optional> Only if missing import the [http://www.tbs-x509.com/USERTrustRSACertificationAuthority.crt "USERTrust RSA Certification Authority"] on your device.'' | ||
* Configure the network eduroam. | * Configure the network eduroam. | ||
* Delete the network webauth if used. | * Delete the network webauth if used. | ||
| Zeile 16: | Zeile 17: | ||
== Step-by-step instructions == | == Step-by-step instructions == | ||
=== Install certificates === | === Install certificates === | ||
| − | * Open the [http://sp.upb.de | + | * Open the [http://sp.upb.de Serviceportal] via Chrome Browser. |
* Log in with your university account. | * Log in with your university account. | ||
* Visit '''Benutzerverwaltung''' and click on '''Netzwerk Einstellungen'''. | * Visit '''Benutzerverwaltung''' and click on '''Netzwerk Einstellungen'''. | ||
| Zeile 38: | Zeile 39: | ||
<br> | <br> | ||
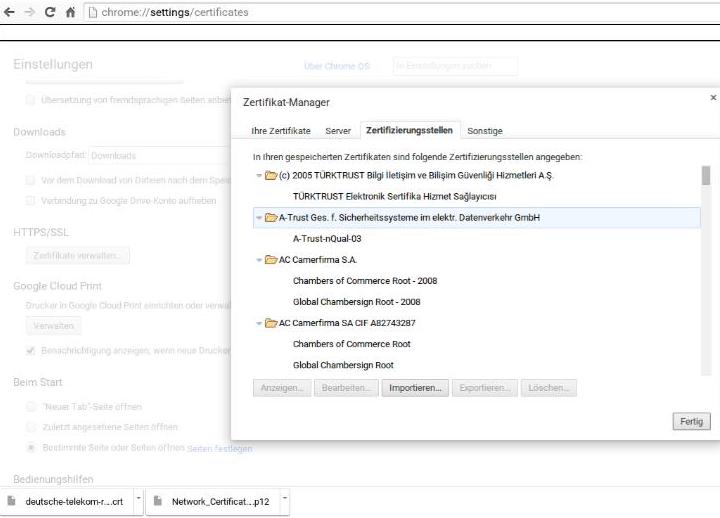
* Click on '''import'''. | * Click on '''import'''. | ||
| − | * Choose the the '''usercertificate''' and install it by using the '''import password''' | + | * Choose the the '''usercertificate''' and install it by using the '''import password'''. |
| − | * Install the ''' | + | * Install the '''USERTrust RSA Certification Authority certificate'''. |
[[Datei:Chrome_OS_01.jpg||links|mini|ohne|800px]] | [[Datei:Chrome_OS_01.jpg||links|mini|ohne|800px]] | ||
<br clear=all> | <br clear=all> | ||
| − | === | + | === Connect to eduroam=== |
* Open the Wi-Fi settings. | * Open the Wi-Fi settings. | ||
* Choose eduroam. | * Choose eduroam. | ||
| Zeile 59: | Zeile 60: | ||
<br clear=all> | <br clear=all> | ||
| − | + | {{warning|It may occur, that the info "Hardware supported user certificate" is displayed. In this case the certificate must be fixed to the device in the installation process (import and bind). Maybe you need to delete and reinstall the certificate.}} | |
<br> | <br> | ||
* Click on '''Connect'''. | * Click on '''Connect'''. | ||
* Your device should now connect to eduroam automatically. | * Your device should now connect to eduroam automatically. | ||
Aktuelle Version vom 6. März 2024, 13:45 Uhr
Die deutsche Version finden Sie auf der Seite Eduroam unter ChromeOS
This tutorial describes how to set up the Wi-Fi eduroam on Chrome OS.
This manual was tested on Google Peppy (45.0.2454.98 (64-Bit). Other versions of Chrome OS may look different.
What needs to be done?[Bearbeiten | Quelltext bearbeiten]
- Import the Network Certifikate from the university
- <optional> Only if missing import the "USERTrust RSA Certification Authority" on your device.
- Configure the network eduroam.
- Delete the network webauth if used.
Step-by-step instructions[Bearbeiten | Quelltext bearbeiten]
Install certificates[Bearbeiten | Quelltext bearbeiten]
- Open the Serviceportal via Chrome Browser.
- Log in with your university account.
- Visit Benutzerverwaltung and click on Netzwerk Einstellungen.
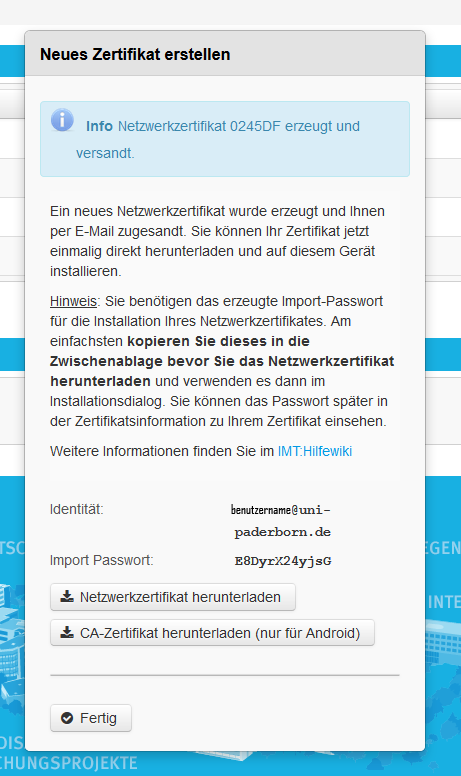
- Click on Neues Zertifikat erstellen.
- Give the certificate an identifier like "Chromebook".
- Click on Neues Zertifikat zusenden

- Copy the import password.
- Click on Netzwerkzertifikat herunterladen.
- Click on CA-Zertifikat herunterladen.
After downloading, we need to install the certificates.
Use the main search option on Chrome OS and type:
chrome://settings/certificates
- Click on import.
- Choose the the usercertificate and install it by using the import password.
- Install the USERTrust RSA Certification Authority certificate.
Connect to eduroam[Bearbeiten | Quelltext bearbeiten]
- Open the Wi-Fi settings.
- Choose eduroam.
Choose the following options:
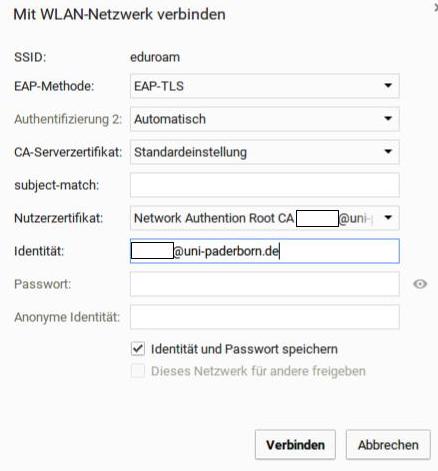
- SSID: eduroam
- EAP-Methode: EAP-TLS
- Authentification 2: Automatic or none
- CA-Serverzertifikat: Default
- subject-match:
- User Certificate: Choose your user certificate that we just installed
- Identity: <Benutzername>@uni-paderborn.de
It may occur, that the info "Hardware supported user certificate" is displayed. In this case the certificate must be fixed to the device in the installation process (import and bind). Maybe you need to delete and reinstall the certificate. |
- Click on Connect.
- Your device should now connect to eduroam automatically.